✨ 企業版
- Enterprise 新手? 從 ✨ Enterprise 快速入門 開始
- 免費試用:7 天企業授權
- 與我們聯絡:預約示範
- SSO 於最多 5 位使用者內免費。 超過後則需要企業授權。
Enterprise 適用於誰?
適用於大規模執行 LiteLLM 的團隊——100 位以上使用者或 10 個以上正式上線的 AI 使用案例——且需要在 OSS 之上提供 SSO、稽核記錄、精細存取控制與專業支援。 不確定是否符合資格?與我們聯絡。
為什麼選擇 Enterprise?
LiteLLM OSS 已涵蓋基礎功能——與 OpenAI 相容的閘道、虛擬金鑰、支出追蹤、預算、備援,以及請求/回應記錄。Enterprise 則加入大型組織安全地讓數百位使用者與數十個應用程式存取 LLM 所需的控管能力。
| OSS | Enterprise | |
|---|---|---|
| 驗證 | API keys | SSO + SCIM, OIDC/JWT |
| 金鑰管理 | 跨 LLM API、MCP 與 Agents 的虛擬金鑰、使用者、團隊 | 組織、組織/團隊管理員、委派管理員角色 |
| 安全性 | — | 金鑰輪替、可讀寫秘密管理工具 |
| 防護欄 | 永遠啟用 / 以請求為基礎1 | 以金鑰與團隊為範圍的防護欄 |
| 記錄 | 請求/回應記錄、Prometheus 指標 | 依金鑰 / 團隊路由至 Langfuse、Langsmith、Arize 等。管理作業記錄 |
| 部署 | 單區域 proxy | 多區域部署,單一授權,管理員/工作者分離 |
1 OSS 防護欄架構支援自訂防護欄與 Presidio(PII 遮罩)。多個內建 callback 整合——包括 llmguard_moderations、llamaguard_moderations、hide_secrets、openai_moderations、google_text_moderation、lakera_prompt_injection 與 aporia_prompt_injection——需要 LiteLLM Enterprise 授權。
核心 Enterprise 功能
安全性與存取控制
- Admin UI 的 SSO – Okta、Azure AD、Google Workspace,以及任何 OIDC/SAML 提供者
- 基於 JWT 的驗證 – 使用您的身分提供者 token 驗證請求
- 具保留政策的稽核記錄 – 追蹤每一項管理員操作與金鑰層級變更
- 基於角色的存取控制 – 組織、團隊與使用者角色
- 公開與私有路由控制 – 限制管理路由,鎖定可接觸面
- 基於 IP 位址的存取控制清單 – 將 proxy 存取限制於特定 CIDR 範圍
- 金鑰輪替 – 自動化虛擬金鑰輪替
- 秘密管理工具 – AWS KMS、AWS Secrets Manager、Azure Key Vault、Google KMS、Google Secret Manager、HashiCorp Vault、CyberArk,或自訂秘密管理工具
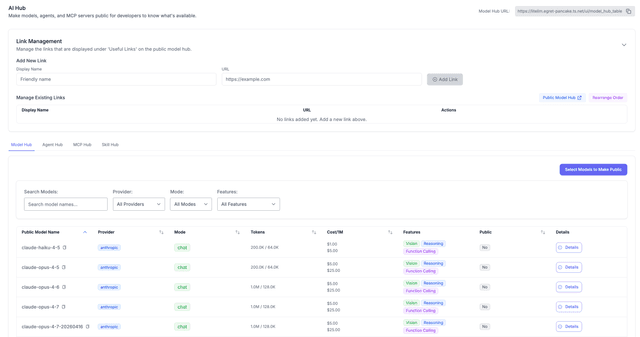
- AI Hub – 與您的使用者分享一個公開、具品牌識別頁面的可用模型與代理程式
治理與成本控制
- 多租戶架構 – 組織 → 團隊 → 專案 → 金鑰
- 專案管理 – 依應用程式或使用案例分組金鑰,並搭配預算、擁有者與隔離的支出追蹤
- 基於標籤的預算 – 依自訂標籤進行預算與支出追蹤
- 每個虛擬金鑰的模型特定預算 – 每個模型、每個金鑰有不同限制
- 暫時性預算增加 – 有時間範圍的支出提高,不做永久變更
- 柔性預算電子郵件警示 – 在團隊觸及硬性限制前發出警告
- 產生支出報表 – 以金鑰/團隊/標籤/模型方式程式化存取支出
可觀測性與合規
- 以團隊為基礎的記錄 – 將每個團隊的記錄路由至其各自的 Langfuse 專案或 callback
- 依團隊停用記錄 – 團隊層級符合 GDPR 的退出選項
- 將記錄匯出至 GCS / Azure Blob – 供合規使用的持久儲存
- 每個金鑰/團隊的防護欄 – 秘密資訊遮罩、內容審核、禁止關鍵字
- 強制必填參數 – 拒絕缺少必要中繼資料的請求
營運與品牌
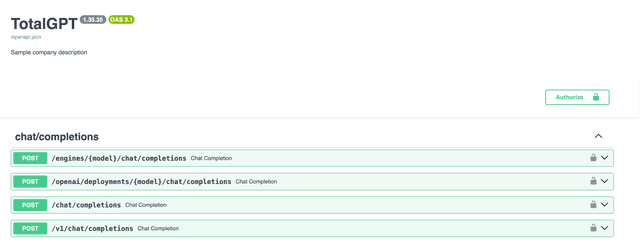
- 自訂 Swagger 品牌化 – 您的標題、描述與已過濾路由
- 自訂電子郵件品牌化 – 系統電子郵件上的您的標誌與色彩
- 最大請求/回應大小限制 – 保護 proxy 不受失控 payload 影響
- 由團隊管理的模型 – 讓團隊帶入自己的金鑰與 fine-tune 模型
專案
專案 可讓您依應用程式或使用案例將虛擬金鑰分組。每個專案都有自己的預算、擁有者、速率限制與隔離的支出檢視——當單一團隊執行多個應用程式並需要依應用程式分開報表時特別有用。
- 依應用程式、環境或客戶分組金鑰
- 每個專案的預算、速率限制與模型允許清單
- 專屬擁有者與支出儀表板
- 可與組織、團隊與標籤搭配使用
部署選項
自架部署
在您自己的基礎架構上部署我們的 Docker image(或從 pip 套件建置)。我們會提供一組授權金鑰,用以解鎖上述企業功能,以及專屬支援管道。
LITELLM_LICENSE="eyJ..."
沒有資料會離開您的環境。 可透過 AWS 與 Azure Marketplace 採購。
價格取決於您的部署規模——請 與我們聯絡 以進行範圍規劃。
專業支援
每一份企業授權皆包含:與我們工程團隊的專屬 Slack/Teams 頻道,用於整合、部署與提供者疑難排解。
| 嚴重程度 | 回應 SLA |
|---|---|
| Sev 0 — 100% 生產流量失敗 | 1 小時 |
| Sev 1 — 部分生產影響 | 6 小時 |
| Sev 2–3 — 設定問題、非緊急臭蟲 | 24 小時(PT 上午 7 點至晚上 7 點,週一至週六) |
| 安全性修補 | 72 小時 |
可依需求提供自訂 SLA。
版本支援
LiteLLM 支援最近四個穩定的次要版本線。這些版本線都會持續取得修補版本;更舊的版本會達到生命週期終點並停止接收更新。此政策將於 2026 年 6 月 29 日星期一生效。截至 2026 年 6 月中旬,受支援的版本線為 1.86、1.87、1.88 與 1.89,並會隨著新的穩定版發布而向前推進。
我們為什麼要這麼做。 LiteLLM 發布速度很快,大約每週會推出一個新的次要版本線。若要將修補程式一路往下帶到我們仍維護的每條版本線,成本會隨著維護版本線數量而成長,而不是隨著修補數量成長。聚焦四條版本線,能讓我們更仔細照顧每一條。
運作方式。 這個窗口會永遠保留最近四個穩定的次要版本線。當我們升級到新版本線時,最舊的版本線會退出並停止接收發布。生命週期終點是明確切點;沒有另外的長期維護分支。對於任何受支援版本線,建議的建置版本都是其最新修補版。對於罕見且高嚴重度的問題,我們會視情況判斷,並可能在需要時超出此窗口處理。
這對您代表什麼。 要確認您目前的位置,請取最新的穩定版版本線並往回數四個;如果您的版本比那更舊,請規劃升級。最簡單的做法是鎖定某個次要版本線、套用其修補版,並在您的版本線退出前移轉到更新的版本線。
公開 AI Hub
與使用者分享一個公開頁面,列出可用模型、MCP、Agents 與技能
秘密管理工具
LiteLLM Enterprise 可與以下秘密管理工具整合:
- AWS KMS
- AWS Secrets Manager
- Azure Key Vault
- Google KMS
- Google Secret Manager
- HashiCorp Vault
- CyberArk
- Custom Secret Manager
請參閱 Secret Managers 總覽 以進行設定。
Enterprise 功能參考
本頁其餘內容為完整功能參考 — 各項 enterprise 能力的設定片段與範例。
💸 支出追蹤
依標籤查看支出
/spend/tags 請求格式
curl -X GET "http://0.0.0.0:4000/spend/tags" \
-H "Authorization: Bearer sk-1234"
/spend/tags回應格式
[
  {
    "individual_request_tag": "model-anthropic-claude-v2.1",
    "log_count": 6,
    "total_spend": 0.000672
  },
  {
    "individual_request_tag": "app-ishaan-local",
    "log_count": 4,
    "total_spend": 0.000448
  },
  {
    "individual_request_tag": "app-ishaan-prod",
    "log_count": 2,
    "total_spend": 0.000224
  }
]
如需包含預算、警示與詳細分析的完整支出追蹤功能,請參閱 支出追蹤。
封鎖網路爬蟲
若要封鎖網路爬蟲索引 proxy 伺服器端點,請在您的 litellm_config.yaml 檔案中將 block_robots 設定為 true。
general_settings:
  block_robots: true
運作方式
啟用此功能後,/robots.txt 端點會回傳 200 狀態碼與以下內容:
User-agent: *
Disallow: /
LLM 請求必填參數
當您想強制所有請求都包含特定參數時使用此功能。範例是您需要所有請求都包含 user 與 ["metadata]["generation_name"] 參數。
- 在設定中設定
- 在金鑰上設定
步驟 1 在 config.yaml 中定義您想強制的所有參數
這表示所有送到 LiteLLM 的 LLM 請求都必須包含 ["user"] 與 ["metadata]["generation_name"]
general_settings:
  master_key: sk-1234
  enforced_params:
    - user
    - metadata.generation_name
curl -L -X POST 'http://0.0.0.0:4000/key/generate' \
-H 'Authorization: Bearer sk-1234' \
-H 'Content-Type: application/json' \
-d '{
    "enforced_params": ["user", "metadata.generation_name"]
}'
步驟 2 驗證是否可運作
- 無效請求(未傳入 `user`)
- 無效請求(未傳入 `metadata`)
- 有效請求
curl --location 'http://localhost:4000/chat/completions' \
    --header 'Authorization: Bearer sk-5fmYeaUEbAMpwBNT-QpxyA' \
    --header 'Content-Type: application/json' \
    --data '{
    "model": "gpt-3.5-turbo",
    "messages": [
        {
        "role": "user",
        "content": "hi"
        }
    ]
}'
預期回應
{"error":{"message":"Authentication Error, BadRequest please pass param=user in request body. This is a required param","type":"auth_error","param":"None","code":401}}%
curl --location 'http://localhost:4000/chat/completions' \
    --header 'Authorization: Bearer sk-5fmYeaUEbAMpwBNT-QpxyA' \
    --header 'Content-Type: application/json' \
    --data '{
    "model": "gpt-3.5-turbo",
    "user": "gm",
    "messages": [
        {
        "role": "user",
        "content": "hi"
        }
    ],
   "metadata": {}
}'
預期回應
{"error":{"message":"Authentication Error, BadRequest please pass param=[metadata][generation_name] in request body. This is a required param","type":"auth_error","param":"None","code":401}}%
curl --location 'http://localhost:4000/chat/completions' \
    --header 'Authorization: Bearer sk-5fmYeaUEbAMpwBNT-QpxyA' \
    --header 'Content-Type: application/json' \
    --data '{
    "model": "gpt-3.5-turbo",
    "user": "gm",
    "messages": [
        {
        "role": "user",
        "content": "hi"
        }
    ],
   "metadata": {"generation_name": "prod-app"}
}'
預期回應
{"id":"chatcmpl-9XALnHqkCBMBKrOx7Abg0hURHqYtY","choices":[{"finish_reason":"stop","index":0,"message":{"content":"Hello! How can I assist you today?","role":"assistant"}}],"created":1717691639,"model":"gpt-3.5-turbo-0125","object":"chat.completion","system_fingerprint":null,"usage":{"completion_tokens":9,"prompt_tokens":8,"total_tokens":17}}%
控制可用的公開、私有路由
請參閱 控制公開與私有路由,了解設定公開路由、僅管理員可用路由、允許路由,以及萬用字元模式的詳細文件。
防護欄 - 秘密偵測/去識別化
❓ 當您要在傳送給 LLM 的請求中 REDACT API 金鑰與秘密時使用此功能。
範例:如果您想在以下請求中去除 OPENAI_API_KEY 的值
傳入請求
{
    "messages": [
        {
            "role": "user",
            "content": "Hey, how's it going, API_KEY = 'sk_1234567890abcdef'",
        }
    ]
}
經過審核後的請求
{
    "messages": [
        {
            "role": "user",
            "content": "Hey, how's it going, API_KEY = '[REDACTED]'",
        }
    ]
}
使用方式
步驟 1 將以下內容加入您的 config.yaml
litellm_settings:
  callbacks: ["hide_secrets"]
步驟 2 以 --detailed_debug 執行 litellm proxy 以查看伺服器記錄
litellm --config config.yaml --detailed_debug
步驟 3 使用請求測試
送出此請求
curl --location 'http://localhost:4000/chat/completions' \
    --header 'Authorization: Bearer sk-1234' \
    --header 'Content-Type: application/json' \
    --data '{
    "model": "llama3",
    "messages": [
        {
        "role": "user",
        "content": "what is the value of my open ai key? openai_api_key=sk-1234998222"
        }
    ]
}'
預期在您的 litellm 伺服器記錄中看到以下警告
LiteLLM Proxy:WARNING: secret_detection.py:88 - Detected and redacted secrets in message: ['Secret Keyword']
您也可以看到從 litellm 傳送到 API 提供者的原始請求
POST Request Sent from LiteLLM:
curl -X POST \
https://api.groq.com/openai/v1/ \
-H 'Authorization: Bearer gsk_mySVchjY********************************************' \
-d {
  "model": "llama3-8b-8192",
  "messages": [
    {
      "role": "user",
      "content": "what is the time today, openai_api_key=[REDACTED]"
    }
  ],
  "stream": false,
  "extra_body": {}
}
每個 API 金鑰的秘密偵測開/關
❓ 當您需要針對每個 API 金鑰切換防護欄開/關時使用此功能
步驟 1 建立將 hide_secrets 設為關閉的金鑰
👉 將 "permissions": {"hide_secrets": false} 設為 /key/generate 或 /key/update
這表示對此 API 金鑰發出的所有請求都會關閉 hide_secrets 防護欄
- /key/generate
- /key/update
curl --location 'http://0.0.0.0:4000/key/generate' \
    --header 'Authorization: Bearer sk-1234' \
    --header 'Content-Type: application/json' \
    --data '{
        "permissions": {"hide_secrets": false}
}'
# {"permissions":{"hide_secrets":false},"key":"sk-jNm1Zar7XfNdZXp49Z1kSQ"}
curl --location 'http://0.0.0.0:4000/key/update' \
    --header 'Authorization: Bearer sk-1234' \
    --header 'Content-Type: application/json' \
    --data '{
        "key": "sk-jNm1Zar7XfNdZXp49Z1kSQ",
        "permissions": {"hide_secrets": false}
}'
# {"permissions":{"hide_secrets":false},"key":"sk-jNm1Zar7XfNdZXp49Z1kSQ"}
步驟 2 使用新金鑰測試
curl --location 'http://0.0.0.0:4000/chat/completions' \
    --header 'Authorization: Bearer sk-jNm1Zar7XfNdZXp49Z1kSQ' \
    --header 'Content-Type: application/json' \
    --data '{
    "model": "llama3",
    "messages": [
        {
        "role": "user",
        "content": "does my openai key look well formatted OpenAI_API_KEY=sk-1234777"
        }
    ]
}'
預期在您的回呼所記錄的伺服器記錄中看到 sk-1234777。
此請求未執行 hide_secrets 防護欄檢查,因為 api key=sk-jNm1Zar7XfNdZXp49Z1kSQ 已經 "permissions": {"hide_secrets": false}
內容審核
使用 LLM Guard 的內容審核
llmguard_moderations 需要 LiteLLM Enterprise 授權與 litellm-enterprise 套件。OSS 防護欄架構仍支援自訂防護欄與 Presidio PII 遮罩。
在您的環境中設定 LLM Guard API Base
LLM_GUARD_API_BASE = "http://0.0.0.0:8192" # deployed llm guard api
將 llmguard_moderations 加入為回呼
litellm_settings:
    callbacks: ["llmguard_moderations"]
現在您可以輕鬆測試了
-
進行一般的 /chat/completion 呼叫
-
檢查您的 proxy 記錄中是否有任何包含
LLM Guard:的陳述
預期結果:
LLM Guard: Received response - {"sanitized_prompt": "hello world", "is_valid": true, "scanners": { "Regex": 0.0 }}
依金鑰開啟/關閉
1. 更新設定
litellm_settings:
    callbacks: ["llmguard_moderations"]
    llm_guard_mode: "key-specific"
2. 建立新金鑰
curl --location 'http://localhost:4000/key/generate' \
--header 'Authorization: Bearer sk-1234' \
--header 'Content-Type: application/json' \
--data '{
    "models": ["fake-openai-endpoint"],
    "permissions": {
        "enable_llm_guard_check": true # 👈 KEY CHANGE
    }
}'

# Returns {..'key': 'my-new-key'}
3. 測試它!
curl --location 'http://0.0.0.0:4000/v1/chat/completions' \
--header 'Content-Type: application/json' \
--header 'Authorization: Bearer my-new-key' \ # 👈 TEST KEY
--data '{"model": "fake-openai-endpoint", "messages": [
        {"role": "system", "content": "Be helpful"},
        {"role": "user", "content": "What do you know?"}
    ]
    }'
依請求開啟/關閉
1. 更新設定
litellm_settings:
    callbacks: ["llmguard_moderations"]
    llm_guard_mode: "request-specific"
2. 建立新金鑰
curl --location 'http://localhost:4000/key/generate' \
--header 'Authorization: Bearer sk-1234' \
--header 'Content-Type: application/json' \
--data '{
    "models": ["fake-openai-endpoint"],
}'

# Returns {..'key': 'my-new-key'}
3. 測試它!
- OpenAI Python v1.0.0+
- Curl 請求
import openai
client = openai.OpenAI(
    api_key="sk-1234",
    base_url="http://0.0.0.0:4000"
)

# request sent to model set on litellm proxy, `litellm --model`
response = client.chat.completions.create(
    model="gpt-3.5-turbo",
    messages = [
        {
            "role": "user",
            "content": "this is a test request, write a short poem"
        }
    ],
    extra_body={ # pass in any provider-specific param, if not supported by openai, https://docs.litellm.ai/docs/completion/input#provider-specific-params
        "metadata": {
            "permissions": {
                "enable_llm_guard_check": True # 👈 KEY CHANGE
            },
        }
    }
)

print(response)
curl --location 'http://0.0.0.0:4000/v1/chat/completions' \
--header 'Content-Type: application/json' \
--header 'Authorization: Bearer my-new-key' \ # 👈 TEST KEY
--data '{"model": "fake-openai-endpoint", "messages": [
        {"role": "system", "content": "Be helpful"},
        {"role": "user", "content": "What do you know?"}
    ]
    }'
使用 LlamaGuard 的內容審核
目前可搭配 Sagemaker 的 LlamaGuard 端點運作。
如何在您的 config.yaml 中啟用此功能:
litellm_settings:
   callbacks: ["llamaguard_moderations"]
   llamaguard_model_name: "sagemaker/jumpstart-dft-meta-textgeneration-llama-guard-7b"
請確保您的環境中有相關金鑰,例如:
os.environ["AWS_ACCESS_KEY_ID"] = ""
os.environ["AWS_SECRET_ACCESS_KEY"] = ""
os.environ["AWS_REGION_NAME"] = ""
自訂 LlamaGuard 提示詞
若要修改 llama guard 所評估的非安全類別,只要建立您自己的 此類別清單 版本即可
將您的 proxy 指向它
callbacks: ["llamaguard_moderations"]
  llamaguard_model_name: "sagemaker/jumpstart-dft-meta-textgeneration-llama-guard-7b"
  llamaguard_unsafe_content_categories: /path/to/llamaguard_prompt.txt
使用 Google Text Moderation 的內容審核
需要在您的 .env 中設定 GOOGLE_APPLICATION_CREDENTIALS(與 VertexAI 相同)。
如何在您的 config.yaml 中啟用此功能:
litellm_settings:
   callbacks: ["google_text_moderation"]
設定自訂信心閾值
Google Moderations 會針對多個類別檢查測試。來源
設定全域預設信心閾值
預設值為 0.8,但您可以在 config.yaml 中覆寫。
litellm_settings:
    google_moderation_confidence_threshold: 0.4
設定特定類別的信心閾值
在 config.yaml 中為特定類別設定信心閾值。若未設定,將使用全域預設值。
litellm_settings:
    toxic_confidence_threshold: 0.1
以下為特定類別的值:
| 類別 | 設定 |
|---|---|
| "toxic" | toxic_confidence_threshold: 0.1 |
| "insult" | insult_confidence_threshold: 0.1 |
| "profanity" | profanity_confidence_threshold: 0.1 |
| "derogatory" | derogatory_confidence_threshold: 0.1 |
| "sexual" | sexual_confidence_threshold: 0.1 |
| "death_harm_and_tragedy" | death_harm_and_tragedy_threshold: 0.1 |
| "violent" | violent_threshold: 0.1 |
| "firearms_and_weapons" | firearms_and_weapons_threshold: 0.1 |
| "public_safety" | public_safety_threshold: 0.1 |
| "health" | health_threshold: 0.1 |
| "religion_and_belief" | religion_and_belief_threshold: 0.1 |
| "illicit_drugs" | illicit_drugs_threshold: 0.1 |
| "war_and_conflict" | war_and_conflict_threshold: 0.1 |
| "politics" | politics_threshold: 0.1 |
| "finance" | finance_threshold: 0.1 |
| "legal" | legal_threshold: 0.1 |
Swagger 文件 - 自訂路由 + 品牌化
使用此功能需要 LiteLLM Enterprise 金鑰。可在 這裡 取得 2 週免費授權
在您的環境中設定 LiteLLM Key
LITELLM_LICENSE=""
自訂標題 + 描述
在您的環境中,設定:
DOCS_TITLE="TotalGPT"
DOCS_DESCRIPTION="Sample Company Description"
自訂路由
對使用者隱藏管理員路由。
在您的環境中,設定:
DOCS_FILTERED="True" # only shows openai routes to user
啟用封鎖使用者清單
如果對 proxy 發出任何包含此使用者 id 的呼叫,該呼叫將會被拒絕 - 當您希望讓使用者選擇退出 AI 功能時可使用此功能
litellm_settings:
     callbacks: ["blocked_user_check"]
     blocked_user_list: ["user_id_1", "user_id_2", ...]  # can also be a .txt filepath e.g. `/relative/path/blocked_list.txt`
如何測試
- OpenAI Python v1.0.0+
- Curl Request
將 user=<user_id> 設為可能已選擇退出之使用者的 user id。
import openai
client = openai.OpenAI(
    api_key="sk-1234",
    base_url="http://0.0.0.0:4000"
)

# request sent to model set on litellm proxy, `litellm --model`
response = client.chat.completions.create(
    model="gpt-3.5-turbo",
    messages = [
        {
            "role": "user",
            "content": "this is a test request, write a short poem"
        }
    ],
    user="user_id_1"
)

print(response)
curl --location 'http://0.0.0.0:4000/chat/completions' \
--header 'Content-Type: application/json' \
--data ' {
      "model": "gpt-3.5-turbo",
      "messages": [
        {
          "role": "user",
          "content": "what llm are you"
        }
      ],
      "user": "user_id_1" # this is also an openai supported param
    }
'
透過 API 使用
封鎖某個 customer id 的所有呼叫
curl -X POST "http://0.0.0.0:4000/customer/block" \
-H "Authorization: Bearer sk-1234" \
-D '{
"user_ids": [<user_id>, ...]
}'
解除某個 user id 的呼叫封鎖
curl -X POST "http://0.0.0.0:4000/user/unblock" \
-H "Authorization: Bearer sk-1234" \
-D '{
"user_ids": [<user_id>, ...]
}'
啟用禁用關鍵字清單
litellm_settings:
     callbacks: ["banned_keywords"]
     banned_keywords_list: ["hello"] # can also be a .txt file - e.g.: `/relative/path/keywords.txt`
測試此功能
curl --location 'http://0.0.0.0:4000/chat/completions' \
--header 'Content-Type: application/json' \
--data ' {
      "model": "gpt-3.5-turbo",
      "messages": [
        {
          "role": "user",
          "content": "Hello world!"
        }
      ]
    }
'
在 LiteLLM Proxy 上設定最大請求 / 回應大小
如果您想為 proxy server 設定最大請求 / 回應大小,可使用此功能。如果請求大小超過此大小,該請求會被拒絕,並觸發 Slack 警示
使用方式
步驟 1. 設定 max_request_size_mb 和 max_response_size_mb
在此範例中,我們對 max_request_size_mb 設定一個非常低的限制,並預期它會被拒絕
在正式環境中,我們建議將 max_request_size_mb / max_response_size_mb 設為約 32 MB
model_list:
  - model_name: fake-openai-endpoint
    litellm_params:
      model: openai/fake
      api_key: fake-key
      api_base: https://exampleopenaiendpoint-production.up.railway.app/
general_settings:
  master_key: sk-1234

  # Security controls
  max_request_size_mb: 0.000000001 # 👈 Key Change - Max Request Size in MB. Set this very low for testing
  max_response_size_mb: 100 # 👈 Key Change - Max Response Size in MB
步驟 2. 使用 /chat/completions 請求進行測試
curl http://localhost:4000/v1/chat/completions \
  -H "Content-Type: application/json" \
  -H "Authorization: Bearer sk-1234" \
  -d '{
    "model": "fake-openai-endpoint",
    "messages": [
      {"role": "user", "content": "Hello, Claude!"}
    ]
  }'
請求的預期回應
我們預期這會失敗,因為請求大小超過 max_request_size_mb
{"error":{"message":"Request size is too large. Request size is 0.0001125335693359375 MB. Max size is 1e-09 MB","type":"bad_request_error","param":"content-length","code":400}}
常見問題
如何設定並驗證 Enterprise 授權?
-
將授權金鑰加入您的環境:
LITELLM_LICENSE="eyJ..." -
重新啟動 LiteLLM Proxy。
-
開啟
http://<your-proxy-host>:<port>/— Swagger 頁面應在描述中顯示 "Enterprise Edition"。如果沒有,請確認金鑰正確、尚未過期,且 proxy 已完全重新啟動。
我可以在哪裡閱讀更多關於資料安全與法規遵循的資訊?
請參閱 資料安全 / 法務 / 法規遵循常見問題。
定價結構是什麼?
定價依使用量而定。請 聯絡我們 取得為您的團隊量身打造的報價。
如何在不重新啟動的情況下,為新模型取得 day-0 支援?
使用 自動同步新模型 依需求或排程從 GitHub 取得最新的定價與 context-window 資料 — 無需重新啟動。可使用 POST /reload/model_cost_map 觸發手動同步,或使用 POST /schedule/model_cost_map_reload?hours=6 排程定期同步。