LiteLLM Proxy - 在 locust 上進行 1K RPS 負載測試
關於如何在 locust 上透過 LiteLLM Proxy 達到 1K+ RPS 的教學
測試前檢查清單
- 確保您使用的是 litellm 的 最新
-stable版本 - 確保您遵循了適用於正式環境的 所有 最佳做法
- Locust - 確保您的 Locust 執行個體可以每秒建立 1K+ 個請求
- 👉 您可以使用我們 此處維護的 locust 執行個體
- 如果您是自行代管 locust
- 使用這份 執行 litellm proxy 的機器規格
- Enterprise LiteLLM - 在您的
proxy_config.yaml中將prometheus用作回呼,以取得負載測試的指標 將litellm_settings.callbacks設為監控成功/失敗/所有類型的錯誤litellm_settings:
callbacks: ["prometheus"] # Enterprise LiteLLM Only - use prometheus to get metrics on your load test
使用此設定進行測試:
注意: 我們目前正在遷移到 aiohttp,其吞吐量高出 10 倍。我們建議在負載測試中使用 openai/ 提供者。
設定假的 OpenAI 端點
您可以使用我們代管的假端點,或自行代管,使用 github.com/BerriAI/example_openai_endpoint。
model_list:
- model_name: "fake-openai-endpoint"
litellm_params:
model: openai/any
api_base: https://exampleopenaiendpoint-production.up.railway.app/ # or your self-hosted endpoint
api_key: "test"
負載測試 - 假 OpenAI 端點
預期效能
| 指標 | 數值 |
|---|---|
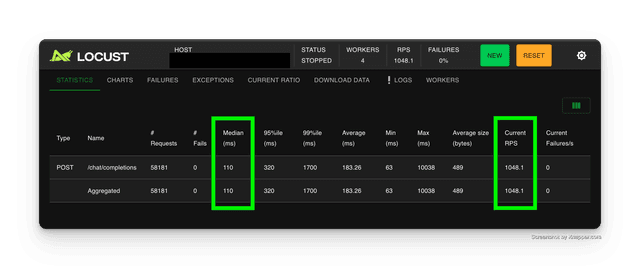
| 每秒請求數 | 1174+ |
| 回應時間中位數 | 96ms |
| 平均回應時間 | 142.18ms |
執行測試
- 將
fake-openai-endpoint加入您的 proxy config.yaml,並啟動您的 litellm proxy litellm 提供了一個代管的fake-openai-endpoint,您可以對其進行負載測試
model_list:
- model_name: fake-openai-endpoint
litellm_params:
model: openai/fake
api_key: fake-key
api_base: https://exampleopenaiendpoint-production.up.railway.app/
litellm_settings:
    callbacks: ["prometheus"] # Enterprise LiteLLM Only - use prometheus to get metrics on your load test
-
uv add locust -
在您的本機建立一個名為
locustfile.py的檔案。將 litellm 負載測試的內容複製到此處,來源可見 這裡 -
啟動 locust 在與步驟 2 的
locustfile.py相同目錄中執行locust
locust -f locustfile.py --processes 4
- 在 locust 上執行負載測試
前往 http://0.0.0.0:8089 上的 locust UI
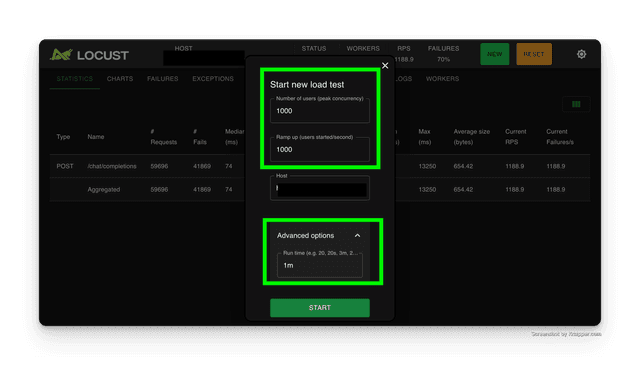
將 Users=1000, Ramp Up Users=1000,Host=您的 LiteLLM Proxy 基礎 URL
- 預期結果
負載測試 - 具有速率限制的端點
對 2 個 LLM 部署執行負載測試,每個都有 10K RPM 配額。預期會看到約 20K RPM
預期效能
- 我們預期在 1 分鐘內看到 20,000+ 個成功回應
- 剩餘請求失敗,因為該端點超過了其 10K RPM 配額限制 - 來自 LLM API 提供者
| 指標 | 數值 |
|---|---|
| 1 分鐘內成功回應數 | 20,000+ |
| 每秒請求數 | ~1170+ |
| 回應時間中位數 | 70ms |
| 平均回應時間 | 640.18ms |
執行測試
- 在您的 config.yaml 上加入 2 個
gemini-vision部署。每個部署可處理 10K RPM。(我們在下方/v1/projects/bad-adroit-crow路由上設定了一個速率限制為 1000 RPM 的假端點)
資訊
所有帶有 model="gemini-vision" 的請求都會在這 2 個部署之間平均進行負載平衡。
model_list:
  - model_name: gemini-vision
    litellm_params:
      model: vertex_ai/gemini-1.0-pro-vision-001
      api_base: https://exampleopenaiendpoint-production.up.railway.app/v1/projects/bad-adroit-crow-413218/locations/us-central1/publishers/google/models/gemini-1.0-pro-vision-001
      vertex_project: "adroit-crow-413218"
      vertex_location: "us-central1"
      vertex_credentials: /etc/secrets/adroit_crow.json
  - model_name: gemini-vision
    litellm_params:
      model: vertex_ai/gemini-1.0-pro-vision-001
      api_base: https://exampleopenaiendpoint-production-c715.up.railway.app/v1/projects/bad-adroit-crow-413218/locations/us-central1/publishers/google/models/gemini-1.0-pro-vision-001
      vertex_project: "adroit-crow-413218"
      vertex_location: "us-central1"
      vertex_credentials: /etc/secrets/adroit_crow.json

litellm_settings:
  callbacks: ["prometheus"] # Enterprise LiteLLM Only - use prometheus to get metrics on your load test
-
uv add locust -
在您的本機建立一個名為
locustfile.py的檔案。將 litellm 負載測試的內容複製到此處,來源可見 這裡 -
啟動 locust 在與步驟 2 的
locustfile.py相同目錄中執行locust
locust -f locustfile.py --processes 4 -t 60
- 在 locust 上執行負載測試
前往 http://0.0.0.0:8089 上的 locust UI,並使用以下設定
- 預期結果
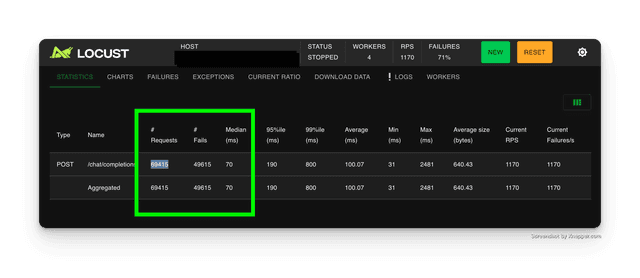
- 1 分鐘內成功回應 = 19,800 = (69415 - 49615)
- 每秒請求數 = 1170
- 回應時間中位數 = 70ms
- 平均回應時間 = 640ms
用於除錯負載測試的 Prometheus 指標
使用以下 prometheus 指標來除錯您的負載測試/失敗
| 指標名稱 | 說明 |
|---|---|
litellm_deployment_failure_responses | 特定 LLM 部署的 LLM API 呼叫失敗總數。標籤:"requested_model", "litellm_model_name", "model_id", "api_base", "api_provider", "hashed_api_key", "api_key_alias", "team", "team_alias", "exception_status", "exception_class" |
litellm_deployment_cooled_down | LiteLLM 負載平衡邏輯將部署降溫的次數。標籤:"litellm_model_name", "model_id", "api_base", "api_provider", "exception_status" |
執行 Locust 的機器規格
| 指標 | 數值 |
|---|---|
locust --processes 4 | 4 |
負載測試機器上的 vCPUs | 2.0 vCPUs |
負載測試機器上的 Memory | 450 MB |
負載測試機器的 Replicas | 1 |
執行 LiteLLM Proxy 的機器規格
👉 為了取得 1K+ RPS,LiteLLM Proxy 的副本數量=4
| 服務 | 規格 | CPU | 記憶體 | 架構 | 版本 |
|---|---|---|---|---|---|
| 伺服器 | t2.large. | 2vCPUs | 8GB | x86 |
測試所使用的 Locust 檔案
import os
import uuid
from locust import HttpUser, task, between

class MyUser(HttpUser):
    wait_time = between(0.5, 1)  # Random wait time between requests

    @task(100)
    def litellm_completion(self):
        # no cache hits with this
        payload = {
            "model": "fake-openai-endpoint",
            "messages": [{"role": "user", "content": f"{uuid.uuid4()} This is a test there will be no cache hits and we'll fill up the context" * 150 }],
            "user": "my-new-end-user-1"
        }
        response = self.client.post("chat/completions", json=payload)
        if response.status_code != 200:
            # log the errors in error.txt
            with open("error.txt", "a") as error_log:
                error_log.write(response.text + "\n")


    def on_start(self):
        self.api_key = os.getenv('API_KEY', 'sk-1234')
        self.client.headers.update({'Authorization': f'Bearer {self.api_key}'})