Azure AI Foundry 代理程式
以 OpenAI Request/Response 格式呼叫 Azure AI Foundry 代理程式。
| 屬性 | 詳細資訊 |
|---|---|
| 說明 | Azure AI Foundry Agents 提供代管的代理程式執行階段,可使用基礎模型、工具與程式碼解譯器執行 agentic 工作流程。 |
| LiteLLM 上的提供者路由 | azure_ai/agents/{AGENT_ID} |
| 提供者文件 | Azure AI Foundry Agents ↗ |
驗證
Azure AI Foundry Agents 需要 Azure AD 驗證(不是 API 金鑰)。您可以使用以下方式進行驗證:
選項 1:服務主體(建議用於正式環境)
設定以下環境變數:
export AZURE_TENANT_ID="your-tenant-id"
export AZURE_CLIENT_ID="your-client-id"
export AZURE_CLIENT_SECRET="your-client-secret"
LiteLLM 會自動使用這些憑證取得 Azure AD 權杖。
選項 2:Azure AD 權杖(手動)
透過 api_key 直接傳入權杖:
# Get token via Azure CLI
az account get-access-token --resource "https://ai.azure.com" --query accessToken -o tsv
所需的 Azure 角色
您的服務主體或使用者必須在 Azure AI Foundry 專案上具備 Azure AI Developer 或 Azure AI User 角色。
使用 Azure CLI 指派:
az role assignment create \
  --assignee-object-id "<service-principal-object-id>" \
  --assignee-principal-type "ServicePrincipal" \
  --role "Azure AI Developer" \
  --scope "/subscriptions/<sub>/resourceGroups/<rg>/providers/Microsoft.CognitiveServices/accounts/<resource>"
或者透過 Azure AI Foundry 入口網站 → 您的專案 → Project users → + New user 新增。
快速入門
LiteLLM 的模型格式
若要透過 LiteLLM 呼叫 Azure AI Foundry Agent,請使用以下模型格式。
這裡的 model=azure_ai/agents/ 會告訴 LiteLLM 呼叫 Azure AI Foundry Agent Service API。
azure_ai/agents/{AGENT_ID}
範例:
azure_ai/agents/asst_abc123
您可以在 Azure AI Foundry 入口網站的 Agents 下找到 Agent ID。
LiteLLM Python SDK
import litellm

# Make a completion request to your Azure AI Foundry Agent
# Uses AZURE_TENANT_ID, AZURE_CLIENT_ID, AZURE_CLIENT_SECRET env vars for auth
response = litellm.completion(
    model="azure_ai/agents/asst_abc123",
    messages=[
        {
            "role": "user",
            "content": "Explain machine learning in simple terms"
        }
    ],
    api_base="https://your-resource.services.ai.azure.com/api/projects/your-project",
)

print(response.choices[0].message.content)
print(f"Usage: {response.usage}")
import litellm

# Stream responses from your Azure AI Foundry Agent
response = await litellm.acompletion(
    model="azure_ai/agents/asst_abc123",
    messages=[
        {
            "role": "user",
            "content": "What are the key principles of software architecture?"
        }
    ],
    api_base="https://your-resource.services.ai.azure.com/api/projects/your-project",
    stream=True,
)

async for chunk in response:
    if chunk.choices[0].delta.content:
        print(chunk.choices[0].delta.content, end="")
LiteLLM Proxy
1. 在 config.yaml 中設定您的模型
- config.yaml
model_list:
  - model_name: azure-agent-1
    litellm_params:
      model: azure_ai/agents/asst_abc123
      api_base: https://your-resource.services.ai.azure.com/api/projects/your-project
      # Service Principal auth (recommended)
      tenant_id: os.environ/AZURE_TENANT_ID
      client_id: os.environ/AZURE_CLIENT_ID
      client_secret: os.environ/AZURE_CLIENT_SECRET

  - model_name: azure-agent-math-tutor
    litellm_params:
      model: azure_ai/agents/asst_def456
      api_base: https://your-resource.services.ai.azure.com/api/projects/your-project
      # Or pass Azure AD token directly
      api_key: os.environ/AZURE_AD_TOKEN
2. 啟動 LiteLLM Proxy
litellm --config config.yaml
3. 向您的 Azure AI Foundry Agents 發出請求
- Curl
- OpenAI Python SDK
curl http://localhost:4000/v1/chat/completions \
  -H "Content-Type: application/json" \
  -H "Authorization: Bearer $LITELLM_API_KEY" \
  -d '{
    "model": "azure-agent-1",
    "messages": [
      {
        "role": "user",
        "content": "Summarize the main benefits of cloud computing"
      }
    ]
  }'
curl http://localhost:4000/v1/chat/completions \
  -H "Content-Type: application/json" \
  -H "Authorization: Bearer $LITELLM_API_KEY" \
  -d '{
    "model": "azure-agent-math-tutor",
    "messages": [
      {
        "role": "user",
        "content": "What is 25 * 4?"
      }
    ],
    "stream": true
  }'
from openai import OpenAI

# Initialize client with your LiteLLM proxy URL
client = OpenAI(
    base_url="http://localhost:4000",
    api_key="your-litellm-api-key"
)

# Make a completion request to your Azure AI Foundry Agent
response = client.chat.completions.create(
    model="azure-agent-1",
    messages=[
      {
        "role": "user",
        "content": "What are best practices for API design?"
      }
    ]
)

print(response.choices[0].message.content)
from openai import OpenAI

client = OpenAI(
    base_url="http://localhost:4000",
    api_key="your-litellm-api-key"
)

# Stream Agent responses
stream = client.chat.completions.create(
    model="azure-agent-math-tutor",
    messages=[
      {
        "role": "user",
        "content": "Explain the Pythagorean theorem"
      }
    ],
    stream=True
)

for chunk in stream:
    if chunk.choices[0].delta.content is not None:
        print(chunk.choices[0].delta.content, end="")
環境變數
| 變數 | 說明 |
|---|---|
AZURE_TENANT_ID | 用於 Service Principal 驗證的 Azure AD 租戶 ID |
AZURE_CLIENT_ID | 您的 Service Principal 的應用程式(client)ID |
AZURE_CLIENT_SECRET | 您的 Service Principal 的 client secret |
export AZURE_TENANT_ID="your-tenant-id"
export AZURE_CLIENT_ID="your-client-id"
export AZURE_CLIENT_SECRET="your-client-secret"
對話延續(Thread 管理)
Azure AI Foundry Agents 使用 threads 來維持對話內容。LiteLLM 會自動為您管理 threads,但您也可以傳入現有的 thread ID 以延續對話。
import litellm

# First message creates a new thread
response1 = await litellm.acompletion(
    model="azure_ai/agents/asst_abc123",
    messages=[{"role": "user", "content": "My name is Alice"}],
    api_base="https://your-resource.services.ai.azure.com/api/projects/your-project",
)

# Get the thread_id from the response
thread_id = response1._hidden_params.get("thread_id")

# Continue the conversation using the same thread
response2 = await litellm.acompletion(
    model="azure_ai/agents/asst_abc123",
    messages=[{"role": "user", "content": "What's my name?"}],
    api_base="https://your-resource.services.ai.azure.com/api/projects/your-project",
    thread_id=thread_id,  # Pass the thread_id to continue conversation
)

print(response2.choices[0].message.content)  # Should mention "Alice"
提供者特定參數
Azure AI Foundry Agents 支援可傳入的額外參數,以自訂代理程式呼叫。
- SDK
- Proxy
from litellm import completion

response = litellm.completion(
    model="azure_ai/agents/asst_abc123",
    messages=[
        {
            "role": "user",
            "content": "Analyze this data and provide insights",
        }
    ],
    api_base="https://your-resource.services.ai.azure.com/api/projects/your-project",
    thread_id="thread_abc123",  # Optional: Continue existing conversation
    instructions="Be concise and focus on key insights",  # Optional: Override agent instructions
)
model_list:
  - model_name: azure-agent-analyst
    litellm_params:
      model: azure_ai/agents/asst_abc123
      api_base: https://your-resource.services.ai.azure.com/api/projects/your-project
      tenant_id: os.environ/AZURE_TENANT_ID
      client_id: os.environ/AZURE_CLIENT_ID
      client_secret: os.environ/AZURE_CLIENT_SECRET
      instructions: "Be concise and focus on key insights"
可用參數
| 參數 | 類型 | 說明 |
|---|---|---|
thread_id | string | 可選的 thread ID,用於延續現有對話 |
instructions | string | 可選的指示,用於覆寫此執行的代理程式預設指示 |
LiteLLM A2A 閘道
您也可以透過 LiteLLM 的 A2A(Agent-to-Agent)閘道 UI 連接到 Azure AI Foundry Agents。這提供了一種不需撰寫程式碼即可註冊與測試代理程式的視覺化方式。
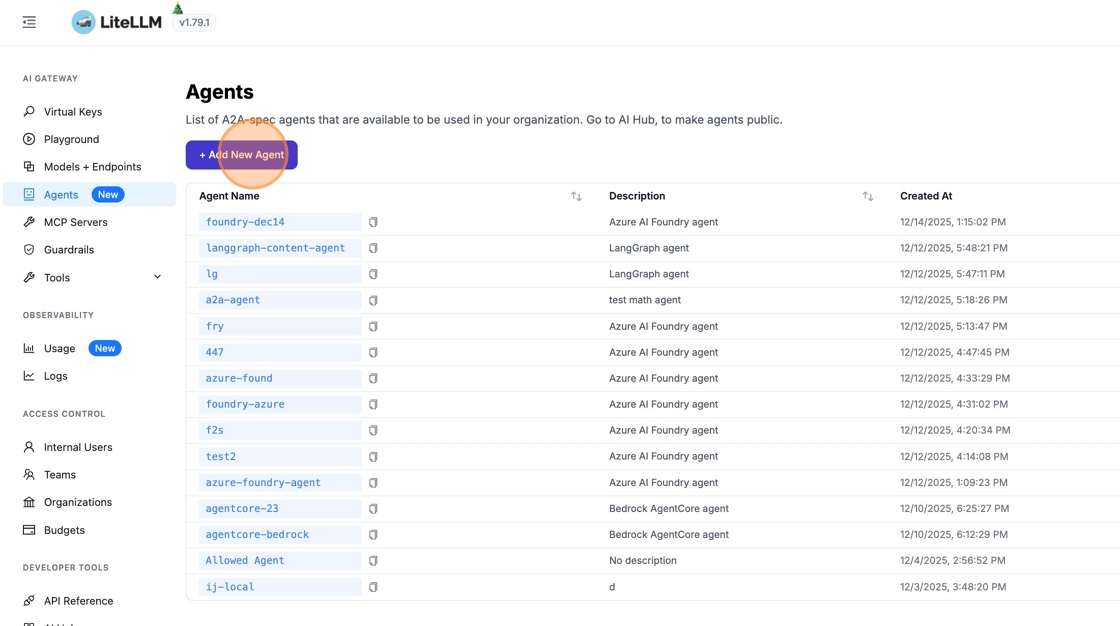
1. 前往 Agents
在側邊欄中,點擊 "Agents" 開啟代理程式管理頁面,然後點擊 "+ Add New Agent"。
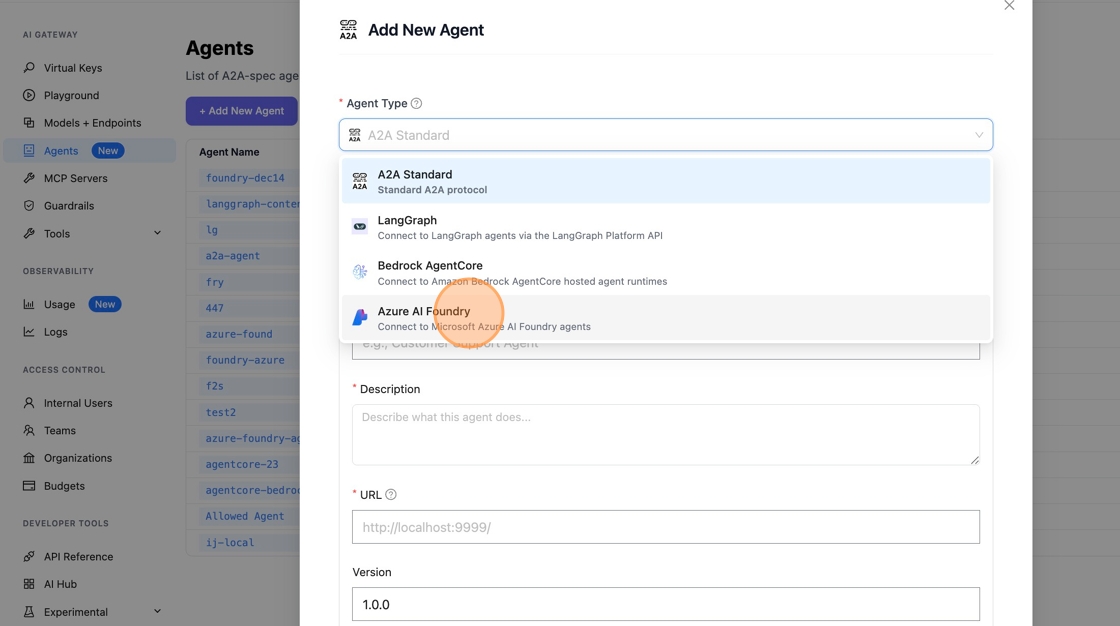
2. 選取 Azure AI Foundry 代理程式類型
點擊 "A2A Standard" 查看可用的代理程式類型,然後選取 "Azure AI Foundry"。

3. 設定代理程式
填入以下欄位:
代理程式名稱
輸入一個容易辨識的代理程式名稱 - 呼叫端將會看到此名稱作為可用的代理程式。

代理程式 ID
從您的 Azure AI Foundry 入口網站取得 Agent ID:
- 前往 https://ai.azure.com/ 並點擊 "Agents"
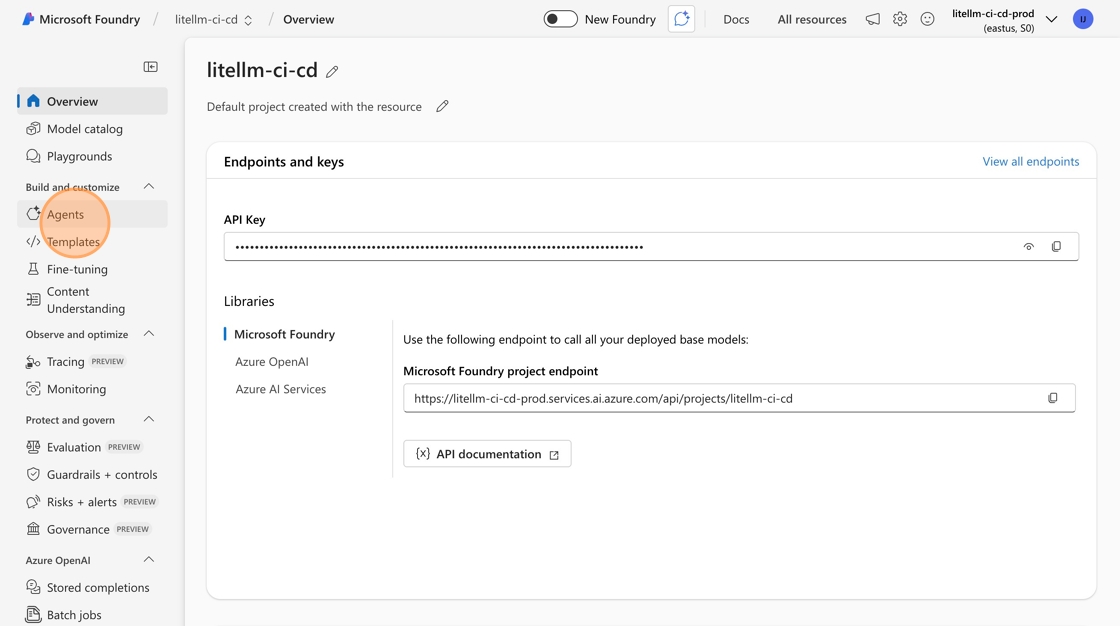
- 複製您要新增的代理程式的 "ID"(例如,
asst_hbnoK9BOCcHhC3lC4MDroVGG)

- 將 Agent ID 貼到 LiteLLM 中 - 這會告訴 LiteLLM 要在 Azure Foundry 上呼叫哪個代理程式

Azure AI API 基底
從 Azure AI Foundry 取得您的 API base URL:
- 前往 https://ai.azure.com/ 並點擊 "Overview"
- 在 libraries 下方選取 Microsoft Foundry
- 取得您的 endpoint - 應該會像
https://<domain>.services.ai.azure.com/api/projects/<project-name>
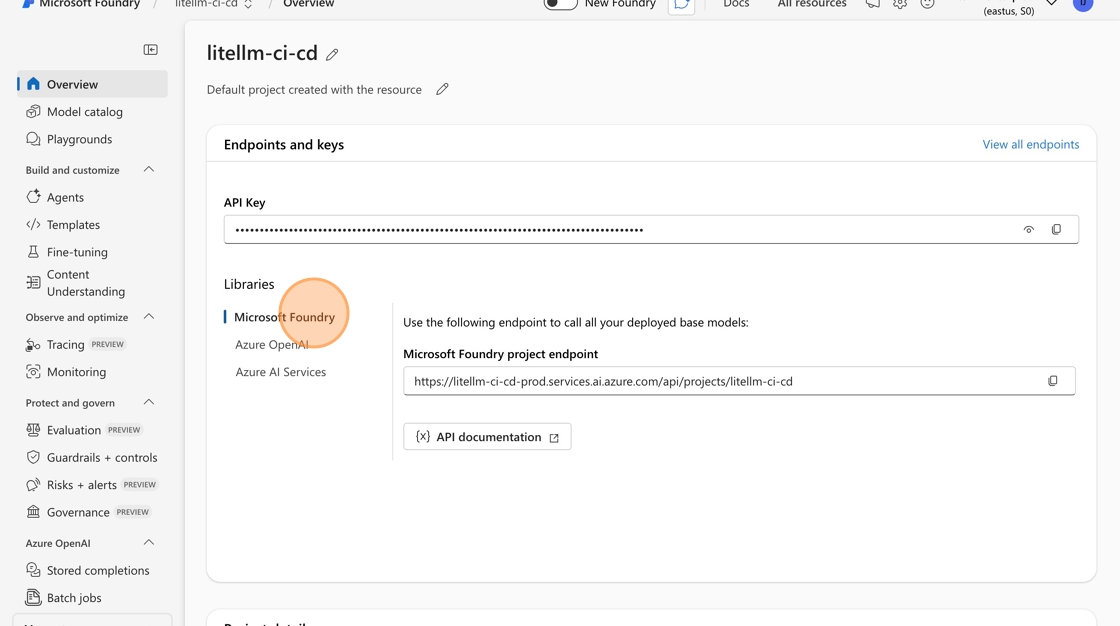
- 將 URL 貼到 LiteLLM 中

驗證
新增用於驗證的 Azure AD 憑證:
- Azure 租戶 ID
- Azure 用戶端 ID
- Azure 用戶端密鑰
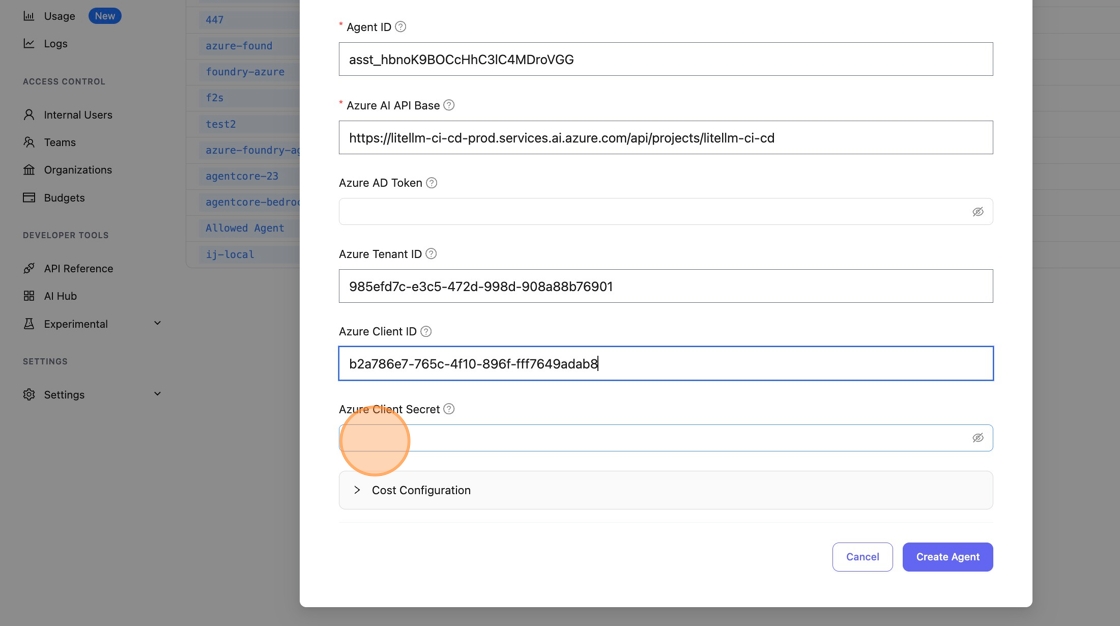
點擊 "Create Agent" 以儲存。

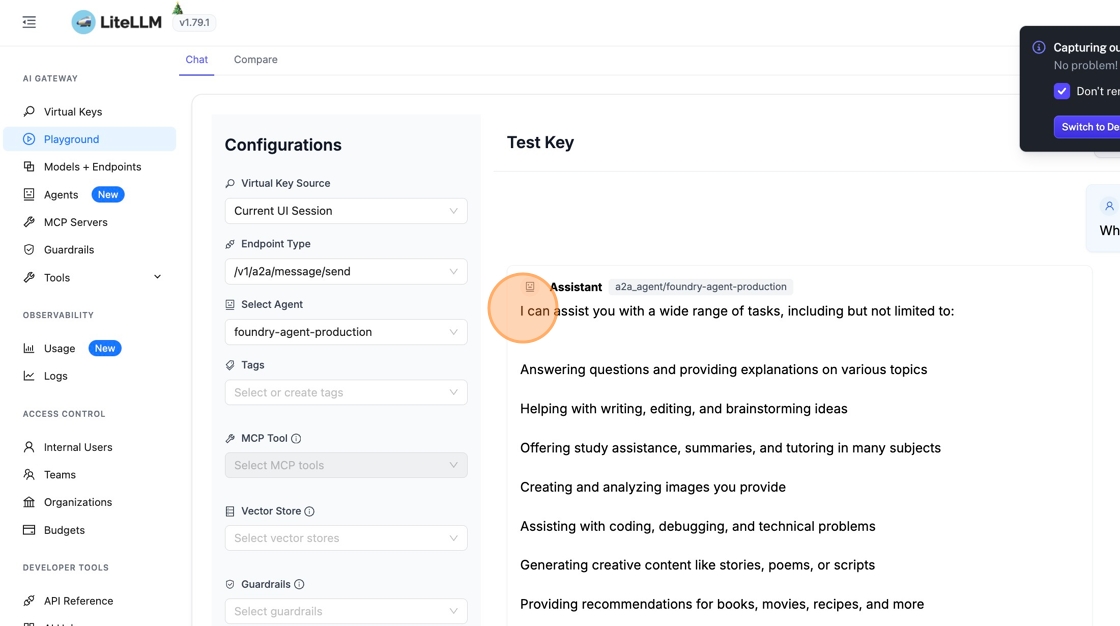
4. 在 Playground 中測試
前往側邊欄中的 "Playground" 測試您的代理程式。
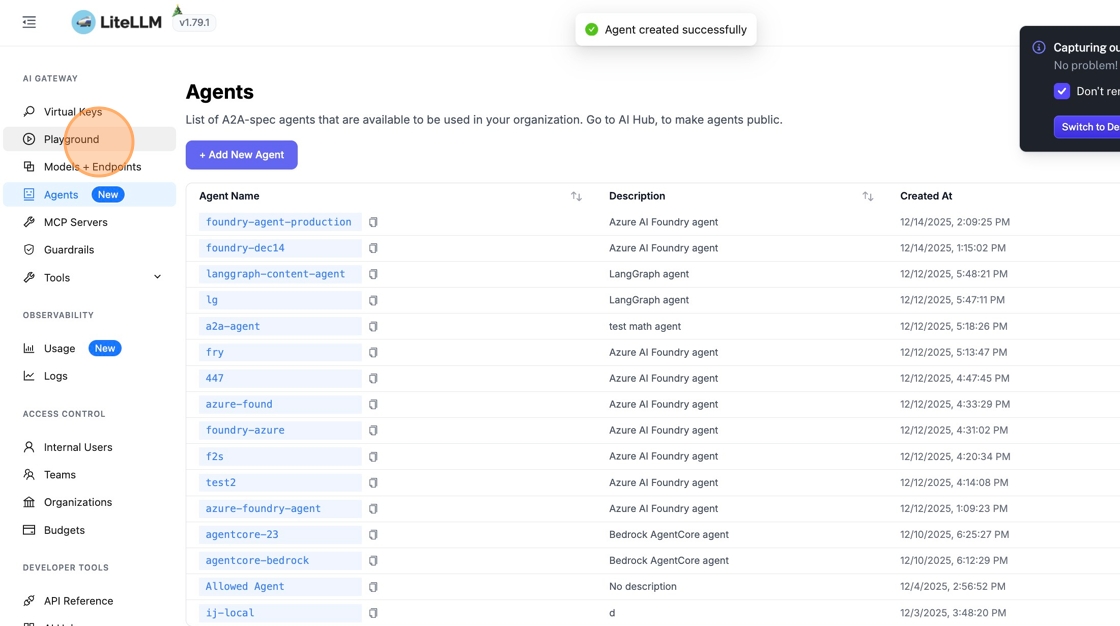
將端點類型更改為 /v1/a2a/message/send。
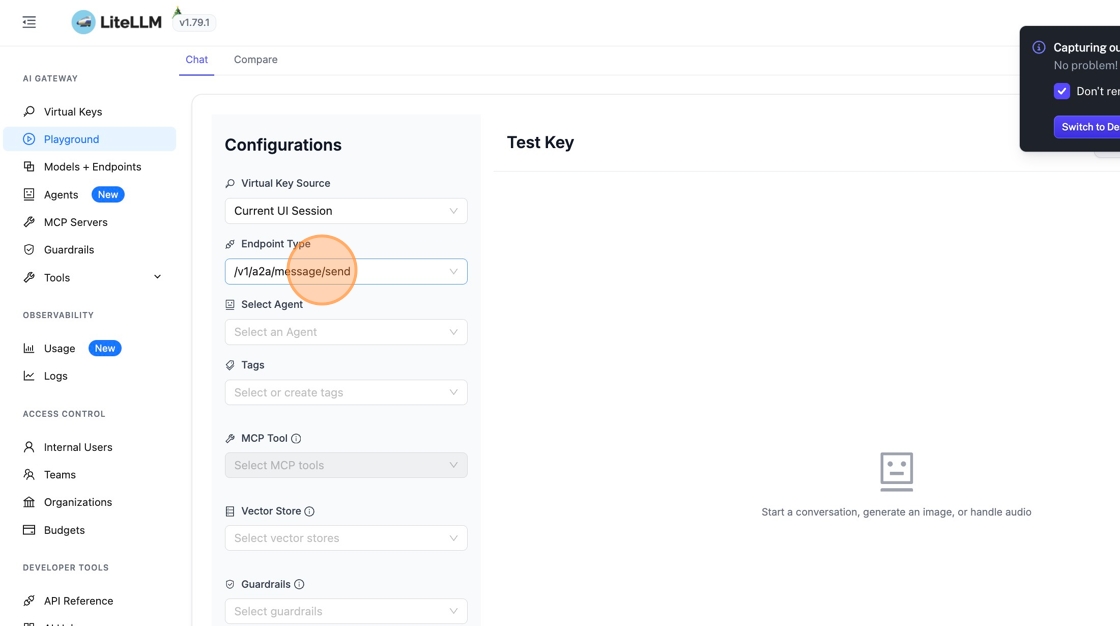
5. 選取您的代理程式並傳送訊息
從下拉選單中選取您的 Azure AI Foundry 代理程式並傳送測試訊息。
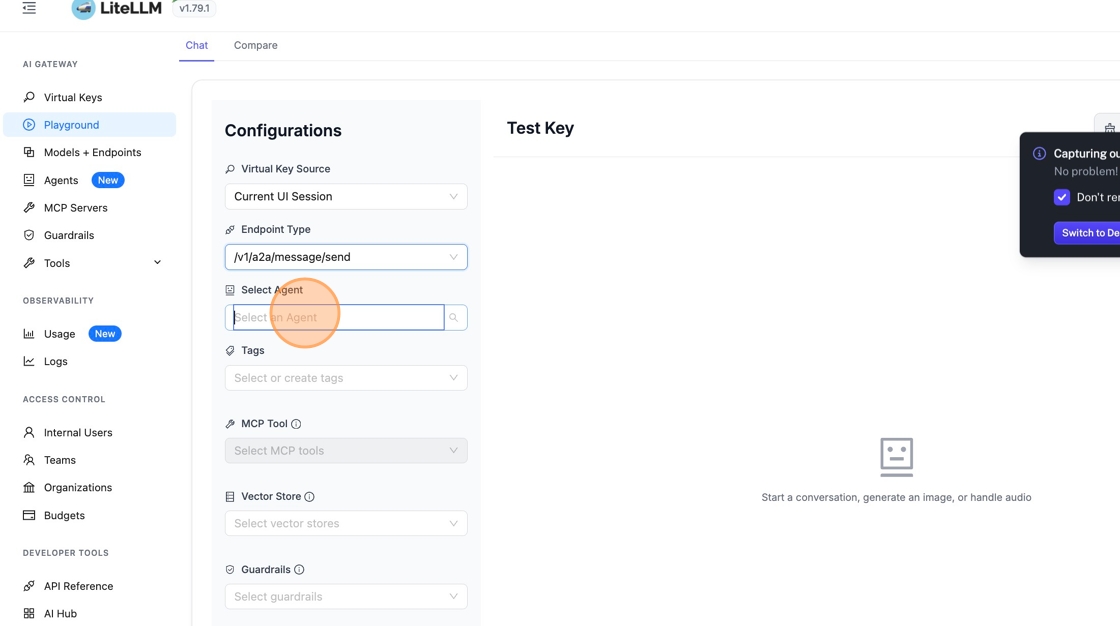
該代理程式會以其能力作為回應。現在您可以透過 A2A 協定與您的 Azure AI Foundry 代理程式互動。