VertexAI [Gemini]
概覽
| 屬性 | 詳細資訊 |
|---|---|
| 說明 | Vertex AI 是一個全代管的 AI 開發平台,用於建置和使用生成式 AI。 |
| LiteLLM 上的提供者路由 | vertex_ai/ |
| 提供者文件連結 | Vertex AI ↗ |
| 基礎 URL | 1. 區域端點https://{vertex_location}-aiplatform.googleapis.com/2. 全域端點(可用性有限) https://aiplatform.googleapis.com/ |
| 支援的操作 | /chat/completions, /completions, /embeddings, /audio/speech, /fine_tuning, /batches, /files, /images, /rerank |
| 模型格式 | 提供者 | 需要驗證 |
|---|---|---|
vertex_ai/gemini-2.0-flash | Vertex AI | GCP 憑證 + 專案 |
gemini-2.0-flash(無前綴) | Vertex AI | GCP 憑證 + 專案 |
gemini/gemini-2.0-flash | Gemini API | GEMINI_API_KEY(簡單 API 金鑰) |
如果您只想使用 API 金鑰(如 OpenAI),請改用 gemini/ 前綴。請參閱 Gemini - Google AI Studio。
沒有前綴的模型會預設為 Vertex AI,且需要 GCP 驗證。

vertex_ai/ 路由
vertex_ai/ 路由會使用 VertexAI 的 REST API。
from litellm import completion
import json

## GET CREDENTIALS
## RUN ##
# !gcloud auth application-default login - run this to add vertex credentials to your env
## OR ##
file_path = 'path/to/vertex_ai_service_account.json'

# Load the JSON file
with open(file_path, 'r') as file:
    vertex_credentials = json.load(file)

# Convert to JSON string
vertex_credentials_json = json.dumps(vertex_credentials)

## COMPLETION CALL
response = completion(
  model="vertex_ai/gemini-2.5-pro",
  messages=[{ "content": "Hello, how are you?","role": "user"}],
  vertex_credentials=vertex_credentials_json
)
系統訊息
from litellm import completion
import json

## GET CREDENTIALS
file_path = 'path/to/vertex_ai_service_account.json'

# Load the JSON file
with open(file_path, 'r') as file:
    vertex_credentials = json.load(file)

# Convert to JSON string
vertex_credentials_json = json.dumps(vertex_credentials)


response = completion(
  model="vertex_ai/gemini-2.5-pro",
  messages=[{"content": "You are a good bot.","role": "system"}, {"content": "Hello, how are you?","role": "user"}],
  vertex_credentials=vertex_credentials_json
)
函式呼叫
使用 tool_choice="required" 強制 Gemini 進行工具呼叫。
from litellm import completion
import json

## GET CREDENTIALS
file_path = 'path/to/vertex_ai_service_account.json'

# Load the JSON file
with open(file_path, 'r') as file:
    vertex_credentials = json.load(file)

# Convert to JSON string
vertex_credentials_json = json.dumps(vertex_credentials)


messages = [
    {
        "role": "system",
        "content": "Your name is Litellm Bot, you are a helpful assistant",
    },
    # User asks for their name and weather in San Francisco
    {
        "role": "user",
        "content": "Hello, what is your name and can you tell me the weather?",
    },
]

tools = [
    {
        "type": "function",
        "function": {
            "name": "get_weather",
            "description": "Get the current weather in a given location",
            "parameters": {
                "type": "object",
                "properties": {
                    "location": {
                        "type": "string",
                        "description": "The city and state, e.g. San Francisco, CA",
                    }
                },
                "required": ["location"],
            },
        },
    }
]

data = {
    "model": "vertex_ai/gemini-1.5-pro-preview-0514"),
    "messages": messages,
    "tools": tools,
    "tool_choice": "required",
    "vertex_credentials": vertex_credentials_json
}

## COMPLETION CALL
print(completion(**data))
JSON Schema
從 v1.40.1+ 開始,LiteLLM 支援將 response_schema 作為參數傳送給 Vertex AI 上的 Gemini-1.5-Pro。對於其他模型(例如 gemini-1.5-flash 或 claude-3-5-sonnet),LiteLLM 會將 schema 加入訊息清單,並搭配使用者可控制的提示詞。
回應 Schema
- SDK
- PROXY
from litellm import completion
import json

## SETUP ENVIRONMENT
# !gcloud auth application-default login - run this to add vertex credentials to your env

messages = [
    {
        "role": "user",
        "content": "List 5 popular cookie recipes."
    }
]

response_schema = {
        "type": "array",
        "items": {
            "type": "object",
            "properties": {
                "recipe_name": {
                    "type": "string",
                },
            },
            "required": ["recipe_name"],
        },
    }


completion(
    model="vertex_ai/gemini-1.5-pro",
    messages=messages,
    response_format={"type": "json_object", "response_schema": response_schema} # 👈 KEY CHANGE
    )

print(json.loads(completion.choices[0].message.content))
- 將模型新增到 config.yaml
model_list:
  - model_name: gemini-2.5-pro
    litellm_params:
      model: vertex_ai/gemini-2.5-pro
      vertex_project: "project-id"
      vertex_location: "us-central1"
      vertex_credentials: "/path/to/service_account.json" # [OPTIONAL] Do this OR `!gcloud auth application-default login` - run this to add vertex credentials to your env
或
model_list:
 - model_name: gemini-pro
    litellm_params:
      model: vertex_ai/gemini-1.5-pro
      litellm_credential_name: vertex-global
      vertex_project: project-name-here
      vertex_location: global
      base_model: gemini
      model_info:
        provider: Vertex
- 啟動 Proxy
$ litellm --config /path/to/config.yaml
- 發送請求!
curl -X POST 'http://0.0.0.0:4000/chat/completions' \
-H 'Content-Type: application/json' \
-H 'Authorization: Bearer sk-1234' \
-D '{
  "model": "gemini-2.5-pro",
  "messages": [
        {"role": "user", "content": "List 5 popular cookie recipes."}
    ],
  "response_format": {"type": "json_object", "response_schema": {
        "type": "array",
        "items": {
            "type": "object",
            "properties": {
                "recipe_name": {
                    "type": "string",
                },
            },
            "required": ["recipe_name"],
        },
    }}
}
'
驗證 Schema
若要驗證 response_schema,請設定 enforce_validation: true。
- SDK
- PROXY
from litellm import completion, JSONSchemaValidationError
try:
	completion(
    model="vertex_ai/gemini-1.5-pro",
    messages=messages,
    response_format={
        "type": "json_object",
        "response_schema": response_schema,
        "enforce_validation": true # 👈 KEY CHANGE
    }
	)
except JSONSchemaValidationError as e:
	print("Raw Response: {}".format(e.raw_response))
	raise e
- 將模型新增到 config.yaml
model_list:
  - model_name: gemini-2.5-pro
    litellm_params:
      model: vertex_ai/gemini-2.5-pro
      vertex_project: "project-id"
      vertex_location: "us-central1"
      vertex_credentials: "/path/to/service_account.json" # [OPTIONAL] Do this OR `!gcloud auth application-default login` - run this to add vertex credentials to your env
- 啟動 Proxy
$ litellm --config /path/to/config.yaml
- 發送請求!
curl -X POST 'http://0.0.0.0:4000/chat/completions' \
-H 'Content-Type: application/json' \
-H 'Authorization: Bearer sk-1234' \
-D '{
  "model": "gemini-2.5-pro",
  "messages": [
        {"role": "user", "content": "List 5 popular cookie recipes."}
    ],
  "response_format": {"type": "json_object", "response_schema": {
        "type": "array",
        "items": {
            "type": "object",
            "properties": {
                "recipe_name": {
                    "type": "string",
                },
            },
            "required": ["recipe_name"],
        },
    },
    "enforce_validation": true
    }
}
'
LiteLLM 會根據 schema 驗證回應,若回應不符合 schema,將拋出 JSONSchemaValidationError。
JSONSchemaValidationError 繼承自 openai.APIError
可使用 e.raw_response 存取原始回應
自行加入到提示詞
from litellm import completion

## GET CREDENTIALS
file_path = 'path/to/vertex_ai_service_account.json'

# Load the JSON file
with open(file_path, 'r') as file:
    vertex_credentials = json.load(file)

# Convert to JSON string
vertex_credentials_json = json.dumps(vertex_credentials)

messages = [
    {
        "role": "user",
        "content": """
List 5 popular cookie recipes.

Using this JSON schema:

    Recipe = {"recipe_name": str}

Return a `list[Recipe]`
        """
    }
]

completion(model="vertex_ai/gemini-1.5-flash-preview-0514", messages=messages, response_format={ "type": "json_object" })
Google 託管工具(Web Search、程式碼執行等)
網頁搜尋
將 Google Search Result grounding 加入 vertex ai 呼叫。
可透過 response_obj._hidden_params["vertex_ai_grounding_metadata"] 查看 grounding 中繼資料
- SDK
- PROXY
from litellm import completion

## SETUP ENVIRONMENT
# !gcloud auth application-default login - run this to add vertex credentials to your env

tools = [{"googleSearch": {}}] # 👈 ADD GOOGLE SEARCH

resp = litellm.completion(
                    model="vertex_ai/gemini-1.0-pro-001",
                    messages=[{"role": "user", "content": "Who won the world cup?"}],
                    tools=tools,
                )

print(resp)
- OpenAI Python SDK
- cURL
from openai import OpenAI

client = OpenAI(
    api_key="sk-1234", # pass litellm proxy key, if you're using virtual keys
    base_url="http://0.0.0.0:4000/v1/" # point to litellm proxy
)

response = client.chat.completions.create(
    model="gemini-2.5-pro",
    messages=[{"role": "user", "content": "Who won the world cup?"}],
    tools=[{"googleSearch": {}}],
)

print(response)
curl http://localhost:4000/v1/chat/completions \
  -H "Content-Type: application/json" \
  -H "Authorization: Bearer sk-1234" \
  -d '{
    "model": "gemini-2.5-pro",
    "messages": [
      {"role": "user", "content": "Who won the world cup?"}
    ],
   "tools": [
        {
            "googleSearch": {}
        }
    ]
  }'
Url Context
使用 URL context 工具,您可以將 URL 作為額外脈絡提供給 Gemini,作為提示詞的補充。接著模型可以從這些 URL 擷取內容,並使用該內容來理解與塑造其回應。
可透過 response_obj._hidden_params["vertex_ai_url_context_metadata"] 查看 grounding 中繼資料
- SDK
- PROXY
from litellm import completion
import os

os.environ["GEMINI_API_KEY"] = ".."

# 👇 ADD URL CONTEXT
tools = [{"urlContext": {}}]

response = completion(
    model="gemini/gemini-2.0-flash",
    messages=[{"role": "user", "content": "Summarize this document: https://ai.google.dev/gemini-api/docs/models"}],
    tools=tools,
)

print(response)

# Access URL context metadata
url_context_metadata = response.model_extra['vertex_ai_url_context_metadata']
urlMetadata = url_context_metadata[0]['urlMetadata'][0]
print(f"Retrieved URL: {urlMetadata['retrievedUrl']}")
print(f"Retrieval Status: {urlMetadata['urlRetrievalStatus']}")
- 設定 config.yaml
model_list:
  - model_name: gemini-2.0-flash
    litellm_params:
      model: gemini/gemini-2.0-flash
      api_key: os.environ/GEMINI_API_KEY
- 啟動 Proxy
$ litellm --config /path/to/config.yaml
- 發送請求!
curl -X POST 'http://0.0.0.0:4000/chat/completions' \
  -H "Content-Type: application/json" \
  -H "Authorization: Bearer <YOUR-LITELLM-KEY>" \
  -d '{
    "model": "gemini-2.0-flash",
    "messages": [{"role": "user", "content": "Summarize this document: https://ai.google.dev/gemini-api/docs/models"}],
    "tools": [{"urlContext": {}}]
  }'
企業 Web Search
您也可以使用 enterpriseWebSearch 工具進行 企業合規搜尋。
- SDK
- PROXY
from litellm import completion

## SETUP ENVIRONMENT
# !gcloud auth application-default login - run this to add vertex credentials to your env

tools = [{"enterpriseWebSearch": {}}] # 👈 ADD GOOGLE ENTERPRISE SEARCH

resp = litellm.completion(
                    model="vertex_ai/gemini-1.0-pro-001",
                    messages=[{"role": "user", "content": "Who won the world cup?"}],
                    tools=tools,
                )

print(resp)
- OpenAI Python SDK
- cURL
from openai import OpenAI

client = OpenAI(
    api_key="sk-1234", # pass litellm proxy key, if you're using virtual keys
    base_url="http://0.0.0.0:4000/v1/" # point to litellm proxy
)

response = client.chat.completions.create(
    model="gemini-2.5-pro",
    messages=[{"role": "user", "content": "Who won the world cup?"}],
    tools=[{"enterpriseWebSearch": {}}],
)

print(response)
curl http://localhost:4000/v1/chat/completions \
  -H "Content-Type: application/json" \
  -H "Authorization: Bearer sk-1234" \
  -d '{
    "model": "gemini-2.5-pro",
    "messages": [
      {"role": "user", "content": "Who won the world cup?"}
    ],
   "tools": [
        {
            "enterpriseWebSearch": {}
        }
    ]
  }'
程式碼執行
- SDK
- PROXY
from litellm import completion
import os

## SETUP ENVIRONMENT
# !gcloud auth application-default login - run this to add vertex credentials to your env


tools = [{"codeExecution": {}}] # 👈 ADD CODE EXECUTION

response = completion(
    model="vertex_ai/gemini-2.0-flash",
    messages=[{"role": "user", "content": "What is the weather in San Francisco?"}],
    tools=tools,
)

print(response)
curl -X POST 'http://0.0.0.0:4000/chat/completions' \
-H 'Content-Type: application/json' \
-H 'Authorization: Bearer sk-1234' \
-d '{
  "model": "gemini-2.0-flash",
  "messages": [{"role": "user", "content": "What is the weather in San Francisco?"}],
  "tools": [{"codeExecution": {}}]
}
'
Google 地圖
使用 Google Maps 為您的 Gemini 模型提供以位置為基礎的脈絡。
- SDK
- PROXY
基本用法 - 只啟用 Widget
from litellm import completion

## SETUP ENVIRONMENT
# !gcloud auth application-default login - run this to add vertex credentials to your env

tools = [{"googleMaps": {"enableWidget": "ENABLE_WIDGET"}}] # 👈 ADD GOOGLE MAPS

resp = litellm.completion(
    model="vertex_ai/gemini-2.0-flash",
    messages=[{"role": "user", "content": "What restaurants are nearby?"}],
    tools=tools,
)

print(resp)
搭配位置資料
您可以指定位置,讓模型的回應以該位置的特定資訊為基礎:
from litellm import completion

## SETUP ENVIRONMENT
# !gcloud auth application-default login - run this to add vertex credentials to your env

tools = [{
    "googleMaps": {
        "enableWidget": "ENABLE_WIDGET",
        "latitude": 37.7749,        # San Francisco latitude
        "longitude": -122.4194,     # San Francisco longitude
        "languageCode": "en_US"     # Optional: language for results
    }
}] # 👈 ADD GOOGLE MAPS WITH LOCATION

resp = litellm.completion(
    model="vertex_ai/gemini-2.0-flash",
    messages=[{"role": "user", "content": "What restaurants are nearby?"}],
    tools=tools,
)

print(resp)
- OpenAI Python SDK
- cURL
基本用法 - 只啟用 Widget
from openai import OpenAI

client = OpenAI(
    api_key="sk-1234", # pass litellm proxy key, if you're using virtual keys
    base_url="http://0.0.0.0:4000/v1/" # point to litellm proxy
)

response = client.chat.completions.create(
    model="gemini-2.0-flash",
    messages=[{"role": "user", "content": "What restaurants are nearby?"}],
    tools=[{"googleMaps": {"enableWidget": "ENABLE_WIDGET"}}],
)

print(response)
搭配位置資料
from openai import OpenAI

client = OpenAI(
    api_key="sk-1234", # pass litellm proxy key, if you're using virtual keys
    base_url="http://0.0.0.0:4000/v1/" # point to litellm proxy
)

response = client.chat.completions.create(
    model="gemini-2.0-flash",
    messages=[{"role": "user", "content": "What restaurants are nearby?"}],
    tools=[{
        "googleMaps": {
            "enableWidget": "ENABLE_WIDGET",
            "latitude": 37.7749,        # San Francisco latitude
            "longitude": -122.4194,     # San Francisco longitude
            "languageCode": "en_US"     # Optional: language for results
        }
    }],
)

print(response)
基本用法 - 只啟用 Widget
curl http://localhost:4000/v1/chat/completions \
  -H "Content-Type: application/json" \
  -H "Authorization: Bearer sk-1234" \
  -d '{
    "model": "gemini-2.0-flash",
    "messages": [
      {"role": "user", "content": "What restaurants are nearby?"}
    ],
   "tools": [
        {
            "googleMaps": {"enableWidget": "ENABLE_WIDGET"}
        }
    ]
  }'
搭配位置資料
curl http://localhost:4000/v1/chat/completions \
  -H "Content-Type: application/json" \
  -H "Authorization: Bearer sk-1234" \
  -d '{
    "model": "gemini-2.0-flash",
    "messages": [
      {"role": "user", "content": "What restaurants are nearby?"}
    ],
   "tools": [
        {
            "googleMaps": {
                "enableWidget": "ENABLE_WIDGET",
                "latitude": 37.7749,
                "longitude": -122.4194,
                "languageCode": "en_US"
            }
        }
    ]
  }'
從 Vertex AI SDK 移轉到 LiteLLM(GROUNDING)
如果這是您原本的 VertexAI Grounding 程式碼,
import vertexai
from vertexai.generative_models import GenerativeModel, GenerationConfig, Tool, grounding


vertexai.init(project=project_id, location="us-central1")

model = GenerativeModel("gemini-1.5-flash-001")

# Use Google Search for grounding
tool = Tool.from_google_search_retrieval(grounding.GoogleSearchRetrieval())

prompt = "When is the next total solar eclipse in US?"
response = model.generate_content(
    prompt,
    tools=[tool],
    generation_config=GenerationConfig(
        temperature=0.0,
    ),
)

print(response)
那麼現在看起來會是這樣
from litellm import completion


# !gcloud auth application-default login - run this to add vertex credentials to your env

tools = [{"googleSearch": {"disable_attributon": False}}] # 👈 ADD GOOGLE SEARCH

resp = litellm.completion(
                    model="vertex_ai/gemini-1.0-pro-001",
                    messages=[{"role": "user", "content": "Who won the world cup?"}],
                    tools=tools,
                    vertex_project="project-id"
                )

print(resp)
Thinking / reasoning_content
LiteLLM 會將 OpenAI 的 reasoning_effort 轉換為 Gemini 的 thinking 參數。程式碼
另外,為非 reasoning 的 Gemini 請求新增了一個非 OpenAI 標準的「disable」值。
對應
| reasoning_effort | thinking |
|---|---|
| "disable" | "budget_tokens": 0 |
| "low" | "budget_tokens": 1024 |
| "medium" | "budget_tokens": 2048 |
| "high" | "budget_tokens": 4096 |
- SDK
- PROXY
from litellm import completion

# !gcloud auth application-default login - run this to add vertex credentials to your env

resp = completion(
    model="vertex_ai/gemini-2.5-flash-preview-04-17",
    messages=[{"role": "user", "content": "What is the capital of France?"}],
    reasoning_effort="low",
    vertex_project="project-id",
    vertex_location="us-central1"
)
- 設定 config.yaml
- model_name: gemini-2.5-flash
  litellm_params:
    model: vertex_ai/gemini-2.5-flash-preview-04-17
    vertex_credentials: {"project_id": "project-id", "location": "us-central1", "project_key": "project-key"}
    vertex_project: "project-id"
    vertex_location: "us-central1"
- 啟動 proxy
litellm --config /path/to/config.yaml
- 測試看看!
curl http://0.0.0.0:4000/v1/chat/completions \
  -H "Content-Type: application/json" \
  -H "Authorization: Bearer <YOUR-LITELLM-KEY>" \
  -d '{
    "model": "gemini-2.5-flash",
    "messages": [{"role": "user", "content": "What is the capital of France?"}],
    "reasoning_effort": "low"
  }'
預期回應
ModelResponse(
    id='chatcmpl-c542d76d-f675-4e87-8e5f-05855f5d0f5e',
    created=1740470510,
    model='claude-3-7-sonnet-20250219',
    object='chat.completion',
    system_fingerprint=None,
    choices=[
        Choices(
            finish_reason='stop',
            index=0,
            message=Message(
                content="The capital of France is Paris.",
                role='assistant',
                tool_calls=None,
                function_call=None,
                reasoning_content='The capital of France is Paris. This is a very straightforward factual question.'
            ),
        )
    ],
    usage=Usage(
        completion_tokens=68,
        prompt_tokens=42,
        total_tokens=110,
        completion_tokens_details=None,
        prompt_tokens_details=PromptTokensDetailsWrapper(
            audio_tokens=None,
            cached_tokens=0,
            text_tokens=None,
            image_tokens=None
        ),
        cache_creation_input_tokens=0,
        cache_read_input_tokens=0
    )
)
將 thinking 傳遞給 Gemini 模型
您也可以將 thinking 參數傳遞給 Gemini 模型。
這會轉換為 Gemini 的 thinkingConfig 參數。
- SDK
- PROXY
from litellm import completion

# !gcloud auth application-default login - run this to add vertex credentials to your env

response = litellm.completion(
  model="vertex_ai/gemini-2.5-flash-preview-04-17",
  messages=[{"role": "user", "content": "What is the capital of France?"}],
  thinking={"type": "enabled", "budget_tokens": 1024},
  vertex_project="project-id",
  vertex_location="us-central1"
)
curl http://0.0.0.0:4000/v1/chat/completions \
  -H "Content-Type: application/json" \
  -H "Authorization: Bearer $LITELLM_KEY" \
  -d '{
    "model": "vertex_ai/gemini-2.5-flash-preview-04-17",
    "messages": [{"role": "user", "content": "What is the capital of France?"}],
    "thinking": {"type": "enabled", "budget_tokens": 1024}
  }'
Context Caching
統一端點
以與 Google AI Studio - Context Caching 相同的方式使用 Vertex AI context caching
範例用法
- SDK
- SDK with Custom TTL
- PROXY
from litellm import completion

for _ in range(2):
    resp = completion(
        model="vertex_ai/gemini-2.5-pro",
        messages=[
        # System Message
            {
                "role": "system",
                "content": [
                    {
                        "type": "text",
                        "text": "Here is the full text of a complex legal agreement" * 4000,
                        "cache_control": {"type": "ephemeral"}, # 👈 KEY CHANGE
                    }
                ],
            },
            # marked for caching with the cache_control parameter, so that this checkpoint can read from the previous cache.
            {
                "role": "user",
                "content": [
                    {
                        "type": "text",
                        "text": "What are the key terms and conditions in this agreement?",
                        "cache_control": {"type": "ephemeral"},
                    }
                ],
            }]
    )

    print(resp.usage) # 👈 2nd usage block will be less, since cached tokens used
from litellm import completion

# Cache for 2 hours (7200 seconds)
resp = completion(
    model="vertex_ai/gemini-2.5-pro",
    messages=[
        {
            "role": "system",
            "content": [
                {
                    "type": "text",
                    "text": "Here is the full text of a complex legal agreement" * 4000,
                    "cache_control": {
                        "type": "ephemeral",
                        "ttl": "7200s"  # 👈 Cache for 2 hours
                    },
                }
            ],
        },
        {
            "role": "user",
            "content": [
                {
                    "type": "text",
                    "text": "What are the key terms and conditions in this agreement?",
                    "cache_control": {
                        "type": "ephemeral",
                        "ttl": "3600s"  # 👈 This TTL will be ignored (first one is used)
                    },
                }
            ],
        }
    ]
)

print(resp.usage)
- 設定 config.yaml
model_list:
  - model_name: gemini-2.5-pro
    litellm_params:
      model: vertex_ai/gemini-2.5-pro
      vertex_project: "project-id"
      vertex_location: "us-central1"
      vertex_credentials: "/path/to/service_account.json"
- 啟動 proxy
litellm --config /path/to/config.yaml
- 測試看看!
curl -X POST 'http://0.0.0.0:4000/chat/completions' \
-H 'Content-Type: application/json' \
-H 'Authorization: Bearer sk-1234' \
-d '{
    "model": "gemini-2.5-flash",
    "messages": [
        {
            "role": "system",
            "content": [
                {
                    "type": "text",
                    "text": "Long cache message (must be >= 1024 tokens)",
                    "cache_control": {
                        "type": "ephemeral",
                        "ttl": "7200s"
                    }
                }
            ]
        },
        {
            "role": "user",
            "content": [
                {
                    "type": "text",
                    "text": "What is the text about?"
                }
            ]
        }
    ]
}'
直接呼叫提供者 API
1. 建立快取
首先,透過 LiteLLM proxy 向 cachedContents 端點送出 POST 請求來建立快取。
- PROXY
curl http://0.0.0.0:4000/vertex_ai/v1/projects/{project_id}/locations/{location}/cachedContents \
  -H "Content-Type: application/json" \
  -H "Authorization: Bearer $LITELLM_KEY" \
  -d '{
    "model": "projects/{project_id}/locations/{location}/publishers/google/models/gemini-2.5-flash",
    "displayName": "example_cache",
    "contents": [{
      "role": "user",
      "parts": [{
        "text": ".... a long book to be cached"
      }]
    }]
  }'
2. 從回應中取得快取名稱
Vertex AI 會傳回一個包含已快取內容 name 的回應。這個名稱是您快取資料的識別碼。
{
    "name": "projects/12341234/locations/{location}/cachedContents/123123123123123",
    "model": "projects/{project_id}/locations/{location}/publishers/google/models/gemini-2.5-flash",
    "createTime": "2025-09-23T19:13:50.674976Z",
    "updateTime": "2025-09-23T19:13:50.674976Z",
    "expireTime": "2025-09-23T20:13:50.655988Z",
    "displayName": "example_cache",
    "usageMetadata": {
        "totalTokenCount": 1246,
        "textCount": 5132
    }
}
3. 使用已快取內容
在後續 API 呼叫中,使用回應中的 name 作為 cachedContent 或 cached_content,以重複使用已快取的資訊。這會在您的請求本文中傳遞給 /chat/completions。
- PROXY
curl http://0.0.0.0:4000/chat/completions \
  -H "Content-Type: application/json" \
  -H "Authorization: Bearer $LITELLM_KEY" \
  -d '{
    "cachedContent": "projects/545201925769/locations/us-central1/cachedContents/4511135542628319232",
    "model": "gemini-2.5-flash",
    "messages": [
        {
            "role": "user",
            "content": "what is the book about?"
        }
    ]
  }'
前置需求
-
uv add google-cloud-aiplatform(proxy docker image 已預先安裝) -
驗證:
- 執行
gcloud auth application-default login請參閱 Google Cloud 文件 - 或者,您可以設定
GOOGLE_APPLICATION_CREDENTIALS
操作方式如下:跳至程式碼
- 在 GCP 上建立 service account
- 將憑證匯出為 json
- 載入 json,並將 json.dump 輸出為字串
- 將該 json 字串儲存在您的環境中作為
GOOGLE_APPLICATION_CREDENTIALS
- 執行
範例用法
import litellm
litellm.vertex_project = "hardy-device-38811" # Your Project ID
litellm.vertex_location = "us-central1"  # proj location

response = litellm.completion(model="gemini-2.5-pro", messages=[{"role": "user", "content": "write code for saying hi from LiteLLM"}])
搭配 LiteLLM Proxy Server 使用
以下說明如何在 LiteLLM Proxy Server 中使用 Vertex AI
- 修改 config.yaml
- 每個模型使用不同位置
- 所有 vertex models 共用一個位置
當您需要為每個 vertex model 設定不同位置時,請使用此項
model_list:
  - model_name: gemini-vision
    litellm_params:
      model: vertex_ai/gemini-1.0-pro-vision-001
      vertex_project: "project-id"
      vertex_location: "us-central1"
  - model_name: gemini-vision
    litellm_params:
      model: vertex_ai/gemini-1.0-pro-vision-001
      vertex_project: "project-id2"
      vertex_location: "us-east"
當您有一個 vertex 位置供所有模型使用時,請使用此項
litellm_settings:
  vertex_project: "hardy-device-38811" # Your Project ID
  vertex_location: "us-central1" # proj location

model_list:
  -model_name: team1-gemini-2.5-pro
  litellm_params:
    model: gemini-2.5-pro
- 啟動 proxy
$ litellm --config /path/to/config.yaml
- 向 LiteLLM Proxy Server 送出請求
- OpenAI Python v1.0.0+
- curl
import openai
client = openai.OpenAI(
    api_key="sk-1234",             # pass litellm proxy key, if you're using virtual keys
    base_url="http://0.0.0.0:4000" # litellm-proxy-base url
)

response = client.chat.completions.create(
    model="team1-gemini-2.5-pro",
    messages = [
        {
            "role": "user",
            "content": "what llm are you"
        }
    ],
)

print(response)
curl --location 'http://0.0.0.0:4000/chat/completions' \
    --header 'Authorization: Bearer sk-1234' \
    --header 'Content-Type: application/json' \
    --data '{
    "model": "team1-gemini-2.5-pro",
    "messages": [
        {
        "role": "user",
        "content": "what llm are you"
        }
    ],
}'
驗證 - vertex_project、vertex_location 等
透過以下方式設定您的 vertex 憑證:
- 動態參數 或
- 環境變數
動態參數
您可以設定:
vertex_credentials(str) - 可以是 json 字串或您的 vertex ai service account.json 檔案路徑vertex_location(str) - vertex model 的部署位置(us-central1、asia-southeast1 等)。部分模型支援 global 位置,請參閱 Vertex AI 文件vertex_projectOptional[str] - 如果 vertex project 與 vertex_credentials 中的不同,請使用此項
作為 litellm.completion 呼叫的動態參數。
- SDK
- PROXY
from litellm import completion
import json

## GET CREDENTIALS
file_path = 'path/to/vertex_ai_service_account.json'

# Load the JSON file
with open(file_path, 'r') as file:
    vertex_credentials = json.load(file)

# Convert to JSON string
vertex_credentials_json = json.dumps(vertex_credentials)


response = completion(
  model="vertex_ai/gemini-2.5-pro",
  messages=[{"content": "You are a good bot.","role": "system"}, {"content": "Hello, how are you?","role": "user"}],
  vertex_credentials=vertex_credentials_json,
  vertex_project="my-special-project",
  vertex_location="my-special-location"
)
model_list:
    - model_name: gemini-1.5-pro
      litellm_params:
        model: gemini-1.5-pro
        vertex_credentials: os.environ/VERTEX_FILE_PATH_ENV_VAR # os.environ["VERTEX_FILE_PATH_ENV_VAR"] = "/path/to/service_account.json"
        vertex_project: "my-special-project"
        vertex_location: "my-special-location:
Workload Identity Federation
LiteLLM 支援 Google Cloud Workload Identity Federation (WIF),可讓您在不使用 service account key 的情況下,授予內部部署或多雲工作負載存取 Google Cloud 資源的權限。這是針對在其他雲端環境(AWS、Azure 等)或內部部署中執行的工作負載所建議的方法。
若要使用 Workload Identity Federation,請透過 vertex_credentials 傳入您的 WIF 憑證設定檔路徑:
- SDK
- PROXY
from litellm import completion

response = completion(
    model="vertex_ai/gemini-1.5-pro",
    messages=[{"role": "user", "content": "Hello!"}],
    vertex_credentials="/path/to/wif-credentials.json",  # 👈 WIF credentials file
    vertex_project="your-gcp-project-id",
    vertex_location="us-central1"
)
model_list:
  - model_name: gemini-model
    litellm_params:
      model: vertex_ai/gemini-1.5-pro
      vertex_project: your-gcp-project-id
      vertex_location: us-central1
      vertex_credentials: /path/to/wif-credentials.json  # 👈 WIF credentials file
或者,您可以在 LiteLLM UI 的 LLM Credentials 中建立憑證,並使用它們來驗證您的模型:
model_list:
  - model_name: gemini-model
    litellm_params:
      model: vertex_ai/gemini-1.5-pro
      vertex_project: your-gcp-project-id
      vertex_location: us-central1
      litellm_credential_name: my-vertex-wif-credential  # 👈 Reference credential stored in UI
WIF 憑證檔案格式
您的 WIF 憑證 JSON 檔案通常如下所示(適用於 AWS federation):
{
  "type": "external_account",
  "audience": "//iam.googleapis.com/projects/PROJECT_NUMBER/locations/global/workloadIdentityPools/POOL_ID/providers/PROVIDER_ID",
  "subject_token_type": "urn:ietf:params:aws:token-type:aws4_request",
  "service_account_impersonation_url": "https://iamcredentials.googleapis.com/v1/projects/-/serviceAccounts/SERVICE_ACCOUNT_EMAIL:generateAccessToken",
  "token_url": "https://sts.googleapis.com/v1/token",
  "credential_source": {
    "environment_id": "aws1",
    "region_url": "http://169.254.169.254/latest/meta-data/placement/availability-zone",
    "url": "http://169.254.169.254/latest/meta-data/iam/security-credentials",
    "regional_cred_verification_url": "https://sts.{region}.amazonaws.com?Action=GetCallerIdentity&Version=2011-06-15"
  }
}
如需設定 Workload Identity Federation 的更多詳細資訊,請參閱 Google Cloud WIF 文件。
明確的 AWS 憑證用於 WIF
預設情況下,基於 AWS 的 WIF 會依賴 EC2 instance metadata service 來取得 AWS 憑證。當 LiteLLM 執行於附加 IAM role 的 EC2 instance 或 ECS task 上時,這可正常運作。
如果您的環境無法存取 EC2 metadata service(例如:在內部部署環境中執行、在沒有 host networking 的容器中執行,或在具有限制的不同雲端中執行),您可以直接在 WIF 憑證 JSON 檔案中提供明確的 AWS 憑證。LiteLLM 會先使用這些憑證向 AWS 驗證,然後再進行 GCP token exchange。
請在您的 WIF 憑證 JSON 的最上層加入 aws_* keys(與 type、audience 等並列):
{
  "type": "external_account",
  "audience": "//iam.googleapis.com/projects/PROJECT_NUMBER/locations/global/workloadIdentityPools/POOL_ID/providers/PROVIDER_ID",
  "subject_token_type": "urn:ietf:params:aws:token-type:aws4_request",
  "service_account_impersonation_url": "https://iamcredentials.googleapis.com/v1/projects/-/serviceAccounts/SERVICE_ACCOUNT_EMAIL:generateAccessToken",
  "token_url": "https://sts.googleapis.com/v1/token",
  "credential_source": {
    "environment_id": "aws1",
    "region_url": "http://169.254.169.254/latest/meta-data/placement/availability-zone",
    "url": "http://169.254.169.254/latest/meta-data/iam/security-credentials",
    "regional_cred_verification_url": "https://sts.{region}.amazonaws.com?Action=GetCallerIdentity&Version=2011-06-15"
  },
  "aws_role_name": "arn:aws:iam::123456789012:role/MyWifRole",
  "aws_region_name": "us-east-1"
}
支援的 aws_* 參數:
| 參數 | 必填 | 說明 |
|---|---|---|
aws_region_name | 是 | 用於憑證驗證的 AWS region(例如 us-east-1) |
aws_role_name | 否 | 用於 STS AssumeRole 的 IAM role ARN |
aws_access_key_id | 否 | 靜態 AWS access key ID |
aws_secret_access_key | 否 | 靜態 AWS secret access key |
aws_session_token | 否 | 暫時性 session token |
aws_profile_name | 否 | AWS CLI profile 名稱 |
aws_session_name | 否 | AssumeRole 的 session 名稱 |
aws_web_identity_token | 否 | 用於 STS 的 web identity token |
aws_sts_endpoint | 否 | 自訂 STS endpoint URL |
aws_external_id | 否 | 跨帳戶 AssumeRole 的 external ID |
使用明確的 AWS 憑證時,aws_region_name 一律必填。其他參數遵循與 Bedrock AWS 驗證 相同的驗證流程——您可以使用角色假設、靜態金鑰、設定檔或 web identity token。
- SDK
- PROXY
from litellm import completion

response = completion(
    model="vertex_ai/gemini-1.5-pro",
    messages=[{"role": "user", "content": "Hello!"}],
    vertex_credentials="/path/to/wif-credentials-with-aws.json",  # WIF JSON with aws_* keys
    vertex_project="your-gcp-project-id",
    vertex_location="us-central1"
)
model_list:
  - model_name: gemini-model
    litellm_params:
      model: vertex_ai/gemini-1.5-pro
      vertex_project: your-gcp-project-id
      vertex_location: us-central1
      vertex_credentials: /path/to/wif-credentials-with-aws.json  # WIF JSON with aws_* keys
當 JSON 中存在 aws_* keys 時,LiteLLM 會自動使用明確的 AWS 驗證,而不是 EC2 metadata service。當它們不存在時,會維持使用標準的 metadata-based 流程。
環境變數
您可以設定:
GOOGLE_APPLICATION_CREDENTIALS- 在此儲存您的 service_account.json 檔案路徑(由 vertex sdk 直接使用)。- VERTEXAI_LOCATION - vertex model 的部署位置(us-central1、asia-southeast1 等)
- VERTEXAI_PROJECT - Optional[str] - 如果 vertex project 與 vertex_credentials 中的不同,請使用此項
- GOOGLE_APPLICATION_CREDENTIALS
export GOOGLE_APPLICATION_CREDENTIALS="/path/to/service_account.json"
- VERTEXAI_LOCATION
export VERTEXAI_LOCATION="us-central1" # can be any vertex location
- VERTEXAI_PROJECT
export VERTEXAI_PROJECT="my-test-project" # ONLY use if model project is different from service account project
指定安全性設定
在某些使用情境中,您可能需要對模型進行呼叫,並傳入與預設值不同的 安全性設定。若要這樣做,只要將 safety_settings 參數傳給 completion 或 acompletion 即可。範例如下:
依模型/請求設定
- SDK
- Proxy
response = completion(
    model="vertex_ai/gemini-2.5-pro",
    messages=[{"role": "user", "content": "write code for saying hi from LiteLLM"}]
    safety_settings=[
        {
            "category": "HARM_CATEGORY_HARASSMENT",
            "threshold": "BLOCK_NONE",
        },
        {
            "category": "HARM_CATEGORY_HATE_SPEECH",
            "threshold": "BLOCK_NONE",
        },
        {
            "category": "HARM_CATEGORY_SEXUALLY_EXPLICIT",
            "threshold": "BLOCK_NONE",
        },
        {
            "category": "HARM_CATEGORY_DANGEROUS_CONTENT",
            "threshold": "BLOCK_NONE",
        },
    ]
)
選項 1:在 config 中設定
model_list:
  - model_name: gemini-experimental
    litellm_params:
      model: vertex_ai/gemini-experimental
      vertex_project: litellm-epic
      vertex_location: us-central1
      safety_settings:
      - category: HARM_CATEGORY_HARASSMENT
        threshold: BLOCK_NONE
      - category: HARM_CATEGORY_HATE_SPEECH
        threshold: BLOCK_NONE
      - category: HARM_CATEGORY_SEXUALLY_EXPLICIT
        threshold: BLOCK_NONE
      - category: HARM_CATEGORY_DANGEROUS_CONTENT
        threshold: BLOCK_NONE
選項 2:在呼叫時設定
response = client.chat.completions.create(
    model="gemini-experimental",
    messages=[
        {
            "role": "user",
            "content": "Can you write exploits?",
        }
    ],
    max_tokens=8192,
    stream=False,
    temperature=0.0,

    extra_body={
        "safety_settings": [
            {
                "category": "HARM_CATEGORY_HARASSMENT",
                "threshold": "BLOCK_NONE",
            },
            {
                "category": "HARM_CATEGORY_HATE_SPEECH",
                "threshold": "BLOCK_NONE",
            },
            {
                "category": "HARM_CATEGORY_SEXUALLY_EXPLICIT",
                "threshold": "BLOCK_NONE",
            },
            {
                "category": "HARM_CATEGORY_DANGEROUS_CONTENT",
                "threshold": "BLOCK_NONE",
            },
        ],
    }
)
全域設定
- SDK
- Proxy
import litellm

litellm.set_verbose = True 👈 See RAW REQUEST/RESPONSE

litellm.vertex_ai_safety_settings = [
        {
            "category": "HARM_CATEGORY_HARASSMENT",
            "threshold": "BLOCK_NONE",
        },
        {
            "category": "HARM_CATEGORY_HATE_SPEECH",
            "threshold": "BLOCK_NONE",
        },
        {
            "category": "HARM_CATEGORY_SEXUALLY_EXPLICIT",
            "threshold": "BLOCK_NONE",
        },
        {
            "category": "HARM_CATEGORY_DANGEROUS_CONTENT",
            "threshold": "BLOCK_NONE",
        },
    ]
response = completion(
    model="vertex_ai/gemini-2.5-pro",
    messages=[{"role": "user", "content": "write code for saying hi from LiteLLM"}]
)
model_list:
  - model_name: gemini-experimental
    litellm_params:
      model: vertex_ai/gemini-experimental
      vertex_project: litellm-epic
      vertex_location: us-central1

litellm_settings:
    vertex_ai_safety_settings:
      - category: HARM_CATEGORY_HARASSMENT
        threshold: BLOCK_NONE
      - category: HARM_CATEGORY_HATE_SPEECH
        threshold: BLOCK_NONE
      - category: HARM_CATEGORY_SEXUALLY_EXPLICIT
        threshold: BLOCK_NONE
      - category: HARM_CATEGORY_DANGEROUS_CONTENT
        threshold: BLOCK_NONE
設定 Vertex Project 與 Vertex Location
所有使用 Vertex AI 的呼叫都需要以下參數:
- 您的 Project ID
import os, litellm

# set via env var
os.environ["VERTEXAI_PROJECT"] = "hardy-device-38811" # Your Project ID`

### OR ###

# set directly on module
litellm.vertex_project = "hardy-device-38811" # Your Project ID`
- 您的 Project Location
import os, litellm

# set via env var
os.environ["VERTEXAI_LOCATION"] = "us-central1 # Your Location

### OR ###

# set directly on module
litellm.vertex_location = "us-central1 # Your Location
Gemini Pro
| 模型名稱 | 函式呼叫 |
|---|---|
| gemini-2.5-pro | completion('gemini-2.5-pro', messages), completion('vertex_ai/gemini-2.5-pro', messages) |
| gemini-2.5-flash-preview-09-2025 | completion('gemini-2.5-flash-preview-09-2025', messages), completion('vertex_ai/gemini-2.5-flash-preview-09-2025', messages) |
| gemini-2.5-flash-lite-preview-09-2025 | completion('gemini-2.5-flash-lite-preview-09-2025', messages), completion('vertex_ai/gemini-2.5-flash-lite-preview-09-2025', messages) |
| gemini-3.1-flash-lite-preview | completion('gemini-3.1-flash-lite-preview', messages), completion('vertex_ai/gemini-3.1-flash-lite-preview', messages) |
PayGo / 優先成本追蹤
LiteLLM 會依據回應的 usageMetadata.trafficType,自動使用正確的定價層級追蹤 Vertex AI Gemini 模型的花費:
Vertex AI trafficType | LiteLLM service_tier | 套用的定價 |
|---|---|---|
ON_DEMAND_PRIORITY | priority | PayGo / 優先定價(input_cost_per_token_priority、output_cost_per_token_priority) |
ON_DEMAND | standard | 預設隨選定價 |
FLEX / BATCH | flex | 批次/flex 定價 |
當您使用 Vertex AI PayGo(隨選優先)或批次工作負載時,LiteLLM 會從回應中讀取 trafficType,並套用 model cost map 中每個 token 對應的成本。無需任何設定——標準與 PayGo 請求都能立即進行花費追蹤。
一般成本追蹤設定請參閱 Spend Tracking。
Private Service Connect (PSC) 端點
LiteLLM 支援部署到 Private Service Connect (PSC) 端點的 Vertex AI 模型,讓您可以為私有部署使用自訂的 api_base URL。
用法
from litellm import completion

# Use PSC endpoint with custom api_base
response = completion(
    model="vertex_ai/1234567890",  # Numeric endpoint ID
    messages=[{"role": "user", "content": "Hello!"}],
    api_base="http://10.96.32.8",  # Your PSC endpoint
    vertex_project="my-project-id",
    vertex_location="us-central1",
    use_psc_endpoint_format=True
)
主要功能:
- 同時支援數字型端點 ID 與自訂模型名稱
- 可搭配 completion 與 embedding 端點使用
- 自動建構完整 PSC URL:
{api_base}/v1/projects/{project}/locations/{location}/endpoints/{model}:{endpoint} - 與串流請求相容
設定
將 PSC 端點加入您的 config.yaml:
model_list:
  - model_name: psc-gemini
    litellm_params:
      model: vertex_ai/1234567890  # Numeric endpoint ID
      api_base: "http://10.96.32.8"  # Your PSC endpoint
      vertex_project: "my-project-id"
      vertex_location: "us-central1"
      vertex_credentials: "/path/to/service_account.json"
      use_psc_endpoint_format: True
  - model_name: psc-embedding
    litellm_params:
      model: vertex_ai/text-embedding-004
      api_base: "http://10.96.32.8"  # Your PSC endpoint
      vertex_project: "my-project-id"
      vertex_location: "us-central1"
      vertex_credentials: "/path/to/service_account.json"
      use_psc_endpoint_format: True
微調模型
您可以透過 LiteLLM 呼叫微調後的 Vertex AI Gemini 模型
| 屬性 | 詳細資訊 |
|---|---|
| 提供者路由 | vertex_ai/gemini/{MODEL_ID} |
| Vertex 文件 | Vertex AI - Fine-tuned Gemini Models |
| 支援的操作 | /chat/completions、/completions、/embeddings、/images |
若要使用遵循 /gemini 請求/回應格式的模型,只需將 model 參數設定為
model="vertex_ai/gemini/<your-finetuned-model>"
- LiteLLM Python SDK
- LiteLLM Proxy
import litellm
import os

## set ENV variables
os.environ["VERTEXAI_PROJECT"] = "hardy-device-38811"
os.environ["VERTEXAI_LOCATION"] = "us-central1"

response = litellm.completion(
  model="vertex_ai/gemini/<your-finetuned-model>",  # e.g. vertex_ai/gemini/4965075652664360960
  messages=[{ "content": "Hello, how are you?","role": "user"}],
)
- 將 Vertex 憑證加入您的環境變數
!gcloud auth application-default login
- 設定 config.yaml
- model_name: finetuned-gemini
  litellm_params:
    model: vertex_ai/gemini/<ENDPOINT_ID>
    vertex_project: <PROJECT_ID>
    vertex_location: <LOCATION>
- 測試看看!
- OpenAI Python SDK
- curl
from openai import OpenAI

client = OpenAI(
    api_key="your-litellm-key",
    base_url="http://0.0.0.0:4000"
)

response = client.chat.completions.create(
    model="finetuned-gemini",
    messages=[
        {"role": "user", "content": "hi"}
    ]
)
print(response)
curl --location 'https://0.0.0.0:4000/v1/chat/completions' \
--header 'Content-Type: application/json' \
--header 'Authorization: <LITELLM_KEY>' \
--data '{"model": "finetuned-gemini" ,"messages":[{"role": "user", "content":[{"type": "text", "text": "hi"}]}]}'
Gemini Pro Vision
| 模型名稱 | 函式呼叫 |
|---|---|
| gemini-2.5-pro-vision | completion('gemini-2.5-pro-vision', messages), completion('vertex_ai/gemini-2.5-pro-vision', messages) |
Gemini 1.5 Pro(以及 Vision)
| 模型名稱 | 函式呼叫 |
|---|---|
| gemini-1.5-pro | completion('gemini-1.5-pro', messages), completion('vertex_ai/gemini-1.5-pro', messages) |
| gemini-1.5-flash-preview-0514 | completion('gemini-1.5-flash-preview-0514', messages), completion('vertex_ai/gemini-1.5-flash-preview-0514', messages) |
| gemini-1.5-pro-preview-0514 | completion('gemini-1.5-pro-preview-0514', messages), completion('vertex_ai/gemini-1.5-pro-preview-0514', messages) |
使用 Gemini Pro Vision
以與 OpenAI gpt-4-vision 相同的輸入/輸出格式呼叫 gemini-2.5-pro-vision
LiteLLM 支援以下透過 url 傳入的圖片類型
- 具有 Cloud Storage URI 的圖片 - gs://cloud-samples-data/generative-ai/image/boats.jpeg
- 具有直接連結的圖片 - https://storage.googleapis.com/github-repo/img/gemini/intro/landmark3.jpg
- 具有 Cloud Storage URI 的影片 - https://storage.googleapis.com/github-repo/img/gemini/multimodality_usecases_overview/pixel8.mp4
- Base64 編碼的本機圖片
範例請求 - 圖片 URL
- 具有直接連結的圖片
- 本機 Base64 圖片
import litellm

response = litellm.completion(
  model = "vertex_ai/gemini-2.5-pro-vision",
  messages=[
      {
          "role": "user",
          "content": [
                          {
                              "type": "text",
                              "text": "Whats in this image?"
                          },
                          {
                              "type": "image_url",
                              "image_url": {
                              "url": "https://awsmp-logos.s3.amazonaws.com/seller-xw5kijmvmzasy/c233c9ade2ccb5491072ae232c814942.png"
                              }
                          }
                      ]
      }
  ],
)
print(response)
import litellm

def encode_image(image_path):
    import base64

    with open(image_path, "rb") as image_file:
        return base64.b64encode(image_file.read()).decode("utf-8")

image_path = "cached_logo.jpg"
# Getting the base64 string
base64_image = encode_image(image_path)
response = litellm.completion(
    model="vertex_ai/gemini-2.5-pro-vision",
    messages=[
        {
            "role": "user",
            "content": [
                {"type": "text", "text": "Whats in this image?"},
                {
                    "type": "image_url",
                    "image_url": {
                        "url": "data:image/jpeg;base64," + base64_image
                    },
                },
            ],
        }
    ],
)
print(response)
用法 - Function Calling
LiteLLM 支援 Vertex AI gemini 模型的 Function Calling。
from litellm import completion
import os
# set env
os.environ["GOOGLE_APPLICATION_CREDENTIALS"] = ".."
os.environ["VERTEX_AI_PROJECT"] = ".."
os.environ["VERTEX_AI_LOCATION"] = ".."

tools = [
    {
        "type": "function",
        "function": {
            "name": "get_current_weather",
            "description": "Get the current weather in a given location",
            "parameters": {
                "type": "object",
                "properties": {
                    "location": {
                        "type": "string",
                        "description": "The city and state, e.g. San Francisco, CA",
                    },
                    "unit": {"type": "string", "enum": ["celsius", "fahrenheit"]},
                },
                "required": ["location"],
            },
        },
    }
]
messages = [{"role": "user", "content": "What's the weather like in Boston today?"}]

response = completion(
    model="vertex_ai/gemini-2.5-pro-vision",
    messages=messages,
    tools=tools,
)
# Add any assertions, here to check response args
print(response)
assert isinstance(response.choices[0].message.tool_calls[0].function.name, str)
assert isinstance(
    response.choices[0].message.tool_calls[0].function.arguments, str
)
媒體解析度控制(圖片與影片)
LiteLLM 支援對所有 Gemini 模型使用 OpenAI 的 detail 參數,對每個部分進行媒體解析度控制。這讓您可以在請求中為個別圖片與影片指定不同的解析度等級,無論是使用 image_url 或 file 內容類型。
支援的 detail 值:
"low"- 對應至media_resolution: "low"(圖片 280 個 token,影片每個 frame 70 個 token)"medium"- 對應至media_resolution: "medium""high"- 對應至media_resolution: "high"(圖片 1120 個 token)"ultra_high"- 對應至media_resolution: "ultra_high""auto"或None- 模型決定最佳解析度(未設定media_resolution)
使用範例:
- 圖片
- 含檔案的影片
from litellm import completion

messages = [
    {
        "role": "user",
        "content": [
            {
                "type": "image_url",
                "image_url": {
                    "url": "https://example.com/chart.png",
                    "detail": "high"  # High resolution for detailed chart analysis
                }
            },
            {
                "type": "text",
                "text": "Analyze this chart"
            },
            {
                "type": "image_url",
                "image_url": {
                    "url": "https://example.com/icon.png",
                    "detail": "low"  # Low resolution for simple icon
                }
            }
        ]
    }
]

response = completion(
    model="vertex_ai/gemini-3-pro-preview",
    messages=messages,
)
from litellm import completion

messages = [
    {
        "role": "user",
        "content": [
            {
                "type": "text",
                "text": "Analyze this video"
            },
            {
                "type": "file",
                "file": {
                    "file_id": "gs://my-bucket/video.mp4",
                    "format": "video/mp4",
                    "detail": "high"  # High resolution for detailed video analysis
                }
            }
        ]
    }
]

response = completion(
    model="vertex_ai/gemini-3-pro-preview",
    messages=messages,
)
每個部分的解析度: 您請求中的每張圖片或影片都可以有自己的 detail 設定,允許混合解析度的請求(例如,高解析度圖表搭配低解析度圖示)。此功能可與所有 Gemini 模型的 image_url 與 file 內容類型搭配使用。
影片中繼資料控制
LiteLLM 透過所有 Gemini 模型(1.x、2.x、3+)的 video_metadata 欄位,支援細緻的影片處理控制。這讓您可以為影片分析指定影格擷取速率與時間範圍。
支援的 video_metadata 參數:
| 參數 | 類型 | 描述 | 範例 |
|---|---|---|---|
fps | Number | 影格擷取速率(每秒影格數) | 5 |
start_offset | String | 影片剪輯處理的開始時間 | "10s" |
end_offset | String | 影片剪輯處理的結束時間 | "60s" |
欄位名稱轉換: LiteLLM 會自動將 snake_case 欄位名稱轉換為 Gemini API 使用的 camelCase:
start_offset→startOffsetend_offset→endOffsetfps保持不變
所有 Gemini 模型都支援影片剪輯(start_offset/end_offset)與影格速率控制(fps),但使用 Gemini 2.5 系列(例如,gemini-2.5-flash、gemini-2.5-pro)時,分析品質明顯更高。
- 建議使用影片檔案: 雖然
video_metadata是為影片檔案設計,但其他媒體類型的錯誤處理由 Vertex AI API 負責 - 支援的檔案格式: 可搭配
gs://、https://與 base64 編碼的影片檔案使用
使用範例:
- 基本影片中繼資料
- 結合細節
- PROXY
from litellm import completion

response = completion(
    model="vertex_ai/gemini-3-pro-preview",
    messages=[
        {
            "role": "user",
            "content": [
                {"type": "text", "text": "Analyze this video clip"},
                {
                    "type": "file",
                    "file": {
                        "file_id": "gs://my-bucket/video.mp4",
                        "format": "video/mp4",
                        "video_metadata": {
                            "fps": 5,               # Extract 5 frames per second
                            "start_offset": "10s",  # Start from 10 seconds
                            "end_offset": "60s"     # End at 60 seconds
                        }
                    }
                }
            ]
        }
    ]
)

print(response.choices[0].message.content)
from litellm import completion

response = completion(
    model="vertex_ai/gemini-3-pro-preview",
    messages=[
        {
            "role": "user",
            "content": [
                {"type": "text", "text": "Provide detailed analysis of this video segment"},
                {
                    "type": "file",
                    "file": {
                        "file_id": "https://example.com/presentation.mp4",
                        "format": "video/mp4",
                        "detail": "high",  # High resolution for detailed analysis
                        "video_metadata": {
                            "fps": 10,              # Extract 10 frames per second
                            "start_offset": "30s",  # Start from 30 seconds
                            "end_offset": "90s"     # End at 90 seconds
                        }
                    }
                }
            ]
        }
    ]
)

print(response.choices[0].message.content)
- 設定 config.yaml
model_list:
  - model_name: gemini-3-pro
    litellm_params:
      model: vertex_ai/gemini-3-pro-preview
      vertex_project: your-project
      vertex_location: us-central1
- 啟動 proxy
litellm --config /path/to/config.yaml
- 發出請求
curl http://0.0.0.0:4000/v1/chat/completions \
  -H "Content-Type: application/json" \
  -H "Authorization: Bearer <YOUR-LITELLM-KEY>" \
  -d '{
    "model": "gemini-3-pro",
    "messages": [
      {
        "role": "user",
        "content": [
          {"type": "text", "text": "Analyze this video clip"},
          {
            "type": "file",
            "file": {
              "file_id": "gs://my-bucket/video.mp4",
              "format": "video/mp4",
              "detail": "high",
              "video_metadata": {
                "fps": 5,
                "start_offset": "10s",
                "end_offset": "60s"
              }
            }
          }
        ]
      }
    ]
  }'
使用 - PDF / 影片 / 音訊等檔案
透過 LiteLLM 傳入 Vertex AI 支援的任何檔案。
LiteLLM 支援以下透過 URL 傳入的檔案類型。
自 v1.65.1+ 起,VertexAI 可使用 file 訊息類型
Files with Cloud Storage URIs - gs://cloud-samples-data/generative-ai/image/boats.jpeg
Files with direct links - https://storage.googleapis.com/github-repo/img/gemini/intro/landmark3.jpg
Videos with Cloud Storage URIs - https://storage.googleapis.com/github-repo/img/gemini/multimodality_usecases_overview/pixel8.mp4
Base64 Encoded Local Files
- SDK
- PROXY
使用 gs:// 或任何 URL
from litellm import completion

response = completion(
    model="vertex_ai/gemini-1.5-flash",
    messages=[
        {
            "role": "user",
            "content": [
                {"type": "text", "text": "You are a very professional document summarization specialist. Please summarize the given document."},
                {
                    "type": "file",
                    "file": {
                        "file_id": "gs://cloud-samples-data/generative-ai/pdf/2403.05530.pdf",
                        "format": "application/pdf" # OPTIONAL - specify mime-type
                    }
                },
            ],
        }
    ],
    max_tokens=300,
)

print(response.choices[0])
使用 base64
from litellm import completion
import base64
import requests

# URL of the file
url = "https://storage.googleapis.com/cloud-samples-data/generative-ai/pdf/2403.05530.pdf"

# Download the file
response = requests.get(url)
file_data = response.content

encoded_file = base64.b64encode(file_data).decode("utf-8")

response = completion(
    model="vertex_ai/gemini-1.5-flash",
    messages=[
        {
            "role": "user",
            "content": [
                {"type": "text", "text": "You are a very professional document summarization specialist. Please summarize the given document."},
                {
                    "type": "file",
                    "file": {
                        "file_data": f"data:application/pdf;base64,{encoded_file}", # 👈 PDF
                    }
                },
                {
                    "type": "audio_input",
                    "audio_input {
                        "audio_input": f"data:audio/mp3;base64,{encoded_file}", # 👈 AUDIO File ('file' message works as too)
                    }
                },
            ],
        }
    ],
    max_tokens=300,
)

print(response.choices[0])
- 將模型加入設定
- model_name: gemini-1.5-flash
  litellm_params:
    model: vertex_ai/gemini-1.5-flash
    vertex_credentials: "/path/to/service_account.json"
- 啟動 Proxy
litellm --config /path/to/config.yaml
- 測試!
使用 gs://
curl http://0.0.0.0:4000/v1/chat/completions \
  -H "Content-Type: application/json" \
  -H "Authorization: Bearer <YOUR-LITELLM-KEY>" \
  -d '{
    "model": "gemini-1.5-flash",
    "messages": [
      {
        "role": "user",
        "content": [
          {
            "type": "text",
            "text": "You are a very professional document summarization specialist. Please summarize the given document"
          },
          {
                "type": "file",
                "file": {
                    "file_id": "gs://cloud-samples-data/generative-ai/pdf/2403.05530.pdf",
                    "format": "application/pdf" # OPTIONAL
                }
            }
          }
        ]
      }
    ],
    "max_tokens": 300
  }'
curl http://0.0.0.0:4000/v1/chat/completions \
  -H "Content-Type: application/json" \
  -H "Authorization: Bearer <YOUR-LITELLM-KEY>" \
  -d '{
    "model": "gemini-1.5-flash",
    "messages": [
      {
        "role": "user",
        "content": [
          {
            "type": "text",
            "text": "You are a very professional document summarization specialist. Please summarize the given document"
          },
          {
                "type": "file",
                "file": {
                    "file_data": f"data:application/pdf;base64,{encoded_file}", # 👈 PDF
                },
            },
            {
                "type": "audio_input",
                "audio_input {
                    "audio_input": f"data:audio/mp3;base64,{encoded_file}", # 👈 AUDIO File ('file' message works as too)
                }
            },
    ]
      }
    ],
    "max_tokens": 300
  }'
聊天模型
| 模型名稱 | 函式呼叫 |
|---|---|
| chat-bison-32k | completion('chat-bison-32k', messages) |
| chat-bison | completion('chat-bison', messages) |
| chat-bison@001 | completion('chat-bison@001', messages) |
程式碼聊天模型
| 模型名稱 | 函式呼叫 |
|---|---|
| codechat-bison | completion('codechat-bison', messages) |
| codechat-bison-32k | completion('codechat-bison-32k', messages) |
| codechat-bison@001 | completion('codechat-bison@001', messages) |
文字模型
| 模型名稱 | 函式呼叫 |
|---|---|
| text-bison | completion('text-bison', messages) |
| text-bison@001 | completion('text-bison@001', messages) |
程式碼文字模型
| 模型名稱 | 函式呼叫 |
|---|---|
| code-bison | completion('code-bison', messages) |
| code-bison@001 | completion('code-bison@001', messages) |
| code-gecko@001 | completion('code-gecko@001', messages) |
| code-gecko@latest | completion('code-gecko@latest', messages) |
嵌入模型
使用 - 嵌入
- SDK
- LiteLLM PROXY
import litellm
from litellm import embedding
litellm.vertex_project = "hardy-device-38811" # Your Project ID
litellm.vertex_location = "us-central1"  # proj location

response = embedding(
    model="vertex_ai/textembedding-gecko",
    input=["good morning from litellm"],
)
print(response)
- 將模型加入 config.yaml
model_list:
  - model_name: snowflake-arctic-embed-m-long-1731622468876
    litellm_params:
      model: vertex_ai/<your-model-id>
      vertex_project: "adroit-crow-413218"
      vertex_location: "us-central1"
      vertex_credentials: adroit-crow-413218-a956eef1a2a8.json

litellm_settings:
  drop_params: True
- 啟動 Proxy
$ litellm --config /path/to/config.yaml
- 使用 OpenAI Python SDK、Langchain Python SDK 發出請求
import openai

client = openai.OpenAI(api_key="sk-1234", base_url="http://0.0.0.0:4000")

response = client.embeddings.create(
    model="snowflake-arctic-embed-m-long-1731622468876",
    input = ["good morning from litellm", "this is another item"],
)

print(response)
支援的嵌入模型
這裡 列出的所有模型都受支援
| 模型名稱 | 函式呼叫 |
|---|---|
| text-embedding-004 | embedding(model="vertex_ai/text-embedding-004", input) |
| text-multilingual-embedding-002 | embedding(model="vertex_ai/text-multilingual-embedding-002", input) |
| textembedding-gecko | embedding(model="vertex_ai/textembedding-gecko", input) |
| textembedding-gecko-multilingual | embedding(model="vertex_ai/textembedding-gecko-multilingual", input) |
| textembedding-gecko-multilingual@001 | embedding(model="vertex_ai/textembedding-gecko-multilingual@001", input) |
| textembedding-gecko@001 | embedding(model="vertex_ai/textembedding-gecko@001", input) |
| textembedding-gecko@003 | embedding(model="vertex_ai/textembedding-gecko@003", input) |
| text-embedding-preview-0409 | embedding(model="vertex_ai/text-embedding-preview-0409", input) |
| text-multilingual-embedding-preview-0409 | embedding(model="vertex_ai/text-multilingual-embedding-preview-0409", input) |
| 微調或自訂嵌入模型 | embedding(model="vertex_ai/<your-model-id>", input) |
支援的 OpenAI(Unified)參數
| 參數 | 型別 | vertex 對應項 |
|---|---|---|
input | string 或 List[string] | instances |
dimensions | int | output_dimensionality |
input_type | Literal["RETRIEVAL_QUERY","RETRIEVAL_DOCUMENT", "SEMANTIC_SIMILARITY", "CLASSIFICATION", "CLUSTERING", "QUESTION_ANSWERING", "FACT_VERIFICATION"] | task_type |
使用 OpenAI(Unified)參數
- SDK
- LiteLLM PROXY
response = litellm.embedding(
    model="vertex_ai/text-embedding-004",
    input=["good morning from litellm", "gm"]
    input_type = "RETRIEVAL_DOCUMENT",
    dimensions=1,
)
import openai

client = openai.OpenAI(api_key="sk-1234", base_url="http://0.0.0.0:4000")

response = client.embeddings.create(
    model="text-embedding-004",
    input = ["good morning from litellm", "gm"],
    dimensions=1,
    extra_body = {
        "input_type": "RETRIEVAL_QUERY",
    }
)

print(response)
支援的 Vertex 特定參數
| 參數 | 型別 |
|---|---|
auto_truncate | bool |
task_type | Literal["RETRIEVAL_QUERY","RETRIEVAL_DOCUMENT", "SEMANTIC_SIMILARITY", "CLASSIFICATION", "CLUSTERING", "QUESTION_ANSWERING", "FACT_VERIFICATION"] |
title | str |
使用 Vertex 特定參數(使用 task_type 和 title)
您可以將任何 Vertex 特定參數傳給嵌入模型。只要像這樣將它們傳給 embedding 函式:
- SDK
- LiteLLM PROXY
response = litellm.embedding(
    model="vertex_ai/text-embedding-004",
    input=["good morning from litellm", "gm"]
    task_type = "RETRIEVAL_DOCUMENT",
    title = "test",
    dimensions=1,
    auto_truncate=True,
)
import openai

client = openai.OpenAI(api_key="sk-1234", base_url="http://0.0.0.0:4000")

response = client.embeddings.create(
    model="text-embedding-004",
    input = ["good morning from litellm", "gm"],
    dimensions=1,
    extra_body = {
        "task_type": "RETRIEVAL_QUERY",
        "auto_truncate": True,
        "title": "test",
    }
)

print(response)
多模態嵌入
已知限制:
- 每個請求只支援 1 張圖片 / 影片 / 圖片
- 僅支援 GCS 或 base64 編碼的圖片 / 影片
使用
- SDK
- LiteLLM PROXY (Unified Endpoint)
- LiteLLM PROXY (Vertex SDK)
使用 GCS 圖片
response = await litellm.aembedding(
    model="vertex_ai/multimodalembedding@001",
    input="gs://cloud-samples-data/vertex-ai/llm/prompts/landmark1.png" # will be sent as a gcs image
)
使用 base 64 編碼圖片
response = await litellm.aembedding(
    model="vertex_ai/multimodalembedding@001",
    input="data:image/jpeg;base64,..." # will be sent as a base64 encoded image
)
- 將模型加入 config.yaml
model_list:
  - model_name: multimodalembedding@001
    litellm_params:
      model: vertex_ai/multimodalembedding@001
      vertex_project: "adroit-crow-413218"
      vertex_location: "us-central1"
      vertex_credentials: adroit-crow-413218-a956eef1a2a8.json

litellm_settings:
  drop_params: True
- 啟動 Proxy
$ litellm --config /path/to/config.yaml
- 使用 OpenAI Python SDK、Langchain Python SDK 發出請求
- OpenAI SDK
- Langchain
使用 GCS 圖片 / 影片 URI 的請求
import openai

client = openai.OpenAI(api_key="sk-1234", base_url="http://0.0.0.0:4000")

# # request sent to model set on litellm proxy, `litellm --model`
response = client.embeddings.create(
    model="multimodalembedding@001",
    input = "gs://cloud-samples-data/vertex-ai/llm/prompts/landmark1.png",
)

print(response)
使用 base64 編碼圖片的請求
import openai

client = openai.OpenAI(api_key="sk-1234", base_url="http://0.0.0.0:4000")

# # request sent to model set on litellm proxy, `litellm --model`
response = client.embeddings.create(
    model="multimodalembedding@001",
    input = "data:image/jpeg;base64,...",
)

print(response)
使用 GCS 圖片 / 影片 URI 的請求
from langchain_openai import OpenAIEmbeddings

embeddings_models = "multimodalembedding@001"

embeddings = OpenAIEmbeddings(
    model="multimodalembedding@001",
    base_url="http://0.0.0.0:4000",
    api_key="sk-1234",  # type: ignore
)


query_result = embeddings.embed_query(
    "gs://cloud-samples-data/vertex-ai/llm/prompts/landmark1.png"
)
print(query_result)
使用 base64 編碼圖片的請求
from langchain_openai import OpenAIEmbeddings

embeddings_models = "multimodalembedding@001"

embeddings = OpenAIEmbeddings(
    model="multimodalembedding@001",
    base_url="http://0.0.0.0:4000",
    api_key="sk-1234",  # type: ignore
)


query_result = embeddings.embed_query(
    "data:image/jpeg;base64,..."
)
print(query_result)
- 將模型加入 config.yaml
default_vertex_config:
  vertex_project: "adroit-crow-413218"
  vertex_location: "us-central1"
  vertex_credentials: adroit-crow-413218-a956eef1a2a8.json
- 啟動 Proxy
$ litellm --config /path/to/config.yaml
- 使用 OpenAI Python SDK 發出請求
import vertexai

from vertexai.vision_models import Image, MultiModalEmbeddingModel, Video
from vertexai.vision_models import VideoSegmentConfig
from google.auth.credentials import Credentials


LITELLM_PROXY_API_KEY = "sk-1234"
LITELLM_PROXY_BASE = "http://0.0.0.0:4000/vertex-ai"

import datetime

class CredentialsWrapper(Credentials):
    def __init__(self, token=None):
        super().__init__()
        self.token = token
        self.expiry = None  # or set to a future date if needed

    def refresh(self, request):
        pass

    def apply(self, headers, token=None):
        headers['Authorization'] = f'Bearer {self.token}'

    @property
    def expired(self):
        return False  # Always consider the token as non-expired

    @property
    def valid(self):
        return True  # Always consider the credentials as valid

credentials = CredentialsWrapper(token=LITELLM_PROXY_API_KEY)

vertexai.init(
    project="adroit-crow-413218",
    location="us-central1",
    api_endpoint=LITELLM_PROXY_BASE,
    credentials = credentials,
    api_transport="rest",

)

model = MultiModalEmbeddingModel.from_pretrained("multimodalembedding")
image = Image.load_from_file(
    "gs://cloud-samples-data/vertex-ai/llm/prompts/landmark1.png"
)

embeddings = model.get_embeddings(
    image=image,
    contextual_text="Colosseum",
    dimension=1408,
)
print(f"Image Embedding: {embeddings.image_embedding}")
print(f"Text Embedding: {embeddings.text_embedding}")
文字 + 圖片 + 影片嵌入
- SDK
- LiteLLM PROXY (Unified Endpoint)
文字 + 圖片
response = await litellm.aembedding(
    model="vertex_ai/multimodalembedding@001",
    input=["hey", "gs://cloud-samples-data/vertex-ai/llm/prompts/landmark1.png"] # will be sent as a gcs image
)
文字 + 影片
response = await litellm.aembedding(
    model="vertex_ai/multimodalembedding@001",
    input=["hey", "gs://my-bucket/embeddings/supermarket-video.mp4"] # will be sent as a gcs image
)
圖片 + 影片
response = await litellm.aembedding(
    model="vertex_ai/multimodalembedding@001",
    input=["gs://cloud-samples-data/vertex-ai/llm/prompts/landmark1.png", "gs://my-bucket/embeddings/supermarket-video.mp4"] # will be sent as a gcs image
)
- 將模型加入 config.yaml
model_list:
  - model_name: multimodalembedding@001
    litellm_params:
      model: vertex_ai/multimodalembedding@001
      vertex_project: "adroit-crow-413218"
      vertex_location: "us-central1"
      vertex_credentials: adroit-crow-413218-a956eef1a2a8.json

litellm_settings:
  drop_params: True
- 啟動 Proxy
$ litellm --config /path/to/config.yaml
- 使用 OpenAI Python SDK、Langchain Python SDK 發出請求
文字 + 圖片
import openai

client = openai.OpenAI(api_key="sk-1234", base_url="http://0.0.0.0:4000")

# # request sent to model set on litellm proxy, `litellm --model`
response = client.embeddings.create(
    model="multimodalembedding@001",
    input = ["hey", "gs://cloud-samples-data/vertex-ai/llm/prompts/landmark1.png"],
)

print(response)
文字 + 影片
import openai

client = openai.OpenAI(api_key="sk-1234", base_url="http://0.0.0.0:4000")

# # request sent to model set on litellm proxy, `litellm --model`
response = client.embeddings.create(
    model="multimodalembedding@001",
    input = ["hey", "gs://my-bucket/embeddings/supermarket-video.mp4"],
)

print(response)
圖片 + 影片
import openai

client = openai.OpenAI(api_key="sk-1234", base_url="http://0.0.0.0:4000")

# # request sent to model set on litellm proxy, `litellm --model`
response = client.embeddings.create(
    model="multimodalembedding@001",
    input = ["gs://cloud-samples-data/vertex-ai/llm/prompts/landmark1.png", "gs://my-bucket/embeddings/supermarket-video.mp4"],
)

print(response)
微調 API
| 屬性 | 詳細資料 |
|---|---|
| 說明 | 使用 OpenAI Python SDK 在 Vertex AI(/tuningJobs)中建立微調工作 |
| Vertex 微調文件 | Vertex Fine Tuning |
使用
1. 將 finetune_settings 加入您的 config.yaml
model_list:
  - model_name: gpt-4
    litellm_params:
      model: openai/fake
      api_key: fake-key
      api_base: https://exampleopenaiendpoint-production.up.railway.app/

# 👇 Key change: For /fine_tuning/jobs endpoints
finetune_settings:
  - custom_llm_provider: "vertex_ai"
    vertex_project: "adroit-crow-413218"
    vertex_location: "us-central1"
    vertex_credentials: "/Users/ishaanjaffer/Downloads/adroit-crow-413218-a956eef1a2a8.json"
2. 建立微調工作
- OpenAI Python SDK
- curl
ft_job = await client.fine_tuning.jobs.create(
    model="gemini-1.0-pro-002",                  # Vertex model you want to fine-tune
    training_file="gs://cloud-samples-data/ai-platform/generative_ai/sft_train_data.jsonl",                 # file_id from create file response
    extra_headers={"custom-llm-provider": "vertex_ai"}, # tell litellm proxy which provider to use
)
curl http://localhost:4000/v1/fine_tuning/jobs \
    -H "Content-Type: application/json" \
    -H "Authorization: Bearer sk-1234" \
    -H "custom-llm-provider: vertex_ai" \
    -d '{
    "model": "gemini-1.0-pro-002",
    "training_file": "gs://cloud-samples-data/ai-platform/generative_ai/sft_train_data.jsonl"
    }'
進階使用情境 - 將 adapter_size 傳給 Vertex AI API
設定 hyper_parameters,例如 n_epochs、learning_rate_multiplier 和 adapter_size。請參閱 Vertex 進階超參數
- OpenAI Python SDK
- curl
ft_job = client.fine_tuning.jobs.create(
    model="gemini-1.0-pro-002",                  # Vertex model you want to fine-tune
    training_file="gs://cloud-samples-data/ai-platform/generative_ai/sft_train_data.jsonl",                 # file_id from create file response
    hyperparameters={
        "n_epochs": 3,                      # epoch_count on Vertex
        "learning_rate_multiplier": 0.1,    # learning_rate_multiplier on Vertex
        "adapter_size": "ADAPTER_SIZE_ONE"  # type: ignore, vertex specific hyperparameter
    },
    extra_headers={"custom-llm-provider": "vertex_ai"},
)
curl http://localhost:4000/v1/fine_tuning/jobs \
    -H "Content-Type: application/json" \
    -H "Authorization: Bearer sk-1234" \
    -H "custom-llm-provider: vertex_ai" \
    -d '{
    "model": "gemini-1.0-pro-002",
    "training_file": "gs://cloud-samples-data/ai-platform/generative_ai/sft_train_data.jsonl",
    "hyperparameters": {
        "n_epochs": 3,
        "learning_rate_multiplier": 0.1,
        "adapter_size": "ADAPTER_SIZE_ONE"
    }
    }'
標籤
Google 讓您可以將自訂中繼資料新增至其 generateContent 和 streamGenerateContent 呼叫。
這個機制在 Vertex AI 中很有用,因為它允許跨多個
不同應用程式或使用者進行成本與使用量追蹤。
使用
您可以透過在請求中傳送 labels 或 metadata 欄位來透過 LiteLLM 使用該功能。
如果用戶端在請求中將 labels 欄位設定給 LiteLLM,
LiteLLM 會將 labels 欄位傳遞給 Vertex AI 後端。
如果用戶端在請求中將 metadata 欄位設定給 LiteLLM,且未設定 labels 欄位,
LiteLLM 會建立填入所有字串值之 labels 欄位,內容為 metadata 鍵/值配對,並
將其傳遞給 Vertex AI 後端。
以下是示範標籤用法的 JSON 請求:
{
    "model": "gemini-2.0-flash-lite",
    "messages": [
        { "role": "user", "content": "respond in 20 words. who are you?" }
    ],
    "labels": {
        "client_app": "acme_comp_financial_app",
        "department": "finance",
        "project": "acme_ai"
    }
}
其他
使用 GOOGLE_APPLICATION_CREDENTIALS
以下是將您的服務帳戶憑證儲存為 GOOGLE_APPLICATION_CREDENTIALS 環境變數的程式碼:
import os
import tempfile

def load_vertex_ai_credentials():
  # Define the path to the vertex_key.json file
  print("loading vertex ai credentials")
  filepath = os.path.dirname(os.path.abspath(__file__))
  vertex_key_path = filepath + "/vertex_key.json"

  # Read the existing content of the file or create an empty dictionary
  try:
      with open(vertex_key_path, "r") as file:
          # Read the file content
          print("Read vertexai file path")
          content = file.read()

          # If the file is empty or not valid JSON, create an empty dictionary
          if not content or not content.strip():
              service_account_key_data = {}
          else:
              # Attempt to load the existing JSON content
              file.seek(0)
              service_account_key_data = json.load(file)
  except FileNotFoundError:
      # If the file doesn't exist, create an empty dictionary
      service_account_key_data = {}

  # Create a temporary file
  with tempfile.NamedTemporaryFile(mode="w+", delete=False) as temp_file:
      # Write the updated content to the temporary file
      json.dump(service_account_key_data, temp_file, indent=2)

  # Export the temporary file as GOOGLE_APPLICATION_CREDENTIALS
  os.environ["GOOGLE_APPLICATION_CREDENTIALS"] = os.path.abspath(temp_file.name)
使用 GCP 服務帳戶
想在 Google Cloud Run 上部署 LiteLLM?教學 這裡
- 找出與 Google Cloud Run 服務繫結的服務帳戶
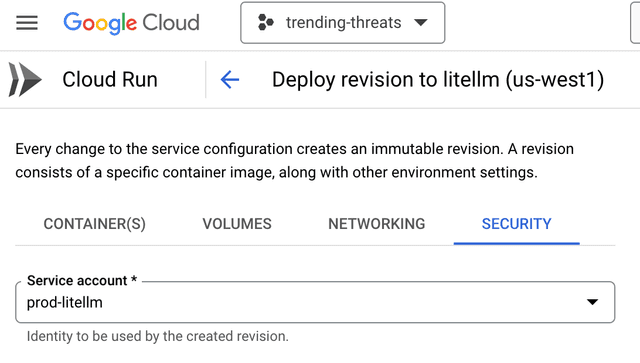
-
取得對應服務帳戶的完整電子郵件地址
-
接著,前往 IAM & Admin > Manage Resources,選取承載您 Google Cloud Run 服務的頂層專案
點擊 Add Principal
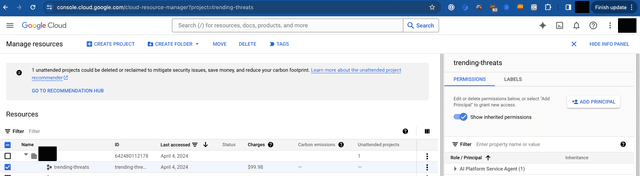
- 將服務帳戶指定為 principal,並將 Vertex AI User 指定為角色
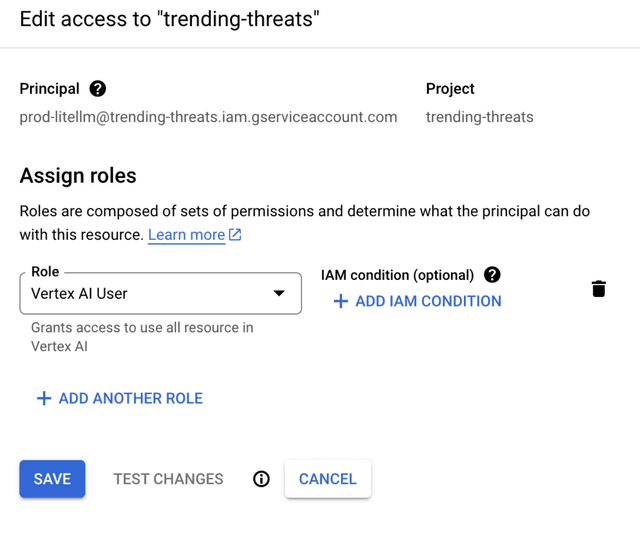
完成後,當您在 Google Cloud Run 服務中部署新的容器時,LiteLLM 將可自動存取所有 Vertex AI 端點。
感謝 @Darien Kindlund 提供這份教學
Rerank API
Vertex AI 透過 Discovery Engine API 支援重新排序,為文件檢索提供語意排序功能。
設定
設定您的 Google Cloud 專案 ID:
export VERTEXAI_PROJECT="your-project-id"
用法
from litellm import rerank

# Using the latest model (recommended)
response = rerank(
    model="vertex_ai/semantic-ranker-default@latest",
    query="What is Google Gemini?",
    documents=[
        "Gemini is a cutting edge large language model created by Google.",
        "The Gemini zodiac symbol often depicts two figures standing side-by-side.",
        "Gemini is a constellation that can be seen in the night sky."
    ],
    top_n=2,
    return_documents=True  # Set to False for ID-only responses
)

# Using specific model versions
response_v003 = rerank(
    model="vertex_ai/semantic-ranker-default-003",
    query="What is Google Gemini?",
    documents=documents,
    top_n=2
)

print(response.results)
參數
| 參數 | 類型 | 說明 |
|---|---|---|
model | string | 模型名稱(例如:vertex_ai/semantic-ranker-default@latest) |
query | string | 搜尋查詢 |
documents | list | 要排序的文件 |
top_n | int | 要回傳的前幾筆結果數量 |
return_documents | bool | 回傳完整內容(True)或僅回傳 ID(False) |
支援的模型
semantic-ranker-default@latestsemantic-ranker-fast@latestsemantic-ranker-default-003semantic-ranker-default-002
如需詳細的模型規格,請參閱 Google Cloud ranking API 文件。
Proxy 用法
加入到您的 config.yaml:
model_list:
  - model_name: semantic-ranker-default@latest
    litellm_params:
      model: vertex_ai/semantic-ranker-default@latest
      vertex_ai_project: "your-project-id"
      vertex_ai_location: "us-central1"
      vertex_ai_credentials: "path/to/service-account.json"
啟動 proxy:
litellm --config /path/to/config.yaml
使用 curl 測試:
curl http://0.0.0.0:4000/rerank \
  -H "Authorization: Bearer sk-1234" \
  -H "Content-Type: application/json" \
  -d '{
    "model": "semantic-ranker-default@latest",
    "query": "What is Google Gemini?",
    "documents": [
      "Gemini is a cutting edge large language model created by Google.",
      "The Gemini zodiac symbol often depicts two figures standing side-by-side.",
      "Gemini is a constellation that can be seen in the night sky."
    ],
    "top_n": 2
  }'