AI Hub
與您的組織共享模型和代理程式。讓開發者能查看可用項目,而無需重新建置它們。
此功能自 v1.74.3-stable 及以上版本可用。
總覽
管理員可以選擇要在公開 AI Hub 上曝光的模型/代理程式 → 使用者前往公開網址並查看可用內容。
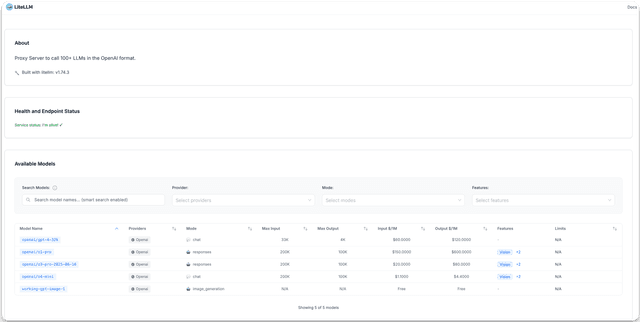
模型
使用方式
1. 前往 Admin UI
在 Admin UI 中前往 Model Hub 頁面(PROXY_BASE_URL/ui/?login=success&page=model-hub-table)
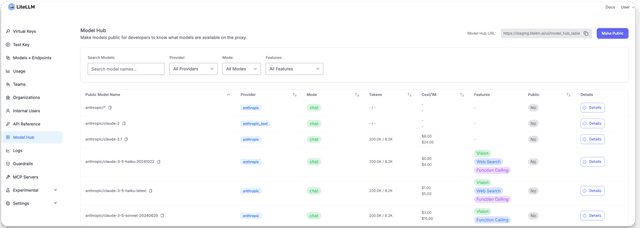
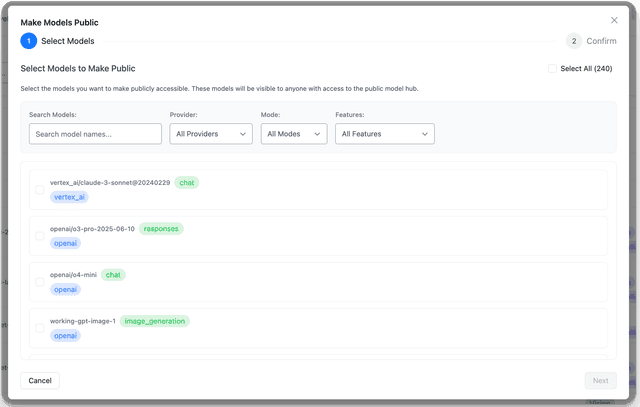
2. 選取您要曝光的模型
點擊 Select Models to Make Public 並選取您要曝光的模型。
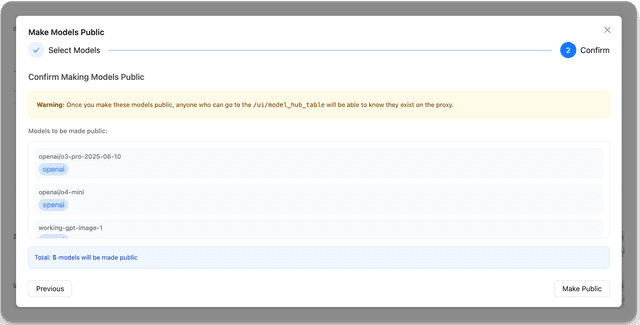
3. 確認變更
4. 成功!
前往公開網址(PROXY_BASE_URL/ui/model_hub_table)並查看可用模型。
API 端點
GET /public/model_hub– 回傳公開模型群組清單。需要有效的使用者 API 金鑰。GET /public/model_hub/info– 回傳公開模型 hub 的中繼資料(文件標題、版本、實用連結)。
代理程式
資訊
代理程式僅在 v1.79.4-stable 及以上版本可用。
在您的組織中共享預先建置的代理程式(A2A 規格)。使用者可以探索並使用代理程式,而無需重新建置。
1. 建立代理程式
建立一個符合 A2A 規格 的代理程式。
- UI
- API
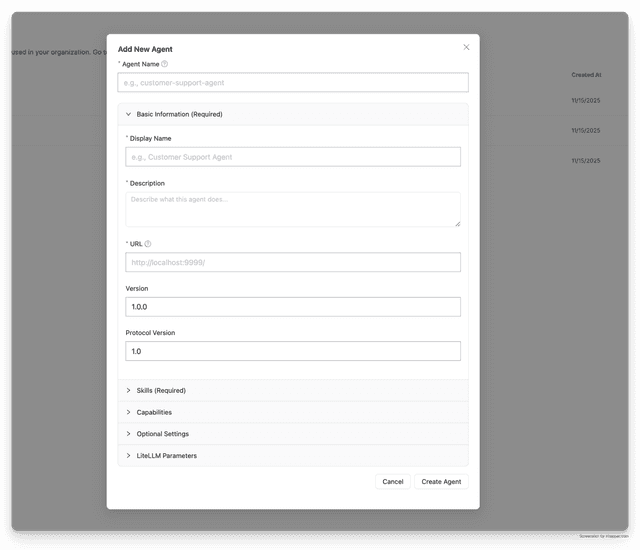
curl -X POST 'http://0.0.0.0:4000/v1/agents' \
--header 'Authorization: Bearer <your-master-key>' \
--header 'Content-Type: application/json' \
--data '{
  "agent_name": "hello-world-agent",
  "agent_card_params": {
    "protocolVersion": "1.0",
    "name": "Hello World Agent",
    "description": "Just a hello world agent",
    "url": "http://localhost:9999/",
    "version": "1.0.0",
    "defaultInputModes": ["text"],
    "defaultOutputModes": ["text"],
    "capabilities": {
      "streaming": true
    },
    "skills": [
      {
        "id": "hello_world",
        "name": "Returns hello world",
        "description": "just returns hello world",
        "tags": ["hello world"],
        "examples": ["hi", "hello world"]
      }
    ]
  }
}'
預期回應
{
  "agent_id": "123e4567-e89b-12d3-a456-426614174000",
  "agent_name": "hello-world-agent",
  "agent_card_params": {
    "protocolVersion": "1.0",
    "name": "Hello World Agent",
    "description": "Just a hello world agent",
    "url": "http://localhost:9999/",
    "version": "1.0.0",
    "defaultInputModes": ["text"],
    "defaultOutputModes": ["text"],
    "capabilities": {
      "streaming": true
    },
    "skills": [
      {
        "id": "hello_world",
        "name": "Returns hello world",
        "description": "just returns hello world",
        "tags": ["hello world"],
        "examples": ["hi", "hello world"]
      }
    ]
  },
  "created_at": "2025-11-15T10:30:00Z",
  "created_by": "user123"
}
2. 將代理程式設為公開
讓該代理程式可在 AI Hub 上被探索。
- UI
- API
前往 AI Hub 頁面的 Agents 分頁
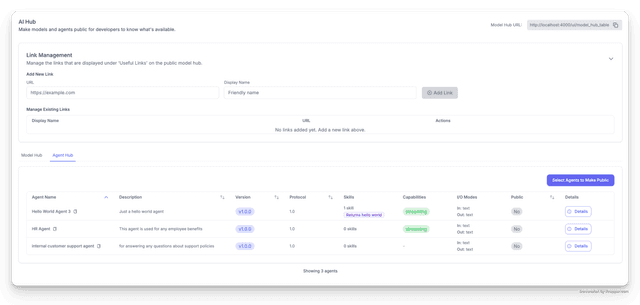
選取您要公開的代理程式,然後點擊 Make Public 按鈕。
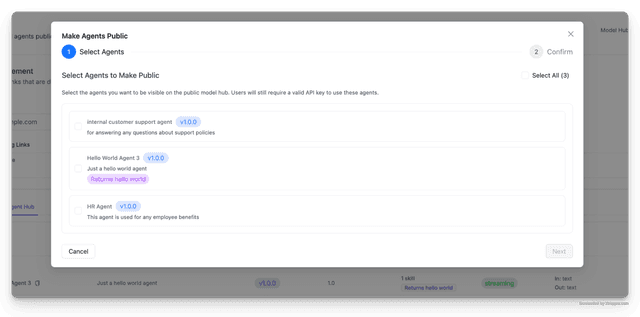
選項 1:將單一代理程式設為公開
curl -X POST 'http://0.0.0.0:4000/v1/agents/123e4567-e89b-12d3-a456-426614174000/make_public' \
--header 'Authorization: Bearer <your-master-key>' \
--header 'Content-Type: application/json'
選項 2:將多個代理程式設為公開
curl -X POST 'http://0.0.0.0:4000/v1/agents/make_public' \
--header 'Authorization: Bearer <your-master-key>' \
--header 'Content-Type: application/json' \
--data '{
  "agent_ids": [
    "123e4567-e89b-12d3-a456-426614174000",
    "123e4567-e89b-12d3-a456-426614174001"
  ]
}'
預期回應
{
  "message": "Successfully updated public agent groups",
  "public_agent_groups": [
    "123e4567-e89b-12d3-a456-426614174000"
  ],
  "updated_by": "user123"
}
3. 查看公開代理程式
使用者現在可以透過公開端點探索該代理程式。
- UI
- API
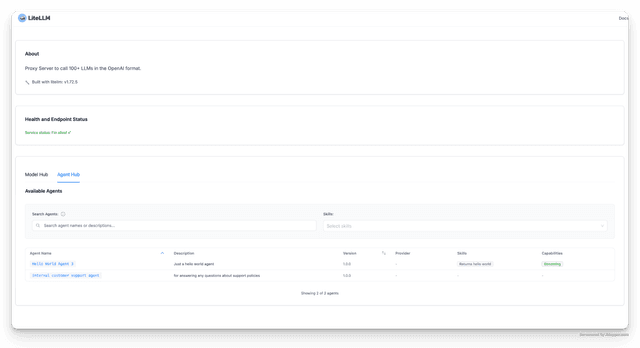
curl -X GET 'http://0.0.0.0:4000/public/agent_hub' \
--header 'Authorization: Bearer <user-api-key>'
預期回應
[
  {
    "protocolVersion": "1.0",
    "name": "Hello World Agent",
    "description": "Just a hello world agent",
    "url": "http://localhost:9999/",
    "version": "1.0.0",
    "defaultInputModes": ["text"],
    "defaultOutputModes": ["text"],
    "capabilities": {
      "streaming": true
    },
    "skills": [
      {
        "id": "hello_world",
        "name": "Returns hello world",
        "description": "just returns hello world",
        "tags": ["hello world"],
        "examples": ["hi", "hello world"]
      }
    ]
  }
]
MCP 伺服器
使用方式
1. 新增 MCP Server
請前往此處查看說明:MCP Overview
2. 將 MCP server 設為公開
- UI
- API
前往 AI Hub 頁面,並選取 MCP 分頁(PROXY_BASE_URL/ui/?login=success&page=mcp-server-table)
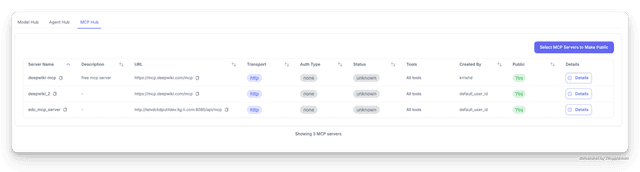
curl -L -X POST 'http://localhost:4000/v1/mcp/make_public' \
-H 'Authorization: Bearer sk-1234' \
-H 'Content-Type: application/json' \
-d '{"mcp_server_ids":["e856f9a3-abc6-45b1-9d06-62fa49ac293d"]}'
3. 查看公開 MCP servers
使用者現在可以透過公開端點(PROXY_BASE_URL/ui/model_hub_table)探索 MCP server
- UI
- API
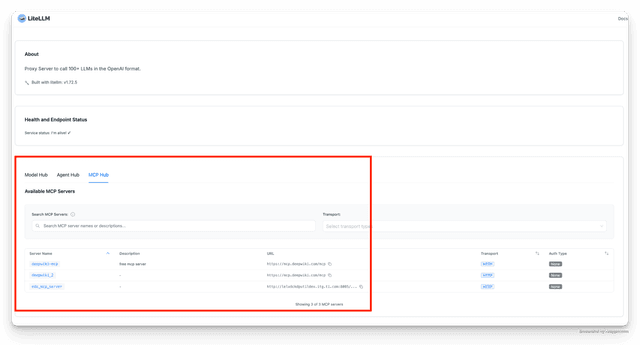
curl -L -X GET 'http://0.0.0.0:4000/public/mcp_hub' \
-H 'Authorization: Bearer sk-1234'
預期回應
[
    {
        "server_id": "e856f9a3-abc6-45b1-9d06-62fa49ac293d",
        "name": "deepwiki-mcp",
        "alias": null,
        "server_name": "deepwiki-mcp",
        "url": "https://mcp.deepwiki.com/mcp",
        "transport": "http",
        "spec_path": null,
        "auth_type": "none",
        "mcp_info": {
            "server_name": "deepwiki-mcp",
            "description": "free mcp server "
        }
    },
    {
        "server_id": "a634819f-3f93-4efc-9108-e49c5b83ad84",
        "name": "deepwiki_2",
        "alias": "deepwiki_2",
        "server_name": "deepwiki_2",
        "url": "https://mcp.deepwiki.com/mcp",
        "transport": "http",
        "spec_path": null,
        "auth_type": "none",
        "mcp_info": {
            "server_name": "deepwiki_2",
            "mcp_server_cost_info": null
        }
    },
    {
        "server_id": "33f950e4-2edb-41fa-91fc-0b9581269be6",
        "name": "edc_mcp_server",
        "alias": "edc_mcp_server",
        "server_name": "edc_mcp_server",
        "url": "http://lelvdckdputildev.itg.ti.com:8085/api/mcp",
        "transport": "http",
        "spec_path": null,
        "auth_type": "none",
        "mcp_info": {
            "server_name": "edc_mcp_server",
            "mcp_server_cost_info": null
        }
    }
]