語意自動路由器(已棄用)
已棄用
語意 Auto Router 已被 Auto Routing 取代,後者將語意關鍵字比對、複雜度評分與自適應路由整合為單一 auto_router/complexity_router。新部署應從該處開始;此語意路由器頁面則保留給既有設定使用。
LiteLLM 可根據您定義的規則,自動選擇最適合請求的模型。
LiteLLM Python SDK
自動路由可讓您定義路由規則,根據輸入內容自動選擇最適合請求的模型。這對於將不同類型的查詢導向專門模型非常有用。
設定
- 建立路由設定檔(例如,
router.json):
{
    "encoder_type": "openai",
    "encoder_name": "text-embedding-3-large",
    "routes": [
        {
            "name": "litellm-gpt-4.1",
            "utterances": [
                "litellm is great"
            ],
            "description": "positive affirmation",
            "function_schemas": null,
            "llm": null,
            "score_threshold": 0.5,
            "metadata": {}
        },
        {
            "name": "litellm-claude-35",
            "utterances": [
                "how to code a program in [language]"
            ],
            "description": "coding assistant",
            "function_schemas": null,
            "llm": null,
            "score_threshold": 0.5,
            "metadata": {}
        }
    ]
}
- 使用自動路由模型設定 Router:
from litellm import Router
import os

router = Router(
    model_list=[
        # Embedding models for routing
        {
            "model_name": "custom-text-embedding-model",
            "litellm_params": {
                "model": "text-embedding-3-large",
                "api_key": os.getenv("OPENAI_API_KEY"),
            },
        },
        # Your target models
        {
            "model_name": "litellm-gpt-4.1",
            "litellm_params": {
                "model": "gpt-4.1",
            },
            "model_info": {"id": "openai-id"},
        },
        {
            "model_name": "litellm-claude-35",
            "litellm_params": {
                "model": "claude-3-5-sonnet-latest",
            },
            "model_info": {"id": "claude-id"},
        },
        # Auto router configuration
        {
            "model_name": "auto_router1",
            "litellm_params": {
                "model": "auto_router/auto_router_1",
                "auto_router_config_path": "router.json",
                "auto_router_default_model": "gpt-4o-mini",
                "auto_router_embedding_model": "custom-text-embedding-model",
            },
        },
    ],
)
用法
完成設定後,請以您的自動路由模型名稱呼叫它來使用自動路由器:
# This request will be routed to gpt-4.1 based on the utterance match
response = await router.acompletion(
    model="auto_router1",
    messages=[{"role": "user", "content": "litellm is great"}],
)

# This request will be routed to claude-3-5-sonnet-latest for coding queries
response = await router.acompletion(
    model="auto_router1",
    messages=[{"role": "user", "content": "how to code a program in python"}],
)
設定參數
- auto_router_config_path:您的 router.json 設定檔路徑
- auto_router_default_model:當沒有路由符合時的備援模型
- auto_router_embedding_model:用於產生 embedding 以比對語句的模型
Router 設定結構
router.json 檔案支援以下結構:
- encoder_type:encoder 類型(例如,"openai")
- encoder_name:embedding 模型名稱
- routes:路由規則陣列,包含:
- name:目標模型名稱(必須與您的 model_list 中的模型相符)
- utterances:要比對的範例片語/模式
- description:此路由的易讀說明
- score_threshold:觸發此路由所需的最低相似度分數(0.0-1.0)
- metadata:此路由的其他 metadata
LiteLLM Proxy 伺服器
設定
前往 LiteLLM UI,並到 Models+Endpoints > Add Model > Auto Router Tab。
設定以下必要欄位:
- Auto Router Name - 開發者在向 LiteLLM 發出 LLM API 請求時會使用的模型名稱
- Default Model - 當沒有路由符合時使用的備援模型(例如,若設為 "gpt-4o-mini",未匹配的請求將路由至 gpt-4o-mini)
- Embedding Model - 用於為輸入訊息產生 embedding 的模型。這些 embedding 會用來在語意上將輸入與您路由中定義的 utterances 進行比對
路由設定
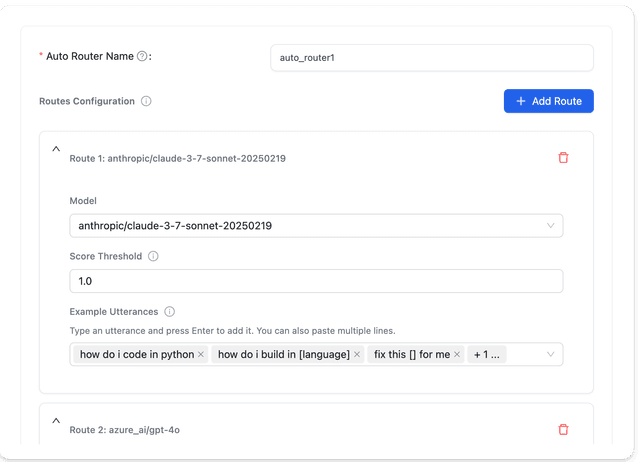
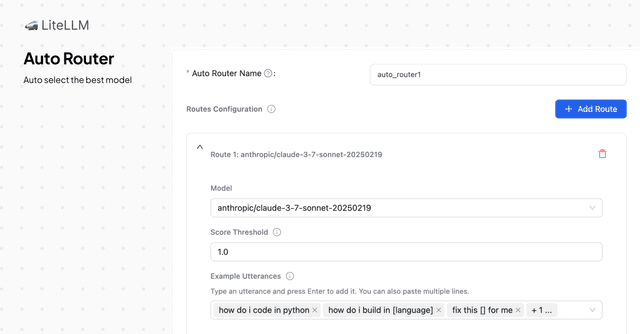
點選 Add Route 以建立新的路由規則。每個 route 都由若干 utterances 組成,系統會將其與輸入訊息比對,以判定目標模型。
設定每個 route 的內容:
- Utterances - 會觸發此 route 的範例片語。變數請使用方括號中的預留位置:
"how to code a program in [language]",
"can you explain this [language] code",
"can you explain this [language] script",
"can you convert this [language] code to [target_language]"
- Description - 此 route 處理內容的易讀說明
- Score Threshold - 觸發此 route 所需的最低相似度分數(0.0-1.0)
用法
新增後,開發者需要在 LLM API 請求的 model 欄位中選取 model=auto_router1。
- OpenAI Python v1.0.0+
- Curl Request
import openai
client = openai.OpenAI(
    api_key="sk-1234", # replace with your LiteLLM API key
    base_url="http://localhost:4000"
)

# This request will be auto-routed based on the content
response = client.chat.completions.create(
    model="auto_router1",
    messages=[
        {
            "role": "user",
            "content": "how to code a program in python"
        }
    ]
)

print(response)
curl -X POST http://localhost:4000/v1/chat/completions \
-H "Content-Type: application/json" \
-H "Authorization: Bearer $LITELLM_API_KEY" \
-d '{
    "model": "auto_router1",
    "messages": [{"role": "user", "content": "how to code a program in python"}]
}'
運作方式
- 當請求進來時,LiteLLM 會為輸入訊息產生 embedding
- 它會將這些 embedding 與您所有 routes 中定義的全部 utterances 同時比對
- 它會找出具有最高相似度分數的 route。若該分數超過該 route 定義的閾值,請求就會路由至該模型。(由於路由器會選擇全域最高分,而不是在第一個符合項就停止,因此設定中 routes 的順序不會影響選取哪個 route。)
- 如果沒有任何 route 的最高分數達到其閾值,請求就會送往 default model