客戶/終端使用者
追蹤花費、為您的客戶設定預算與權限。
追蹤客戶花費 + 權限
1. 使用客戶 ID 發出 LLM API 請求
LiteLLM 依照以下順序檢查客戶/終端使用者 ID(以第一個符合者為準):
| 優先順序 | 方法 | 位置 | 備註 |
|---|---|---|---|
| 1 | x-litellm-customer-id 標頭 | 請求標頭 | 標準標頭,一律檢查 |
| 2 | x-litellm-end-user-id 標頭 | 請求標頭 | 標準標頭,一律檢查 |
| 3 | 透過 user_header_mappings 的自訂標頭 | 請求標頭 | 在 general_settings 中設定 |
| 4 | 透過 user_header_name 的自訂標頭 | 請求標頭 | 已棄用 — 請改用 user_header_mappings |
| 5 | user 欄位 | 請求主體 | 標準 OpenAI 欄位 |
| 6 | litellm_metadata.user 欄位 | 請求主體 | Anthropic 風格的中繼資料 |
| 7 | metadata.user_id 欄位 | 請求主體 | 通用中繼資料模式 |
| 8 | safety_identifier 欄位 | 請求主體 | Responses API |
選項 1:標準標頭(建議 — 不需要修改請求主體)
curl -X POST 'http://0.0.0.0:4000/chat/completions' \
        --header 'Content-Type: application/json' \
        --header 'Authorization: Bearer sk-1234' \
        --header 'x-litellm-end-user-id: ishaan3' \
        --data '{
        "model": "azure-gpt-3.5",
        "messages": [{"role": "user", "content": "what time is it"}]
        }'
x-litellm-customer-id 和 x-litellm-end-user-id 都受支援,且一律會在不需任何設定的情況下檢查。
選項 2:請求主體中的 user 欄位(相容 OpenAI)
curl -X POST 'http://0.0.0.0:4000/chat/completions' \
        --header 'Content-Type: application/json' \
        --header 'Authorization: Bearer sk-1234' \
        --data '{
        "model": "azure-gpt-3.5",
        "user": "ishaan3",
        "messages": [{"role": "user", "content": "what time is it"}]
        }'
選項 3:透過 user_header_mappings 的自訂標頭(可設定)
general_settings:
  user_header_mappings:
    - header_name: "x-my-app-user-id"
      litellm_user_role: "customer"
curl -X POST 'http://0.0.0.0:4000/chat/completions' \
        --header 'Content-Type: application/json' \
        --header 'Authorization: Bearer sk-1234' \
        --header 'x-my-app-user-id: ishaan3' \
        --data '{
        "model": "azure-gpt-3.5",
        "messages": [{"role": "user", "content": "what time is it"}]
        }'
選項 4:litellm_metadata.user(Anthropic 風格)
curl -X POST 'http://0.0.0.0:4000/chat/completions' \
        --header 'Content-Type: application/json' \
        --header 'Authorization: Bearer sk-1234' \
        --data '{
        "model": "claude-3-5-sonnet",
        "messages": [{"role": "user", "content": "what time is it"}],
        "litellm_metadata": {"user": "ishaan3"}
        }'
選項 5:metadata.user_id
curl -X POST 'http://0.0.0.0:4000/chat/completions' \
        --header 'Content-Type: application/json' \
        --header 'Authorization: Bearer sk-1234' \
        --data '{
        "model": "azure-gpt-3.5",
        "messages": [{"role": "user", "content": "what time is it"}],
        "metadata": {"user_id": "ishaan3"}
        }'
customer_id 會隨著新的花費 upsert 到資料庫中。
如果 customer_id 已存在,花費將會累加。
2. 取得客戶花費
- 總花費
- 事件 Webhook
呼叫 /customer/info 以取得客戶的總花費
curl -X GET 'http://0.0.0.0:4000/customer/info?end_user_id=ishaan3' \ # 👈 CUSTOMER ID
        -H 'Authorization: Bearer sk-1234' \ # 👈 YOUR PROXY KEY
預期回應:
{
    "user_id": "ishaan3",
    "blocked": false,
    "alias": null,
    "spend": 0.001413,
    "allowed_model_region": null,
    "default_model": null,
    "litellm_budget_table": null
}
若要在用戶端資料庫中更新花費,請將 proxy 指向您的 webhook。
例如,如果您的伺服器是 https://webhook.site,且您正在 6ab090e8-c55f-4a23-b075-3209f5c57906 監聽
- 將 webhook URL 新增至您的 proxy 環境:
export WEBHOOK_URL="https://webhook.site/6ab090e8-c55f-4a23-b075-3209f5c57906"
- 在 config.yaml 中加入 'webhook'
general_settings:
  alerting: ["webhook"] # 👈 KEY CHANGE
- 測試它!
curl -X POST 'http://localhost:4000/chat/completions' \
-H 'Content-Type: application/json' \
-H 'Authorization: Bearer sk-1234' \
-D '{
    "model": "mistral",
    "messages": [
        {
        "role": "user",
        "content": "What's the weather like in Boston today?"
        }
    ],
    "user": "krrish12"
}
'
預期回應
{
  "spend": 0.0011120000000000001, # 👈 SPEND
  "max_budget": null,
  "token": "example-api-key-123",
  "customer_id": "krrish12",  # 👈 CUSTOMER ID
  "user_id": null,
  "team_id": null,
  "user_email": null,
  "key_alias": null,
  "projected_exceeded_date": null,
  "projected_spend": null,
  "event": "spend_tracked",
  "event_group": "customer",
  "event_message": "Customer spend tracked. Customer=krrish12, spend=0.0011120000000000001"
}
設定客戶物件權限
控制客戶可存取哪些資源(MCP 伺服器、向量儲存、代理程式)。
什麼是物件權限?
物件權限可讓您限制客戶對特定項目的存取:
- MCP 伺服器:限制客戶可呼叫哪些 MCP 伺服器
- MCP 存取群組:將客戶指派至預先定義的 MCP 伺服器群組
- MCP 工具權限:細緻控制客戶可在 MCP 伺服器中使用哪些工具
- 向量儲存:控制客戶可查詢哪些向量儲存
- 代理程式:限制客戶可互動的代理程式
- 代理程式存取群組:將客戶指派至預先定義的代理程式群組
建立具有物件權限的客戶
curl -L -X POST 'http://localhost:4000/customer/new' \
-H 'Authorization: Bearer sk-1234' \
-H 'Content-Type: application/json' \
-d '{
    "user_id": "user_1",
    "object_permission": {
      "mcp_servers": ["server_1", "server_2"],
      "mcp_access_groups": ["public_group"],
      "mcp_tool_permissions": {
        "server_1": ["tool_a", "tool_b"]
      },
      "vector_stores": ["vector_store_1"],
      "agents": ["agent_1"],
      "agent_access_groups": ["basic_agents"]
    }
  }'
參數:
mcp_servers(Optional[List[str]]): 允許的 MCP 伺服器 ID 清單mcp_access_groups(Optional[List[str]]): MCP 存取群組名稱清單mcp_tool_permissions(Optional[Dict[str, List[str]]]): 伺服器 ID 對允許工具名稱的對應vector_stores(Optional[List[str]]): 允許的向量儲存 ID 清單agents(Optional[List[str]]): 允許的代理程式 ID 清單agent_access_groups(Optional[List[str]]): 代理程式存取群組名稱清單
**注意:**如果 object_permission 是 null 或 {},則該客戶沒有物件層級限制。
更新客戶物件權限
您可以更新既有客戶的物件權限:
curl -L -X POST 'http://localhost:4000/customer/update' \
-H 'Authorization: Bearer sk-1234' \
-H 'Content-Type: application/json' \
-d '{
    "user_id": "user_1",
    "object_permission": {
      "mcp_servers": ["server_3"],
      "vector_stores": ["vector_store_2", "vector_store_3"]
    }
  }'
檢視客戶物件權限
當您查詢客戶資訊時,回應中會包含物件權限:
curl -X GET 'http://0.0.0.0:4000/customer/info?end_user_id=user_1' \
    -H 'Authorization: Bearer sk-1234'
回應:
{
  "user_id": "user_1",
  "blocked": false,
  "alias": "John Doe",
  "spend": 0.0,
  "object_permission": {
    "object_permission_id": "perm_abc123",
    "mcp_servers": ["server_1", "server_2"],
    "mcp_access_groups": ["public_group"],
    "mcp_tool_permissions": {
      "server_1": ["tool_a", "tool_b"]
    },
    "vector_stores": ["vector_store_1"],
    "agents": ["agent_1"],
    "agent_access_groups": ["basic_agents"]
  },
  "litellm_budget_table": null
}
使用案例
1. 分級存取控制 為您的客戶建立不同的權限等級:
# Free tier - limited access
curl -L -X POST 'http://localhost:4000/customer/new' \
-H 'Authorization: Bearer sk-1234' \
-H 'Content-Type: application/json' \
-d '{
    "user_id": "free_user",
    "budget_id": "free_tier",
    "object_permission": {
      "mcp_access_groups": ["public_group"],
      "agent_access_groups": ["basic_agents"]
    }
  }'
# Premium tier - full access
curl -L -X POST 'http://localhost:4000/customer/new' \
-H 'Authorization: Bearer sk-1234' \
-H 'Content-Type: application/json' \
-d '{
    "user_id": "premium_user",
    "budget_id": "premium_tier",
    "object_permission": {
      "mcp_servers": ["server_1", "server_2", "server_3"],
      "vector_stores": ["vector_store_1", "vector_store_2"],
      "agents": ["agent_1", "agent_2", "agent_3"]
    }
  }'
2. 部門專屬存取 將客戶限制在與其部門相關的資源:
curl -L -X POST 'http://localhost:4000/customer/new' \
-H 'Authorization: Bearer sk-1234' \
-H 'Content-Type: application/json' \
-d '{
    "user_id": "sales_user",
    "object_permission": {
      "mcp_servers": ["crm_server", "email_server"],
      "agents": ["sales_assistant"],
      "vector_stores": ["sales_knowledge_base"]
    }
  }'
3. 工具層級限制 授予對 MCP 伺服器內特定工具的存取:
curl -L -X POST 'http://localhost:4000/customer/new' \
-H 'Authorization: Bearer sk-1234' \
-H 'Content-Type: application/json' \
-d '{
    "user_id": "restricted_user",
    "object_permission": {
      "mcp_servers": ["database_server"],
      "mcp_tool_permissions": {
        "database_server": ["read_only_query", "get_table_schema"]
      }
    }
  }'
設定客戶預算
在 LiteLLM Proxy 上設定客戶預算(例如每月預算、tpm/rpm 限制)
所有客戶的預設預算
將預算限制套用至所有沒有明確預算的客戶。這對於在所有終端使用者之間進行速率限制與花費控制很有用。
步驟 1:建立預設預算
curl -X POST 'http://localhost:4000/budget/new' \
-H 'Content-Type: application/json' \
-H 'Authorization: Bearer sk-1234' \
-d '{
    "max_budget": 10,
    "rpm_limit": 2,
    "tpm_limit": 1000
}'
步驟 2:設定預設預算 ID
litellm_settings:
  max_end_user_budget_id: "budget_id_from_step_1"
步驟 3:測試它
curl -X POST 'http://localhost:4000/chat/completions' \
-H 'Content-Type: application/json' \
-H 'Authorization: Bearer sk-1234' \
-d '{
    "model": "gpt-3.5-turbo",
    "messages": [{"role": "user", "content": "Hello"}],
    "user": "my-customer-id"
}'
客戶將受到預設預算限制(RPM、TPM 和 $ 預算)的約束。具有明確預算的客戶不受影響。
快速入門
建立/更新具有預算的客戶
建立新客戶並附加預算
curl -X POST 'http://0.0.0.0:4000/customer/new'
    -H 'Authorization: Bearer sk-1234'
    -H 'Content-Type: application/json'
    -d '{
        "user_id" : "my-customer-id",
        "max_budget": "0", # 👈 CAN BE FLOAT
    }'
測試它!
curl -X POST 'http://localhost:4000/chat/completions' \
-H 'Content-Type: application/json' \
-H 'Authorization: Bearer sk-1234' \
-D '{
    "model": "mistral",
    "messages": [
        {
        "role": "user",
        "content": "What'\''s the weather like in Boston today?"
        }
    ],
    "user": "ishaan-jaff-48"
}
指派定價層級
建立並將客戶指派至定價層級。
1. 建立預算
- UI
- API
- 前往 UI 上的 'Budgets' 分頁。
- 點選 '+ Create Budget'。
- 建立您的定價層級(例如,'my-free-tier',預算為 $4)。這表示此定價層級上的每位使用者最高預算為 $4。
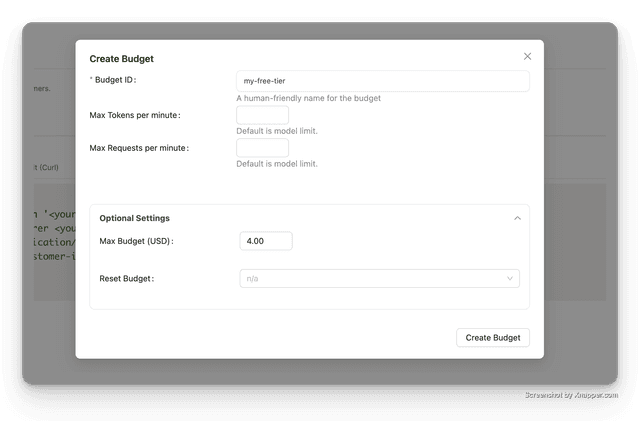
使用 /budget/new 端點來建立新的預算。API 參考
curl -X POST 'http://localhost:4000/budget/new' \
-H 'Content-Type: application/json' \
-H 'Authorization: Bearer sk-1234' \
-D '{
    "budget_id": "my-free-tier",
    "max_budget": 4
}
2. 將預算指派給客戶
在您的應用程式程式碼中,於建立新客戶時指派預算。
只要使用建立預算時所用的 budget_id。在我們的範例中,這是 my-free-tier。
curl -X POST 'http://localhost:4000/customer/new' \
-H 'Content-Type: application/json' \
-H 'Authorization: Bearer sk-1234' \
-D '{
    "user_id": "my-customer-id",
    "budget_id": "my-free-tier" # 👈 KEY CHANGE
}
3. 測試它!
- curl
- OpenAI
curl -X POST 'http://localhost:4000/customer/new' \
-H 'Content-Type: application/json' \
-H 'Authorization: Bearer sk-1234' \
-D '{
    "user_id": "my-customer-id",
    "budget_id": "my-free-tier" # 👈 KEY CHANGE
}
from openai import OpenAI
client = OpenAI(
  base_url="<your_proxy_base_url>",
  api_key="<your_proxy_key>"
)

completion = client.chat.completions.create(
  model="gpt-3.5-turbo",
  messages=[
    {"role": "system", "content": "You are a helpful assistant."},
    {"role": "user", "content": "Hello!"}
  ],
  user="my-customer-id"
)

print(completion.choices[0].message)