入門教學
LiteLLM Proxy 的端到端教學,用於:
- 新增 Azure OpenAI 模型
- 成功發出 /chat/completion 請求
- 產生虛擬金鑰
- 設定虛擬金鑰的 RPM 限制
快速安裝(建議給本機/初學者)
如果您剛接觸 LiteLLM,這是最簡單的本機上手方式。一個指令即可安裝 LiteLLM,並以互動式方式引導您完成設定,無需手動撰寫設定檔。
1. 安裝
curl -fsSL https://raw.githubusercontent.com/BerriAI/litellm/main/scripts/install.sh | sh
這會偵測您的作業系統、安裝 litellm[proxy],並直接進入設定精靈。
2. 依照精靈指示操作
$ litellm --setup

  Welcome to LiteLLM

  Choose your LLM providers
  ○ 1. OpenAI        GPT-4o, GPT-4o-mini, o1
  ○ 2. Anthropic     Claude Opus, Sonnet, Haiku
  ○ 3. Azure OpenAI  GPT-4o via Azure
  ○ 4. Google Gemini Gemini 2.0 Flash, 1.5 Pro
  ○ 5. AWS Bedrock   Claude, Llama via AWS
  ○ 6. Ollama        Local models

  ❯ Provider(s): 1,2

  ❯ OpenAI API key: sk-...
  ❯ Anthropic API key: sk-ant-...

  ❯ Port [4000]:
  ❯ Master key [auto-generate]:

  ✔ Config saved → ./litellm_config.yaml

  ❯ Start the proxy now? (Y/n):
精靈會引導您完成:
- 選擇您的 LLM 提供者(OpenAI、Anthropic、Azure、Bedrock、Gemini、Ollama)
- 輸入每個提供者的 API 金鑰
- 設定連接埠與主金鑰(或接受預設值)
- 設定會儲存至
./litellm_config.yaml,且 proxy 會立即啟動
3. 發出請求
您的 proxy 正在 http://0.0.0.0:4000 上執行。請進行測試:
curl -X POST 'http://0.0.0.0:4000/chat/completions' \
-H 'Content-Type: application/json' \
-H 'Authorization: Bearer <your-master-key>' \
-d '{
    "model": "gpt-4o",
    "messages": [{"role": "user", "content": "Hello!"}]
}'
您可以略過 curl 安裝,並在 uv tool install 'litellm[proxy]' 後直接執行 litellm --setup。
前置需求
請選擇您的安裝方式。Docker Compose 使用者會在分頁內完成完整設定,之後就結束。Docker 與 LiteLLM CLI 使用者則請繼續依照下方分頁下方的步驟操作。
- Docker
- LiteLLM CLI
- Docker Compose(Proxy + DB)
docker pull docker.litellm.ai/berriai/litellm:latest
$ uv tool install 'litellm[proxy]'
LiteLLM 1.84.0 及更新版本需要 Python 3.10 或更高版本(requires-python >=3.10)。uv tool install 與上方的 install.sh 腳本會自動提供相容的 Python,因此可替您處理這件事。單獨的 pip install 'litellm[proxy]' 不會;在 Python 3.9 下,pip 會默默解析到最後一個仍允許 3.9 的版本,也就是 1.83.9,且不會報錯。如果您意外被鎖定到舊版本,請檢查 python --version,並升級至 3.10+(或使用 uv),然後重新安裝
Docker Compose 會將 LiteLLM 與 Postgres 資料庫一起打包。請依照下方步驟操作——到最後 proxy 就會完整執行。
步驟 1 — 下載 LiteLLM 資料庫映像
LiteLLM 提供專用的 litellm-database 映像,供連接至 Postgres 的 proxy 部署使用。
docker pull ghcr.io/berriai/litellm-database:latest
所有可用標籤請見 GitHub Container Registry。
步驟 2 — 設定資料庫
請在執行 docker compose up 之前完成所有三個設定檔。若其中任何一個缺失,proxy 伺服器都無法正確啟動。
2.1 — 取得 docker-compose.yml 並建立 .env
# Get the docker compose file
curl -O https://raw.githubusercontent.com/BerriAI/litellm/main/docker-compose.yml

# Add the master key - you can change this after setup
echo 'LITELLM_MASTER_KEY="sk-1234"' > .env

# Add the litellm salt key — cannot be changed after adding a model
# Used to encrypt/decrypt your LLM API key credentials
# Generate a strong random value: https://1password.com/password-generator/
echo 'LITELLM_SALT_KEY="sk-1234"' >> .env

# Add your model credentials
echo 'AZURE_API_BASE="https://openai-***********/"' >> .env
echo 'AZURE_API_KEY="your-azure-api-key"' >> .env
2.2 — 建立 config.yaml
預設的 docker-compose.yml 會在 db:5432 啟動一個 Postgres 容器。您的 config.yaml 必須包含指向它的 database_url:
model_list:
  - model_name: gpt-4o
    litellm_params:
      model: azure/my_azure_deployment
      api_base: os.environ/AZURE_API_BASE
      api_key: os.environ/AZURE_API_KEY
      api_version: "2025-01-01-preview"

general_settings:
  master_key: sk-1234 # 🔑 your proxy admin key (must start with sk-)
  database_url: "postgresql://llmproxy:dbpassword9090@db:5432/litellm"
2.3 — 建立 prometheus.yml
在執行 docker compose up 之前,此檔案必須以檔案形式存在。如果缺少,Docker 會自動將其建立為空目錄,而 Prometheus 容器會無法啟動。
global:
  scrape_interval: 15s
  evaluation_interval: 15s

scrape_configs:
  - job_name: "litellm"
    static_configs:
      - targets: ["litellm:4000"]
也請確認 config.yaml volume mount 與 --config 旗標在 docker-compose.yml 中沒有被註解掉:
services:
  litellm:
    volumes:
      - ./config.yaml:/app/config.yaml # ✅ must be uncommented
    command:
      - "--config=/app/config.yaml" # ✅ must be uncommented
在執行 docker compose up 之前,三個檔案(.env、config.yaml、prometheus.yml)都必須存在。如果遇到問題,請參閱疑難排解。
步驟 3 — 啟動 proxy 伺服器並進行測試
在 config.yaml、prometheus.yml 與 .env 完成後,啟動 proxy:
docker compose up
啟動後,使用 curl 請求進行測試:
curl -X POST 'http://0.0.0.0:4000/chat/completions' \
  -H 'Content-Type: application/json' \
  -H 'Authorization: Bearer sk-1234' \
  -d '{
    "model": "gpt-4o",
    "messages": [{"role": "user", "content": "Hello!"}]
  }'
預期回應:
{
  "id": "chatcmpl-abcd",
  "created": 1773817678,
  "model": "gpt-4o",
  "object": "chat.completion",
  "system_fingerprint": "fp_6b1ef07cda",
  "choices": [
    {
      "finish_reason": "stop",
      "index": 0,
      "message": {
        "content": "Hello! How can I assist you today?",
        "role": "assistant",
        "annotations": []
      }
    }
  ],
  "usage": {
    "completion_tokens": 9,
    "prompt_tokens": 9,
    "total_tokens": 18,
    "completion_tokens_details": {
      "accepted_prediction_tokens": 0,
      "audio_tokens": 0,
      "reasoning_tokens": 0,
      "rejected_prediction_tokens": 0
    },
    "prompt_tokens_details": {
      "audio_tokens": 0,
      "cached_tokens": 0
    }
  },
  "service_tier": "default"
}
選用 — 前往 LiteLLM UI 並產生虛擬金鑰
在瀏覽器中開啟 http://localhost:4000/ui,並使用您的主金鑰(sk-1234)登入。
前往 虛擬金鑰,然後點選 + 建立新金鑰:
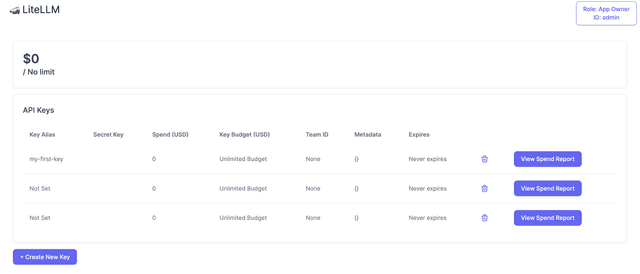
虛擬金鑰可讓您追蹤支出、設定速率限制,並依使用者或團隊控制模型存取權。
您的設定已完成——下方步驟僅供 Docker 與 LiteLLM CLI 使用者使用。
步驟 1 — 新增模型
使用 config.yaml 檔案控制 LiteLLM Proxy。請建立一個包含您的 Azure 模型的檔案:
model_list:
  - model_name: gpt-4o
    litellm_params:
      model: azure/my_azure_deployment
      api_base: os.environ/AZURE_API_BASE
      api_key: "os.environ/AZURE_API_KEY"
      api_version: "2025-01-01-preview" # [OPTIONAL] litellm uses the latest azure api_version by default
模型清單規格
您可以在模型設定章節中進一步了解模型解析的運作方式。
model_name(str)- 此欄位應包含收到的模型名稱。litellm_params(dict)查看所有 LiteLLM 參數model(str)- 指定要傳送給litellm.acompletion/litellm.aembedding等的模型名稱。這是 LiteLLM 用來在後端路由至正確模型與提供者邏輯的識別碼。api_key(str)- 驗證所需的 API 金鑰。可使用os.environ/從環境變數取得。api_base(str)- 您的 azure 部署的 API 基底位址。api_version(str)- 呼叫 Azure 的 OpenAI API 時要使用的 API 版本。請在這裡取得最新的 Inference API 版本。
實用連結
2. 成功發出 /chat/completion 請求
LiteLLM Proxy 與 OpenAI 100% 相容。請透過 /chat/completions 路由測試您的 azure 模型。
2.1 啟動 Proxy
將步驟 1 的 config.yaml 儲存為 litellm_config.yaml。
- Docker
- LiteLLM CLI
docker run \
    -v $(pwd)/litellm_config.yaml:/app/config.yaml \
    -e AZURE_API_KEY=d6*********** \
    -e AZURE_API_BASE=https://openai-***********/ \
    -p 4000:4000 \
    docker.litellm.ai/berriai/litellm:latest \
    --config /app/config.yaml --detailed_debug

# RUNNING on http://0.0.0.0:4000
$ litellm --config /app/config.yaml --detailed_debug
確認您的設定已正確載入——您應該會在記錄中看到這些內容:
Loaded config YAML (api_key and environment_variables are not shown):
{
  "model_list": [
    {
      "model_name": ...
2.2 發出請求
LiteLLM Proxy 與 OpenAI 100% 相容。請透過 /chat/completions 測試您的模型:
curl -X POST 'http://0.0.0.0:4000/chat/completions' \
-H 'Content-Type: application/json' \
-H 'Authorization: Bearer sk-1234' \
-d '{
    "model": "gpt-4o",
    "messages": [
      {
        "role": "system",
        "content": "You are an LLM named gpt-4o"
      },
      {
        "role": "user",
        "content": "what is your name?"
      }
    ]
}'
預期回應
{
  "id": "chatcmpl-BcO8tRQmQV6Dfw6onqMufxPkLLkA8",
  "created": 1748488967,
  "model": "gpt-4o-2024-11-20",
  "object": "chat.completion",
  "system_fingerprint": "fp_ee1d74bde0",
  "choices": [
    {
      "finish_reason": "stop",
      "index": 0,
      "message": {
        "content": "My name is **gpt-4o**! How can I assist you today?",
        "role": "assistant",
        "tool_calls": null,
        "function_call": null,
        "annotations": []
      }
    }
  ],
  "usage": {
    "completion_tokens": 19,
    "prompt_tokens": 28,
    "total_tokens": 47,
    "completion_tokens_details": {
      "accepted_prediction_tokens": 0,
      "audio_tokens": 0,
      "reasoning_tokens": 0,
      "rejected_prediction_tokens": 0
    },
    "prompt_tokens_details": {
      "audio_tokens": 0,
      "cached_tokens": 0
    }
  },
  "service_tier": null,
  "prompt_filter_results": [
    {
      "prompt_index": 0,
      "content_filter_results": {
        "hate": {
          "filtered": false,
          "severity": "safe"
        },
        "self_harm": {
          "filtered": false,
          "severity": "safe"
        },
        "sexual": {
          "filtered": false,
          "severity": "safe"
        },
        "violence": {
          "filtered": false,
          "severity": "safe"
        }
      }
    }
  ]
}
實用連結
- 所有支援的 LLM API 提供者(OpenAI/Bedrock/Vertex 等)
- 透過 OpenAI SDK、Langchain 等呼叫 LiteLLM Proxy
- 所有 API 端點 Swagger
- 其他/非 Chat Completion 端點
- VertexAI、Bedrock 等的透傳
選用:產生虛擬金鑰
透過虛擬金鑰追蹤支出並控制 proxy 的模型存取權。
前置條件 — 設定資料庫
您的 Postgres 容器已在執行中——請直接跳至下方的建立具 RPM 限制的金鑰。
Docker / LiteLLM CLI 使用者 — 您需要一個 Postgres 資料庫(例如 Supabase、Neon,或自行架設)。將 general_settings 加入您的 config.yaml:
model_list:
  - model_name: gpt-4o
    litellm_params:
      model: azure/my_azure_deployment
      api_base: os.environ/AZURE_API_BASE
      api_key: "os.environ/AZURE_API_KEY"
      api_version: "2025-01-01-preview" # [OPTIONAL] litellm uses the latest azure api_version by default

general_settings:
  master_key: sk-1234
  database_url: "postgresql://<user>:<password>@<host>:<port>/<dbname>" # 👈 KEY CHANGE
在繼續之前,請將 config.yaml 儲存為 litellm_config.yaml。
您必須在啟動 proxy server 之前完成此設定。
什麼是 general_settings?
這些是 LiteLLM Proxy Server 的設定。
請參閱所有一般設定 這裡。
-
master_key(str)- 說明:
- 設定一個
master key,這是您的 Proxy 管理金鑰 — 您可以用它來建立其他金鑰(🚨 必須以sk-開頭)。
- 設定一個
- 用法:
- 在 config.yaml 中設定:將您的 master key 設在
general_settings:master_key下方,範例 —master_key: sk-1234 - 設定環境變數:設定
LITELLM_MASTER_KEY
- 在 config.yaml 中設定:將您的 master key 設在
- 說明:
-
database_url(str)- 說明:
- 設定一個
database_url,這是連線到您的 Postgres DB,用於 litellm 產生金鑰、使用者、團隊。
- 設定一個
- 用法:
- 在 config.yaml 中設定:將您的
database_url設在general_settings:database_url下方,範例 —database_url: "postgresql://..." - 在您的環境中設定
DATABASE_URL=postgresql://<user>:<password>@<host>:<port>/<dbname>
- 在 config.yaml 中設定:將您的
- 說明:
啟動 Proxy
docker run \
    -v $(pwd)/litellm_config.yaml:/app/config.yaml \
    -e AZURE_API_KEY=d6*********** \
    -e AZURE_API_BASE=https://openai-***********/ \
    -p 4000:4000 \
    ghcr.io/berriai/litellm-database:latest \
    --config /app/config.yaml --detailed_debug
建立具有 RPM 限制的金鑰
建立一個具有 rpm_limit: 1 的金鑰。這將只允許使用此金鑰對 proxy 的請求每分鐘 1 次。
curl -L -X POST 'http://0.0.0.0:4000/key/generate' \
-H 'Authorization: Bearer sk-1234' \
-H 'Content-Type: application/json' \
-d '{
    "rpm_limit": 1
}'
預期回應
{
    "key": "sk-12..."
}
測試看看!
使用您剛建立的虛擬金鑰。
第 1 次呼叫 - 預期會成功!
curl -X POST 'http://0.0.0.0:4000/chat/completions' \
-H 'Content-Type: application/json' \
-H 'Authorization: Bearer sk-12...' \
-d '{
    "model": "gpt-4o",
    "messages": [
      {
        "role": "system",
        "content": "You are a helpful math tutor. Guide the user through the solution step by step."
      },
      {
        "role": "user",
        "content": "how can I solve 8x + 7 = -23"
      }
    ]
}'
預期回應
{
    "id": "chatcmpl-2076f062-3095-4052-a520-7c321c115c68",
    "choices": [
        ...
}
第 2 次呼叫 - 預期會失敗!
為什麼這次呼叫失敗?
我們已將虛擬金鑰的每分鐘請求數(RPM)限制設為 1。現在這個限制已被超過。
curl -X POST 'http://0.0.0.0:4000/chat/completions' \
-H 'Content-Type: application/json' \
-H 'Authorization: Bearer sk-12...' \
-d '{
    "model": "gpt-4o",
    "messages": [
      {
        "role": "system",
        "content": "You are a helpful math tutor. Guide the user through the solution step by step."
      },
      {
        "role": "user",
        "content": "how can I solve 8x + 7 = -23"
      }
    ]
}'
預期回應
{
  "error": {
    "message": "LiteLLM Rate Limit Handler for rate limit type = key. Crossed TPM / RPM / Max Parallel Request Limit. current rpm: 1, rpm limit: 1, current tpm: 348, tpm limit: 9223372036854775807, current max_parallel_requests: 0, max_parallel_requests: 9223372036854775807",
    "type": "None",
    "param": "None",
    "code": "429"
  }
}
實用連結
核心概念
本節說明 LiteLLM AI Gateway 的核心概念。
了解模型設定
以下是這個 config.yaml 範例:
model_list:
  - model_name: gpt-4o
    litellm_params:
      model: azure/my_azure_deployment
      api_base: os.environ/AZURE_API_BASE
      api_key: "os.environ/AZURE_API_KEY"
      api_version: "2025-01-01-preview" # [OPTIONAL] litellm uses the latest azure api_version by default
模型解析運作方式:
Client Request                LiteLLM Proxy                 Provider API
──────────────              ────────────────              ─────────────

POST /chat/completions
{                           1. Looks up model_name
  "model": "gpt-4o" ──────────▶ in config.yaml
  ...
}                           2. Finds matching entry:
                               model_name: gpt-4o

                            3. Extracts litellm_params:
                               model: azure/my_azure_deployment
                               api_base: https://...
                               api_key: sk-...

                            4. Routes to provider ──▶ Azure OpenAI API
                                                      POST /deployments/my_azure_deployment/...
拆解 model 參數在 litellm_params 下的作用:
model_list:
  - model_name: gpt-4o                       # What the client calls
    litellm_params:
      model: azure/my_azure_deployment       # <provider>/<model-name>
             ─────  ───────────────────
               │           │
               │           └─────▶ Model name sent to the provider API
               │
               └─────────────────▶ Provider that LiteLLM routes to
視覺化拆解:
model: azure/my_azure_deployment
       └─┬─┘ └─────────┬─────────┘
         │             │
         │             └────▶ The actual model identifier that gets sent to Azure
         │                   (e.g., your deployment name, or the model name)
         │
         └──────────────────▶ Tells LiteLLM which provider to use
                             (azure, openai, anthropic, bedrock, etc.)
核心概念:
-
model_name:您的用戶端用來呼叫模型的別名。這是您在 API 請求中傳送的內容(例如,gpt-4o)。 -
model(在 litellm_params 中):格式為<provider>/<model-identifier>- 提供者(在
/之前):路由到正確的 LLM 提供者(例如,azure、openai、anthropic、bedrock) - 模型識別碼(在
/之後):傳送給該提供者 API 的實際模型/部署名稱
- 提供者(在
進階設定範例:
針對自訂的 OpenAI 相容端點(例如 vLLM、Ollama、自訂部署):
model_list:
  - model_name: my-custom-model
    litellm_params:
      model: openai/nvidia/llama-3.2-nv-embedqa-1b-v2
      api_base: http://my-service.svc.cluster.local:8000/v1
      api_key: "sk-1234"
拆解複雜的模型路徑:
model: openai/nvidia/llama-3.2-nv-embedqa-1b-v2
       └─┬──┘ └────────────┬────────────────┘
         │                 │
         │                 └────▶ Full model string sent to the provider API
         │                       (in this case: "nvidia/llama-3.2-nv-embedqa-1b-v2")
         │
         └──────────────────────▶ Provider (openai = OpenAI-compatible API)
重點是:第一個 / 之後的所有內容都會原封不動地傳遞給提供者的 API。
常見模式:
model_list:
  # Azure deployment
  - model_name: gpt-4
    litellm_params:
      model: azure/gpt-4-deployment
      api_base: https://my-azure.openai.azure.com

  # OpenAI
  - model_name: gpt-4
    litellm_params:
      model: openai/gpt-4
      api_key: os.environ/OPENAI_API_KEY

  # Custom OpenAI-compatible endpoint
  - model_name: my-llama-model
    litellm_params:
      model: openai/meta/llama-3-8b
      api_base: http://my-vllm-server:8000/v1
      api_key: "optional-key"

  # Bedrock
  - model_name: claude-3
    litellm_params:
      model: bedrock/anthropic.claude-3-sonnet-20240229-v1:0
      aws_region_name: us-east-1
疑難排解
prometheus.yml 掛載錯誤 — 「不是目錄」
如果您看到:
Error: cannot create subdirectories in ".../prometheus.yml": not a directory
Docker 將 prometheus.yml 建立為一個空目錄而不是檔案。這種情況發生在檔案於 docker compose up 時不存在。
修正方式:
然後建立該檔案(請參閱 步驟 2.3 — 建立 prometheus.yml),並再次執行 docker compose up。
rm -rf prometheus.yml
然後建立該檔案(請參閱 步驟 2.4),並再次執行 docker compose up。
非 root docker 映像檔?
如果您需要以非 root 使用者執行 docker 映像檔,請使用 這個。
SSL 驗證問題 / 連線錯誤。
如果您看到
ssl.SSLCertVerificationError: [SSL: CERTIFICATE_VERIFY_FAILED] certificate verify failed: self-signed certificate in certificate chain (_ssl.c:1006)
或
Connection Error.
您可以透過以下方式停用 ssl 驗證:
model_list:
  - model_name: gpt-4o
    litellm_params:
      model: azure/my_azure_deployment
      api_base: os.environ/AZURE_API_BASE
      api_key: "os.environ/AZURE_API_KEY"
      api_version: "2025-01-01-preview"

litellm_settings:
    ssl_verify: false # 👈 KEY CHANGE
(DB)所有連線嘗試都失敗
如果您看到:
httpx.ConnectError: All connection attempts failed

ERROR:    Application startup failed. Exiting.
3:21:43 - LiteLLM Proxy:ERROR: utils.py:2207 - Error getting LiteLLM_SpendLogs row count: All connection attempts failed
這可能是 DB 權限問題。
- 驗證 db 使用者權限問題
嘗試建立一個新資料庫。
STATEMENT: CREATE DATABASE "litellm"
如果您得到:
ERROR: permission denied to create
這表示您有權限問題。
- 授予您的 DB 使用者權限
看起來應該像這樣:
psql -U postgres
CREATE DATABASE litellm;
在 CloudSQL 上,這是:
GRANT ALL PRIVILEGES ON DATABASE litellm TO your_username;
什麼是 litellm_settings?
LiteLLM Proxy 使用 LiteLLM Python SDK 來處理 LLM API 呼叫。
litellm_settings 是 LiteLLM Python SDK 的模組層級參數(等同於在 SDK 上執行 litellm.<some_param>)。您可以在 這裡 查看所有參數
支援與創辦人對談
-
我們的電子郵件 ✉️ ishaan@berri.ai / krrish@berri.ai

