記錄
使用以下方式記錄 Proxy 的輸入、輸出與例外:
- Langfuse
- OpenTelemetry
- GCS、s3、Azure(Blob)Buckets
- AWS SQS
- Lunary
- MLflow
- Deepeval
- 自訂回呼 - 自訂程式碼與 API 端點
- Langsmith
- DataDog
- Azure Sentinel
- DynamoDB
- 等等
取得 LiteLLM Call ID
LiteLLM 會為每個請求產生一個唯一的 call_id。此 call_id 可用於
追蹤系統中的請求。這對於在記錄系統中尋找
特定請求的資訊非常有用,例如本頁所提及的系統之一。
curl -i -sSL --location 'http://0.0.0.0:4000/chat/completions' \
    --header 'Authorization: Bearer sk-1234' \
    --header 'Content-Type: application/json' \
    --data '{
      "model": "gpt-3.5-turbo",
      "messages": [{"role": "user", "content": "what llm are you"}]
    }' | grep 'x-litellm'
其輸出如下:
x-litellm-call-id: b980db26-9512-45cc-b1da-c511a363b83f
x-litellm-model-id: cb41bc03f4c33d310019bae8c5afdb1af0a8f97b36a234405a9807614988457c
x-litellm-model-api-base: https://x-example-1234.openai.azure.com
x-litellm-version: 1.40.21
x-litellm-response-cost: 2.85e-05
x-litellm-key-tpm-limit: None
x-litellm-key-rpm-limit: None
其中一些標頭對疑難排解可能有幫助,但
x-litellm-call-id 是最適合用來追蹤系統中各元件間請求的標頭,
包括記錄工具。
記錄功能
遮罩訊息、回應內容
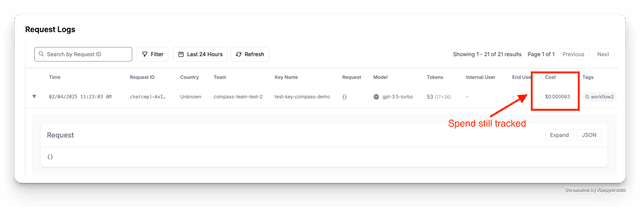
設定 litellm.turn_off_message_logging=True 這將防止訊息與回應被記錄到您的記錄提供者,但請求中繼資料(例如支出)仍會被追蹤。當處理敏感資料時,這對隱私/法規遵循很有用。
- 全域
- 每個請求
1. 設定 config.yaml
model_list:
 - model_name: gpt-3.5-turbo
    litellm_params:
      model: gpt-3.5-turbo
litellm_settings:
  success_callback: ["langfuse"]
  turn_off_message_logging: True # 👈 Key Change
2. 傳送請求
curl --location 'http://0.0.0.0:4000/chat/completions' \
    --header 'Content-Type: application/json' \
    --data '{
    "model": "gpt-3.5-turbo",
    "messages": [
        {
        "role": "user",
        "content": "what llm are you"
        }
    ]
}'
動態請求訊息遮罩目前為 BETA。
傳入請求標頭以啟用該請求的訊息遮罩。
x-litellm-enable-message-redaction: true
範例 config.yaml
**1. 設定 config.yaml **
model_list:
 - model_name: gpt-3.5-turbo
    litellm_params:
      model: gpt-3.5-turbo
2. 設定每個請求的標頭
curl -L -X POST 'http://0.0.0.0:4000/v1/chat/completions' \
-H 'Content-Type: application/json' \
-H 'Authorization: Bearer sk-zV5HlSIm8ihj1F9C_ZbB1g' \
-H 'x-litellm-enable-message-redaction: true' \
-d '{
  "model": "gpt-3.5-turbo-testing",
  "messages": [
    {
      "role": "user",
      "content": "Hey, how'\''s it going 1234?"
    }
  ]
}'
3. 檢查記錄工具 + 支出記錄
記錄工具
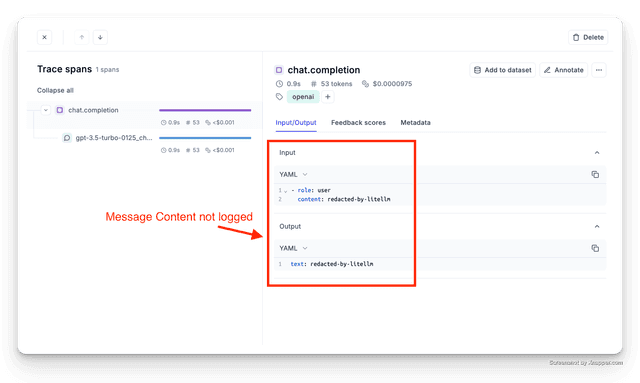
支出記錄
遮罩 UserAPIKeyInfo
從記錄中遮罩使用者 api key 的資訊(hashed token、user_id、team id 等)。
目前支援 Langfuse、OpenTelemetry、Logfire、ArizeAI 記錄。
litellm_settings:
  callbacks: ["langfuse"]
  redact_user_api_key_info: true
停用訊息遮罩
如果您已啟用 litellm.turn_on_message_logging,可透過
設定請求標頭 LiteLLM-Disable-Message-Redaction: true 來針對特定請求覆寫它。
curl --location 'http://0.0.0.0:4000/chat/completions' \
    --header 'Content-Type: application/json' \
    --header 'LiteLLM-Disable-Message-Redaction: true' \
    --data '{
    "model": "gpt-3.5-turbo",
    "messages": [
        {
        "role": "user",
        "content": "what llm are you"
        }
    ]
}'
關閉所有追蹤/記錄
對於某些用途,您可能會想關閉所有追蹤/記錄。您可以在請求本文中傳入 no-log=True 來做到這點。
可在您的 config.yaml 檔案中設定 global_disable_no_log_param:true 來停用此功能。
litellm_settings:
  global_disable_no_log_param: True
- Curl 請求
- OpenAI
curl -L -X POST 'http://0.0.0.0:4000/v1/chat/completions' \
-H 'Content-Type: application/json' \
-H 'Authorization: Bearer <litellm-api-key>' \
-d '{
    "model": "openai/gpt-3.5-turbo",
    "messages": [
      {
        "role": "user",
        "content": [
          {
            "type": "text",
            "text": "What'\''s in this image?"
          }
        ]
      }
    ],
    "max_tokens": 300,
    "no-log": true # 👈 Key Change
}'
import openai
client = openai.OpenAI(
    api_key="anything",
    base_url="http://0.0.0.0:4000"
)

# request sent to model set on litellm proxy, `litellm --model`
response = client.chat.completions.create(
    model="gpt-3.5-turbo",
    messages = [
        {
            "role": "user",
            "content": "this is a test request, write a short poem"
        }
    ],
    extra_body={
      "no-log": True # 👈 Key Change
    }
)

print(response)
預期的主控台記錄
LiteLLM.Info: "no-log request, skipping logging"
✨ 動態停用特定 callback
這是企業功能。
在某些使用情境中,您可能會希望為某個請求停用特定回呼。您可以在請求標頭中傳入 x-litellm-disable-callbacks: <callback_name> 來達成。
在請求標頭 x-litellm-disable-callbacks 中傳送要停用的回呼清單。
- Curl 請求
- OpenAI Python SDK
curl --location 'http://0.0.0.0:4000/chat/completions' \
    --header 'Content-Type: application/json' \
    --header 'Authorization: Bearer sk-1234' \
    --header 'x-litellm-disable-callbacks: langfuse' \
    --data '{
    "model": "claude-sonnet-4-20250514",
    "messages": [
        {
        "role": "user",
        "content": "what llm are you"
        }
    ]
}'
import openai

client = openai.OpenAI(
    api_key="sk-1234",
    base_url="http://0.0.0.0:4000"
)

response = client.chat.completions.create(
    model="claude-sonnet-4-20250514",
    messages=[
        {
            "role": "user",
            "content": "what llm are you"
        }
    ],
    extra_headers={
        "x-litellm-disable-callbacks": "langfuse"
    }
)

print(response)
✨ 依虛擬金鑰、團隊進行條件式記錄
可用於:
- 依條件為某些虛擬金鑰/團隊啟用記錄
- 為不同的虛擬金鑰/團隊設定不同的記錄提供者
會記錄哪些內容?
可在 kwargs["standard_logging_object"] 中找到。這是標準負載,會針對每個回應記錄。
Langfuse
我們將使用 --config 來設定 litellm.success_callback = ["langfuse"],這會將所有成功的 LLM 呼叫記錄到 langfuse。請務必在您的環境中設定 LANGFUSE_PUBLIC_KEY 和 LANGFUSE_SECRET_KEY
步驟 1 安裝 langfuse
uv add langfuse>=2.0.0
步驟 2:建立 config.yaml 檔案並設定 litellm_settings:success_callback
model_list:
 - model_name: gpt-3.5-turbo
    litellm_params:
      model: gpt-3.5-turbo
litellm_settings:
  success_callback: ["langfuse"]
步驟 3:設定記錄到 langfuse 所需的環境變數
export LANGFUSE_PUBLIC_KEY="pk_kk"
export LANGFUSE_SECRET_KEY="sk_ss"
# Optional, defaults to https://cloud.langfuse.com
export LANGFUSE_HOST="https://xxx.langfuse.com"
步驟 4:啟動 proxy,送出測試請求
啟動 proxy
litellm --config config.yaml --debug
測試請求
litellm --test
Langfuse 上的預期輸出
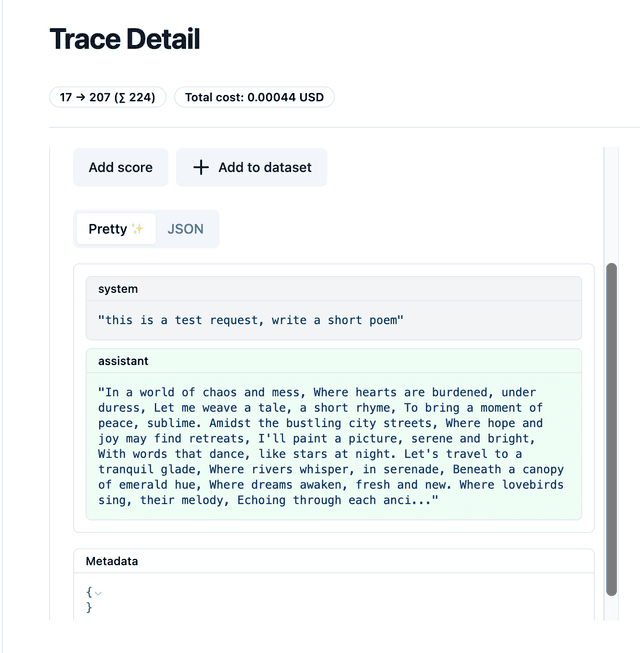
將記錄中繼資料寫入 Langfuse
- Curl 請求
- OpenAI v1.0.0+
- Langchain
將 metadata 作為請求本文的一部分傳入
curl --location 'http://0.0.0.0:4000/chat/completions' \
    --header 'Content-Type: application/json' \
    --data '{
    "model": "gpt-3.5-turbo",
    "messages": [
        {
        "role": "user",
        "content": "what llm are you"
        }
    ],
    "metadata": {
        "generation_name": "ishaan-test-generation",
        "generation_id": "gen-id22",
        "trace_id": "trace-id22",
        "trace_user_id": "user-id2"
    }
}'
將您要傳入的 metadata 設為 extra_body={"metadata": { }}
import openai
client = openai.OpenAI(
    api_key="anything",
    base_url="http://0.0.0.0:4000"
)

# request sent to model set on litellm proxy, `litellm --model`
response = client.chat.completions.create(
    model="gpt-3.5-turbo",
    messages = [
        {
            "role": "user",
            "content": "this is a test request, write a short poem"
        }
    ],
    extra_body={
        "metadata": {
            "generation_name": "ishaan-generation-openai-client",
            "generation_id": "openai-client-gen-id22",
            "trace_id": "openai-client-trace-id22",
            "trace_user_id": "openai-client-user-id2"
        }
    }
)

print(response)
from langchain.chat_models import ChatOpenAI
from langchain.prompts.chat import (
    ChatPromptTemplate,
    HumanMessagePromptTemplate,
    SystemMessagePromptTemplate,
)
from langchain.schema import HumanMessage, SystemMessage

chat = ChatOpenAI(
    openai_api_base="http://0.0.0.0:4000",
    model = "gpt-3.5-turbo",
    temperature=0.1,
    extra_body={
        "metadata": {
            "generation_name": "ishaan-generation-langchain-client",
            "generation_id": "langchain-client-gen-id22",
            "trace_id": "langchain-client-trace-id22",
            "trace_user_id": "langchain-client-user-id2"
        }
    }
)

messages = [
    SystemMessage(
        content="You are a helpful assistant that im using to make a test request to."
    ),
    HumanMessage(
        content="test from litellm. tell me why it's amazing in 1 sentence"
    ),
]
response = chat(messages)

print(response)
自訂標籤
將 tags 作為請求本文的一部分傳入
- OpenAI Python v1.0.0+
- Curl 請求
- Langchain
import openai
client = openai.OpenAI(
    api_key="sk-1234",
    base_url="http://0.0.0.0:4000"
)

response = client.chat.completions.create(
    model="llama3",
    messages = [
        {
            "role": "user",
            "content": "this is a test request, write a short poem"
        }
    ],
    user="palantir",
    extra_body={
        "metadata": {
            "tags": ["jobID:214590dsff09fds", "taskName:run_page_classification"]
        }
    }
)

print(response)
將 metadata 作為請求本文的一部分傳入
curl --location 'http://0.0.0.0:4000/chat/completions' \
    --header 'Content-Type: application/json' \
    --header 'Authorization: Bearer sk-1234' \
    --data '{
    "model": "llama3",
    "messages": [
        {
        "role": "user",
        "content": "what llm are you"
        }
    ],
    "user": "palantir",
    "metadata": {
        "tags": ["jobID:214590dsff09fds", "taskName:run_page_classification"]
    }
}'
from langchain.chat_models import ChatOpenAI
from langchain.prompts.chat import (
    ChatPromptTemplate,
    HumanMessagePromptTemplate,
    SystemMessagePromptTemplate,
)
from langchain.schema import HumanMessage, SystemMessage
import os

os.environ["OPENAI_API_KEY"] = "sk-1234"

chat = ChatOpenAI(
    openai_api_base="http://0.0.0.0:4000",
    model = "llama3",
    user="palantir",
    extra_body={
        "metadata": {
            "tags": ["jobID:214590dsff09fds", "taskName:run_page_classification"]
        }
    }
)

messages = [
    SystemMessage(
        content="You are a helpful assistant that im using to make a test request to."
    ),
    HumanMessage(
        content="test from litellm. tell me why it's amazing in 1 sentence"
    ),
]
response = chat(messages)

print(response)
LiteLLM 標籤 - cache_hit, cache_key
如果您想控制由 LiteLLM proxy 將哪些 LiteLLM 特定欄位以標籤形式記錄,請使用此功能。預設情況下,LiteLLM Proxy 不會記錄任何 LiteLLM 特定欄位
| LiteLLM 特定欄位 | 說明 | 範例值 |
|---|---|---|
cache_hit | 表示是否發生快取命中(True)或未發生(False) | true, false |
cache_key | 此請求使用的快取金鑰 | d2b758c**** |
proxy_base_url | 代理伺服器的基礎 URL,其值為您伺服器上的環境變數 PROXY_BASE_URL | https://proxy.example.com |
user_api_key_alias | LiteLLM Virtual Key 的別名。 | prod-app1 |
user_api_key_user_id | 與使用者 API 金鑰相關聯的唯一 ID。 | user_123, user_456 |
user_api_key_user_email | 與使用者 API 金鑰相關聯的電子郵件。 | user@example.com, admin@example.com |
user_api_key_team_alias | 與 API 金鑰相關聯之團隊的別名。 | team_alpha, dev_team |
使用方式
指定 langfuse_default_tags 以控制會記錄到 Langfuse 的 litellm 欄位
範例 config.yaml
model_list:
  - model_name: gpt-4
    litellm_params:
      model: openai/fake
      api_key: fake-key
      api_base: https://exampleopenaiendpoint-production.up.railway.app/

litellm_settings:
  success_callback: ["langfuse"]

  # 👇 Key Change
  langfuse_default_tags: ["cache_hit", "cache_key", "proxy_base_url", "user_api_key_alias", "user_api_key_user_id", "user_api_key_user_email", "user_api_key_team_alias", "semantic-similarity", "proxy_base_url"]
檢視 LiteLLM 傳送給提供者的 POST
當您想查看從 LiteLLM 傳送到 LLM API 的原始 curl 請求時,請使用這個設定
- Curl 請求
- OpenAI v1.0.0+
- Langchain
將 metadata 作為請求本文的一部分傳入
curl --location 'http://0.0.0.0:4000/chat/completions' \
    --header 'Content-Type: application/json' \
    --data '{
    "model": "gpt-3.5-turbo",
    "messages": [
        {
        "role": "user",
        "content": "what llm are you"
        }
    ],
    "metadata": {
        "log_raw_request": true
    }
}'
將您想要傳入的 extra_body={"metadata": {"log_raw_request": True }} 設為 metadata
import openai
client = openai.OpenAI(
    api_key="anything",
    base_url="http://0.0.0.0:4000"
)

# request sent to model set on litellm proxy, `litellm --model`
response = client.chat.completions.create(
    model="gpt-3.5-turbo",
    messages = [
        {
            "role": "user",
            "content": "this is a test request, write a short poem"
        }
    ],
    extra_body={
        "metadata": {
            "log_raw_request": True
        }
    }
)

print(response)
from langchain.chat_models import ChatOpenAI
from langchain.prompts.chat import (
    ChatPromptTemplate,
    HumanMessagePromptTemplate,
    SystemMessagePromptTemplate,
)
from langchain.schema import HumanMessage, SystemMessage

chat = ChatOpenAI(
    openai_api_base="http://0.0.0.0:4000",
    model = "gpt-3.5-turbo",
    temperature=0.1,
    extra_body={
        "metadata": {
            "log_raw_request": True
        }
    }
)

messages = [
    SystemMessage(
        content="You are a helpful assistant that im using to make a test request to."
    ),
    HumanMessage(
        content="test from litellm. tell me why it's amazing in 1 sentence"
    ),
]
response = chat(messages)

print(response)
Langfuse 上的預期輸出
您會在 Langfuse 的 Metadata 中看到 raw_request。這是從 LiteLLM 傳送到您的 LLM API 提供者的原始 CURL 命令
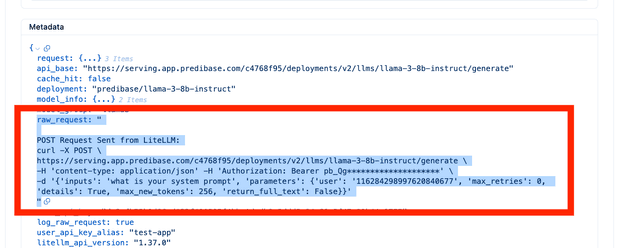
OpenTelemetry
完整的 OpenTelemetry 參考資料——span 階層、每個發出的 span 與屬性、metrics、semconv 模式,以及疑難排解——請見 可觀測性 → OpenTelemetry 整合。下方章節是以代理伺服器為焦點的快速入門。
[選用] 透過在您的環境中設定下列變數,自訂 OTEL Service Name 與 OTEL TRACER NAME
OTEL_TRACER_NAME=<your-trace-name>     # default="litellm"
OTEL_SERVICE_NAME=<your-service-name>` # default="litellm"
- 記錄到主控台
- 記錄到 Honeycomb
- 記錄到 Traceloop Cloud
- 記錄到 OTEL HTTP Collector
- 記錄到 OTEL GRPC Collector
步驟 1: 設定 callbacks 與環境變數
將下列內容加入您的環境中
OTEL_EXPORTER="console"
將 otel 加為您的 litellm_config.yaml 的 callback
litellm_settings:
  callbacks: ["otel"]
步驟 2:啟動 proxy,發出測試請求
啟動 proxy
litellm --config config.yaml --detailed_debug
測試請求
curl --location 'http://0.0.0.0:4000/chat/completions' \
    --header 'Content-Type: application/json' \
    --data ' {
    "model": "gpt-3.5-turbo",
    "messages": [
        {
        "role": "user",
        "content": "what llm are you"
        }
    ]
    }'
步驟 3:預期會在您的伺服器記錄 / 主控台中看到下列內容
這是來自 OTEL Logging 的 Span
{
    "name": "litellm-acompletion",
    "context": {
        "trace_id": "0x8d354e2346060032703637a0843b20a3",
        "span_id": "0xd8d3476a2eb12724",
        "trace_state": "[]"
    },
    "kind": "SpanKind.INTERNAL",
    "parent_id": null,
    "start_time": "2024-06-04T19:46:56.415888Z",
    "end_time": "2024-06-04T19:46:56.790278Z",
    "status": {
        "status_code": "OK"
    },
    "attributes": {
        "model": "llama3-8b-8192"
    },
    "events": [],
    "links": [],
    "resource": {
        "attributes": {
            "service.name": "litellm"
        },
        "schema_url": ""
    }
}
快速入門 - 記錄到 Honeycomb
步驟 1: 設定 callbacks 與環境變數
將下列內容加入您的環境中
OTEL_EXPORTER="otlp_http"
OTEL_ENDPOINT="https://api.honeycomb.io/v1/traces"
OTEL_HEADERS="x-honeycomb-team=<your-api-key>"
將 otel 加為您的 litellm_config.yaml 的 callback
litellm_settings:
  callbacks: ["otel"]
步驟 2:啟動 proxy,發出測試請求
啟動 proxy
litellm --config config.yaml --detailed_debug
測試請求
curl --location 'http://0.0.0.0:4000/chat/completions' \
    --header 'Content-Type: application/json' \
    --data ' {
    "model": "gpt-3.5-turbo",
    "messages": [
        {
        "role": "user",
        "content": "what llm are you"
        }
    ]
    }'
快速入門 - 記錄到 Traceloop
步驟 1: 將下列內容加入您的環境中
OTEL_EXPORTER="otlp_http"
OTEL_ENDPOINT="https://api.traceloop.com"
OTEL_HEADERS="Authorization=Bearer%20<your-api-key>"
步驟 2: 將 otel 加為 callbacks
litellm_settings:
  callbacks: ["otel"]
步驟 3:啟動 proxy,發出測試請求
啟動 proxy
litellm --config config.yaml --detailed_debug
測試請求
curl --location 'http://0.0.0.0:4000/chat/completions' \
    --header 'Content-Type: application/json' \
    --data ' {
    "model": "gpt-3.5-turbo",
    "messages": [
        {
        "role": "user",
        "content": "what llm are you"
        }
    ]
    }'
快速入門 - 記錄到 OTEL Collector
步驟 1: 設定 callbacks 與環境變數
將下列內容加入您的環境中
OTEL_EXPORTER="otlp_http"
OTEL_ENDPOINT="http://0.0.0.0:4317"
OTEL_HEADERS="x-honeycomb-team=<your-api-key>" # Optional
將 otel 加為您的 litellm_config.yaml 的 callback
litellm_settings:
  callbacks: ["otel"]
步驟 2:啟動 proxy,發出測試請求
啟動 proxy
litellm --config config.yaml --detailed_debug
測試請求
curl --location 'http://0.0.0.0:4000/chat/completions' \
    --header 'Content-Type: application/json' \
    --data ' {
    "model": "gpt-3.5-turbo",
    "messages": [
        {
        "role": "user",
        "content": "what llm are you"
        }
    ]
    }'
快速入門 - 記錄到 OTEL GRPC Collector
步驟 1: 設定 callbacks 與環境變數
將下列內容加入您的環境中
OTEL_EXPORTER="otlp_grpc"
OTEL_ENDPOINT="http:/0.0.0.0:4317"
OTEL_HEADERS="x-honeycomb-team=<your-api-key>" # Optional
注意:OTLP gRPC 需要
grpcio。可透過uv add "litellm[grpc]"(或grpcio)安裝。
將 otel 加為您的 litellm_config.yaml 的 callback
litellm_settings:
  callbacks: ["otel"]
步驟 2:啟動 proxy,發出測試請求
啟動 proxy
litellm --config config.yaml --detailed_debug
測試請求
curl --location 'http://0.0.0.0:4000/chat/completions' \
    --header 'Content-Type: application/json' \
    --data ' {
    "model": "gpt-3.5-turbo",
    "messages": [
        {
        "role": "user",
        "content": "what llm are you"
        }
    ]
    }'
** 🎉 預期會在您的 OTEL collector 中看到這個 trace 被記錄**
遮罩訊息、回應內容
將 message_logging=False 設為 otel,將不會記錄任何訊息 / 回應
litellm_settings:
  callbacks: ["otel"]

## 👇 Key Change
callback_settings:
  otel:
    message_logging: False
Traceparent 標頭
跨服務的內容傳遞 Traceparent HTTP Header
❓ 當您想要在分散式追蹤系統中 傳遞關於傳入請求的資訊 時,請使用這個
✅ 主要變更:在您的請求中傳遞 traceparent 標頭。在此閱讀更多關於 traceparent 標頭的資訊
traceparent: 00-80e1afed08e019fc1110464cfa66635c-7a085853722dc6d2-01
使用範例
- 向 LiteLLM Proxy 發出帶有
traceparent標頭的請求
import openai
import uuid

client = openai.OpenAI(api_key="sk-1234", base_url="http://0.0.0.0:4000")
example_traceparent = f"00-80e1afed08e019fc1110464cfa66635c-02e80198930058d4-01"
extra_headers = {
    "traceparent": example_traceparent
}
_trace_id = example_traceparent.split("-")[1]

print("EXTRA HEADERS: ", extra_headers)
print("Trace ID: ", _trace_id)

response = client.chat.completions.create(
    model="llama3",
    messages=[
        {"role": "user", "content": "this is a test request, write a short poem"}
    ],
    extra_headers=extra_headers,
)

print(response)
# EXTRA HEADERS:  {'traceparent': '00-80e1afed08e019fc1110464cfa66635c-02e80198930058d4-01'}
# Trace ID:  80e1afed08e019fc1110464cfa66635c
- 在 OTEL Logger 上查詢 Trace ID
在您的 OTEL Collector 上搜尋 Trace=80e1afed08e019fc1110464cfa66635c
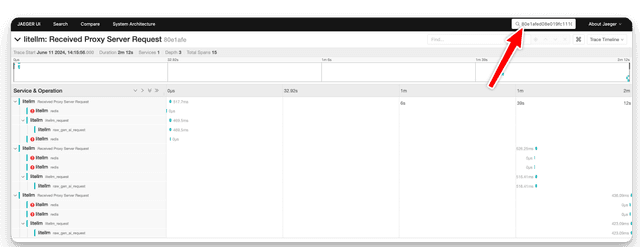
轉送 Traceparent HTTP Header 至 LLM API
如果您想將 traceparent 標頭轉送到您自架的 LLM,例如 vLLM,請使用這個
在您的 config.yaml 中設定 forward_traceparent_to_llm_provider: True。這會將 traceparent 標頭轉送到您的 LLM API
僅可用於自架 LLM,這可能會導致 Bedrock、VertexAI 呼叫失敗
litellm_settings:
  forward_traceparent_to_llm_provider: True
Google Cloud Storage Bucket
將 LLM 記錄寫入 Google Cloud Storage Buckets
✨ 這是僅限 Enterprise 的功能 在此開始使用 Enterprise
| 屬性 | 詳細資訊 |
|---|---|
| 說明 | 將 LLM 輸入/輸出記錄到雲端儲存 bucket |
| 壓力測試基準 | 基準 |
| Google Cloud Storage 文件 | Google Cloud Storage |
使用方式
- 將
gcs_bucket加到 LiteLLM Config.yaml
model_list:
- litellm_params:
    api_base: https://exampleopenaiendpoint-production.up.railway.app/
    api_key: my-fake-key
    model: openai/my-fake-model
  model_name: fake-openai-endpoint

litellm_settings:
  callbacks: ["gcs_bucket"] # 👈 KEY CHANGE # 👈 KEY CHANGE
- 設定必要的環境變數
GCS_BUCKET_NAME="<your-gcs-bucket-name>"
GCS_PATH_SERVICE_ACCOUNT="/Users/ishaanjaffer/Downloads/adroit-crow-413218-a956eef1a2a8.json" # Add path to service account.json
- 啟動 Proxy
litellm --config /path/to/config.yaml
- 測試一下!
curl --location 'http://0.0.0.0:4000/chat/completions' \
--header 'Content-Type: application/json' \
--data ' {
      "model": "fake-openai-endpoint",
      "messages": [
        {
          "role": "user",
          "content": "what llm are you"
        }
      ],
    }
'
GCS Bucket 上預期的記錄
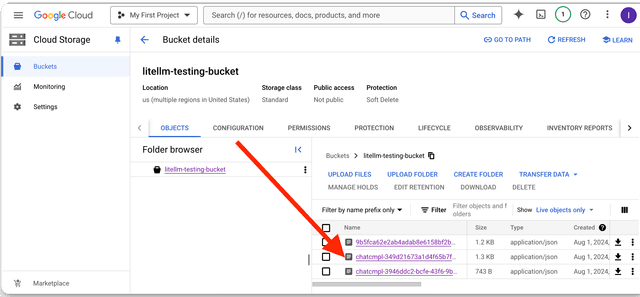
GCS Bucket 上記錄的欄位
從 Google Cloud Console 取得 service_account.json
- 前往 Google Cloud Console
- 搜尋 IAM & Admin
- 點選 Service Accounts
- 選取一個 Service Account
- 點選 'Keys' -> Add Key -> Create New Key -> JSON
- 儲存 JSON 檔案並將路徑加入
GCS_PATH_SERVICE_ACCOUNT
Google Cloud Storage - PubSub 主題
將 LLM 記錄/SpendLogs 寫入 Google Cloud Storage PubSub Topic
✨ 這是僅限 Enterprise 的功能 在此開始使用 Enterprise
| 屬性 | 詳細資訊 |
|---|---|
| 說明 | 將 LiteLLM SpendLogs Table 記錄到 Google Cloud Storage PubSub Topic |
何時使用 gcs_pubsub?
- 如果您的 LiteLLM 資料庫中已超過 1M+ 筆支出記錄,且您想將
SpendLogs傳送到可由 GCS BigQuery 消費的 PubSub Topic
使用方式
- 將
gcs_pubsub新增到 LiteLLM Config.yaml
model_list:
- litellm_params:
    api_base: https://exampleopenaiendpoint-production.up.railway.app/
    api_key: my-fake-key
    model: openai/my-fake-model
  model_name: fake-openai-endpoint

litellm_settings:
  callbacks: ["gcs_pubsub"] # 👈 KEY CHANGE # 👈 KEY CHANGE
- 設定必要的環境變數
GCS_PUBSUB_TOPIC_ID="litellmDB"
GCS_PUBSUB_PROJECT_ID="reliableKeys"
- 啟動 Proxy
litellm --config /path/to/config.yaml
- 測試它!
curl --location 'http://0.0.0.0:4000/chat/completions' \
--header 'Content-Type: application/json' \
--data ' {
      "model": "fake-openai-endpoint",
      "messages": [
        {
          "role": "user",
          "content": "what llm are you"
        }
      ],
    }
'
Deepeval
LiteLLM 支援在 Confidential AI(Deepeval 平台)上記錄:
使用方式:
- 在 LiteLLM
config.yaml中新增deepeval
model_list:
  - model_name: gpt-4o
    litellm_params:
      model: gpt-4o
litellm_settings:
  success_callback: ["deepeval"]
  failure_callback: ["deepeval"]
- 在
.env檔案中設定您的環境變數。
CONFIDENT_API_KEY=<your-api-key>
您可以透過登入 Confident AI 平台來取得您的 CONFIDENT_API_KEY。
- 啟動您的 proxy server:
litellm --config config.yaml --debug
- 發送請求:
curl -X POST 'http://0.0.0.0:4000/chat/completions' \
-H 'Content-Type: application/json' \
-H 'Authorization: Bearer sk-1234' \
-d '{
    "model": "gpt-3.5-turbo",
    "messages": [
      {
        "role": "system",
        "content": "You are a helpful math tutor. Guide the user through the solution step by step."
      },
      {
        "role": "user",
        "content": "how can I solve 8x + 7 = -23"
      }
    ]
}'
- 在平台上檢查 trace:
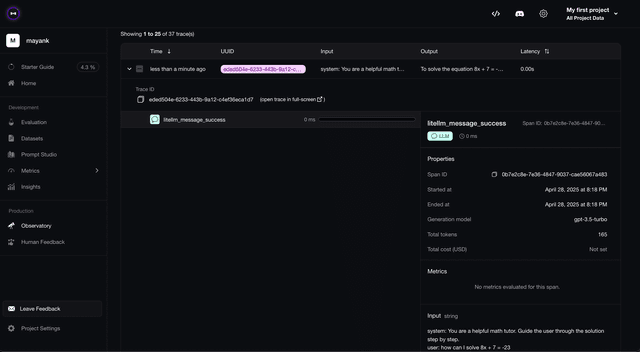
s3 儲存貯體
我們將使用 --config 來設定
litellm.success_callback = ["s3"]
這會將所有成功的 LLM 呼叫記錄到 s3 Bucket
步驟 1 在 .env 中設定 AWS 憑證
AWS_ACCESS_KEY_ID = ""
AWS_SECRET_ACCESS_KEY = ""
AWS_REGION_NAME = ""
步驟 2:建立 config.yaml 檔案,並設定 litellm_settings:success_callback
model_list:
 - model_name: gpt-3.5-turbo
    litellm_params:
      model: gpt-3.5-turbo
litellm_settings:
  success_callback: ["s3_v2"]
  s3_callback_params:
    s3_bucket_name: logs-bucket-litellm   # AWS Bucket Name for S3
    s3_region_name: us-west-2              # AWS Region Name for S3
    s3_aws_access_key_id: os.environ/AWS_ACCESS_KEY_ID  # us os.environ/<variable name> to pass environment variables. This is AWS Access Key ID for S3
    s3_aws_secret_access_key: os.environ/AWS_SECRET_ACCESS_KEY  # AWS Secret Access Key for S3
    s3_path: my-test-path # [OPTIONAL] set path in bucket you want to write logs to
    s3_endpoint_url: https://s3.amazonaws.com  # [OPTIONAL] S3 endpoint URL, if you want to use Backblaze/cloudflare s3 buckets
    s3_use_virtual_hosted_style: false # [OPTIONAL] use virtual-hosted-style URLs (bucket.endpoint/key) instead of path-style (endpoint/bucket/key). Useful for S3-compatible services like MinIO
    s3_strip_base64_files: false # [OPTIONAL] remove base64 files before storing in s3
步驟 3:啟動 proxy,發送測試請求
啟動 proxy
litellm --config config.yaml --debug
測試請求
curl --location 'http://0.0.0.0:4000/chat/completions' \
    --header 'Content-Type: application/json' \
    --data ' {
    "model": "Azure OpenAI GPT-4 East",
    "messages": [
        {
        "role": "user",
        "content": "what llm are you"
        }
    ]
    }'
您的記錄應該會出現在指定的 s3 Bucket 中
團隊別名在物件鍵中的前綴
您可以在 config.yaml 檔案中設定 team_alias,將團隊別名加入物件鍵。
這會在物件鍵前加上團隊別名作為前綴。
litellm_settings:
  callbacks: ["s3_v2"]
  s3_callback_params:
    s3_bucket_name: logs-bucket-litellm
    s3_region_name: us-west-2
    s3_aws_access_key_id: os.environ/AWS_ACCESS_KEY_ID
    s3_aws_secret_access_key: os.environ/AWS_SECRET_ACCESS_KEY
    s3_path: my-test-path
    s3_endpoint_url: https://s3.amazonaws.com
    s3_use_team_prefix: true
在 s3 bucket 中,您會看到物件鍵為 my-test-path/my-team-alias/...
鍵別名在物件鍵中的前綴
您可以透過啟用 s3_use_key_prefix,將使用者 API 金鑰別名加入 s3 物件鍵。
litellm_settings:
  callbacks: ["s3_v2"]
  s3_callback_params:
    s3_bucket_name: logs-bucket-litellm
    s3_region_name: us-west-2
    s3_aws_access_key_id: os.environ/AWS_ACCESS_KEY_ID
    s3_aws_secret_access_key: os.environ/AWS_SECRET_ACCESS_KEY
    s3_path: my-test-path
    s3_endpoint_url: https://s3.amazonaws.com
    s3_use_key_prefix: true
在 s3 bucket 中,您會看到物件鍵為 my-test-path/my-key-alias/...
如果團隊別名和金鑰別名都已啟用,則路徑會變成
my-test-path/my-team-alias/my-key-alias/...
AWS SQS
| 屬性 | 詳細資料 |
|---|---|
| 說明 | 將 LLM 輸入/輸出記錄到 AWS SQS Queue |
| SQS 的 AWS 文件 | AWS SQS |
| 記錄到 SQS 的欄位 | LiteLLM 每次 LLM 呼叫都會記錄標準記錄負載 |
將 LLM 記錄寫入 AWS Simple Queue Service (SQS)
我們將使用 litellm --config 來設定
litellm.callbacks = ["aws_sqs"]
這會將所有成功的 LLM 請求記錄到 AWS SQS Queue
步驟 1 在 .env 中設定 AWS 憑證
AWS_ACCESS_KEY_ID = ""
AWS_SECRET_ACCESS_KEY = ""
AWS_REGION_NAME = ""
步驟 2:建立一個 config.yaml 檔案,並設定 litellm_settings:callbacks
model_list:
  - model_name: gpt-4o
    litellm_params:
      model: gpt-4o

litellm_settings:
  callbacks: ["aws_sqs"]

  aws_sqs_callback_params:
    # --- 🧱 Required Parameters ---
    sqs_queue_url: https://sqs.us-west-2.amazonaws.com/123456789012/my-queue
    # The AWS SQS Queue URL to which LiteLLM will send log events.

    sqs_region_name: us-west-2
    # AWS Region for your SQS queue (e.g., us-east-1, eu-central-1, etc.)

    # --- Logging Controls ---
    sqs_strip_base64_files: false
    # If true, LiteLLM will remove or redact base64-encoded binary data (e.g., PDFs, images, audio)
    # from logged messages to avoid large payloads. SQS has a 1 MB payload size limit.
    s3_use_team_prefix: false
    # If true, Litellm will add the team alias prefix to s3 path
    s3_use_key_prefix: false
    # If true, Litellm will add the key alias prefix to s3 path
步驟 3:啟動 proxy,發出測試請求
啟動 proxy
litellm --config config.yaml --debug
測試請求
curl --location 'http://0.0.0.0:4000/chat/completions' \
    --header 'Content-Type: application/json' \
    --data ' {
    "model": "gpt-4o",
    "messages": [
        {
        "role": "user",
        "content": "what llm are you"
        }
    ]
    }'
Azure Blob 儲存體
將 LLM 記錄寫入 Azure Data Lake Storage
✨ 這是僅限 Enterprise 的功能 在此開始使用 Enterprise
| 屬性 | 詳細資訊 |
|---|---|
| 說明 | 將 LLM 輸入/輸出記錄到 Azure Blob Storage(Bucket) |
| Azure Data Lake Storage 文件 | Azure Data Lake Storage |
使用方式
- 將
azure_storage加入 LiteLLM Config.yaml
model_list:
  - model_name: fake-openai-endpoint
    litellm_params:
      model: openai/fake
      api_key: fake-key
      api_base: https://exampleopenaiendpoint-production.up.railway.app/

litellm_settings:
  callbacks: ["azure_storage"] # 👈 KEY CHANGE # 👈 KEY CHANGE
- 設定必要的環境變數
# Required Environment Variables for Azure Storage
AZURE_STORAGE_ACCOUNT_NAME="litellm2" # The name of the Azure Storage Account to use for logging
AZURE_STORAGE_FILE_SYSTEM="litellm-logs" # The name of the Azure Storage File System to use for logging.  (Typically the Container name)

# Authentication Variables
# Option 1: Use Storage Account Key
AZURE_STORAGE_ACCOUNT_KEY="xxxxxxxxxxxxxxxxxxxxxxxxxxxxxxxxxxxxxxxxxxxxxxxxxxxxxxxxxxxxxxxx" # The Azure Storage Account Key to use for Authentication

# Option 2: Use Tenant ID + Client ID + Client Secret
AZURE_STORAGE_TENANT_ID="985efd7cxxxxxxxxxx" # The Application Tenant ID to use for Authentication
AZURE_STORAGE_CLIENT_ID="abe66585xxxxxxxxxx" # The Application Client ID to use for Authentication
AZURE_STORAGE_CLIENT_SECRET="uMS8Qxxxxxxxxxx" # The Application Client Secret to use for Authentication
- 啟動 Proxy
litellm --config /path/to/config.yaml
- 試試看!
curl --location 'http://0.0.0.0:4000/chat/completions' \
--header 'Content-Type: application/json' \
--data ' {
      "model": "fake-openai-endpoint",
      "messages": [
        {
          "role": "user",
          "content": "what llm are you"
        }
      ],
    }
'
Azure Data Lake Storage 上預期的記錄
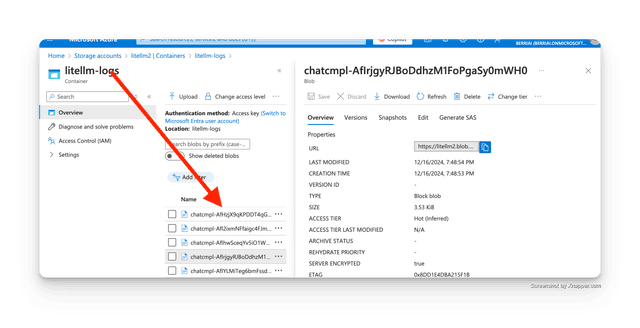
Azure Data Lake Storage 上記錄的欄位
標準 logging 物件會記錄到 Azure Data Lake Storage
Datadog
👉 請到這裡使用 Datadog LLM 可觀測性 搭配 LiteLLM Proxy
Azure Sentinel
👉 請到這裡使用 Azure Sentinel 搭配 LiteLLM Proxy
Lunary
步驟 1:安裝相依套件並設定環境變數
安裝依賴項
uv add litellm lunary
從 https://app.lunary.ai/settings 取得您的 Lunary 公開金鑰
export LUNARY_PUBLIC_KEY="<your-public-key>"
步驟 2:建立 config.yaml 並設定 lunary callback
model_list:
  - model_name: "*"
    litellm_params:
      model: "*"
litellm_settings:
  success_callback: ["lunary"]
  failure_callback: ["lunary"]
步驟 3:啟動 LiteLLM proxy
litellm --config config.yaml
步驟 4:發出請求
curl -X POST 'http://0.0.0.0:4000/chat/completions' \
-H 'Content-Type: application/json' \
-d '{
    "model": "gpt-4o",
    "messages": [
      {
        "role": "system",
        "content": "You are a helpful math tutor. Guide the user through the solution step by step."
      },
      {
        "role": "user",
        "content": "how can I solve 8x + 7 = -23"
      }
    ]
}'
MLflow
👉 請依照這裡的教學 here 開始在 LiteLLM Proxy Server 上使用 mlflow
自訂 Callback 類別 [Async]
當您想在 python 中執行自訂回呼時,請使用這個
步驟 1 - 建立您的自訂 litellm callback 類別
我們為此使用 litellm.integrations.custom_logger,關於 litellm 自訂回呼的更多詳細資訊 請見這裡
在 python 檔案中定義您的自訂回呼類別。
這裡有一個用於追蹤 key, user, model, prompt, response, tokens, cost 的自訂記錄器範例。我們建立一個名為 custom_callbacks.py 的檔案並初始化 proxy_handler_instance
from litellm.integrations.custom_logger import CustomLogger
import litellm

# This file includes the custom callbacks for LiteLLM Proxy
# Once defined, these can be passed in proxy_config.yaml
class MyCustomHandler(CustomLogger):
    def log_pre_api_call(self, model, messages, kwargs):
        print(f"Pre-API Call")

    def log_post_api_call(self, kwargs, response_obj, start_time, end_time):
        print(f"Post-API Call")

    def log_success_event(self, kwargs, response_obj, start_time, end_time):
        print("On Success")

    def log_failure_event(self, kwargs, response_obj, start_time, end_time):
        print(f"On Failure")

    async def async_log_success_event(self, kwargs, response_obj, start_time, end_time):
        print(f"On Async Success!")
        # log: key, user, model, prompt, response, tokens, cost
        # Access kwargs passed to litellm.completion()
        model = kwargs.get("model", None)
        messages = kwargs.get("messages", None)
        user = kwargs.get("user", None)

        # Access litellm_params passed to litellm.completion(), example access `metadata`
        litellm_params = kwargs.get("litellm_params", {})
        metadata = litellm_params.get("metadata", {})   # headers passed to LiteLLM proxy, can be found here

        # Calculate cost using  litellm.completion_cost()
        cost = litellm.completion_cost(completion_response=response_obj)
        response = response_obj
        # tokens used in response
        usage = response_obj["usage"]

        print(
            f"""
                Model: {model},
                Messages: {messages},
                User: {user},
                Usage: {usage},
                Cost: {cost},
                Response: {response}
                Proxy Metadata: {metadata}
            """
        )
        return

    async def async_log_failure_event(self, kwargs, response_obj, start_time, end_time):
        try:
            print(f"On Async Failure !")
            print("\nkwargs", kwargs)
            # Access kwargs passed to litellm.completion()
            model = kwargs.get("model", None)
            messages = kwargs.get("messages", None)
            user = kwargs.get("user", None)

            # Access litellm_params passed to litellm.completion(), example access `metadata`
            litellm_params = kwargs.get("litellm_params", {})
            metadata = litellm_params.get("metadata", {})   # headers passed to LiteLLM proxy, can be found here

            # Access Exceptions & Traceback
            exception_event = kwargs.get("exception", None)
            traceback_event = kwargs.get("traceback_exception", None)

            # Calculate cost using  litellm.completion_cost()
            cost = litellm.completion_cost(completion_response=response_obj)
            print("now checking response obj")

            print(
                f"""
                    Model: {model},
                    Messages: {messages},
                    User: {user},
                    Cost: {cost},
                    Response: {response_obj}
                    Proxy Metadata: {metadata}
                    Exception: {exception_event}
                    Traceback: {traceback_event}
                """
            )
        except Exception as e:
            print(f"Exception: {e}")

proxy_handler_instance = MyCustomHandler()

# Set litellm.callbacks = [proxy_handler_instance] on the proxy
步驟 2 - 在 config.yaml 中傳入您的自訂 callback 類別
我們將 Step1 中定義的自訂回呼類別傳遞給 config.yaml。
將 callbacks 設為 python_filename.logger_instance_name
在下面的設定中,我們傳遞:
- python_filename:
custom_callbacks.py - logger_instance_name:
proxy_handler_instance。這是在 Step 1 中定義的
callbacks: custom_callbacks.proxy_handler_instance
model_list:
  - model_name: gpt-3.5-turbo
    litellm_params:
      model: gpt-3.5-turbo

litellm_settings:
  callbacks: custom_callbacks.proxy_handler_instance # sets litellm.callbacks = [proxy_handler_instance]
步驟 2b - 從 S3/GCS 載入自訂 Callback(替代方式)
您也可以不使用本機 Python 檔案,而是直接從 S3 或 GCS bucket 載入自訂回呼。這對於集中管理回呼,或在容器化環境中部署時很有用。
URL 格式:
- S3:
s3://bucket-name/module_name.instance_name - GCS:
gcs://bucket-name/module_name.instance_name
範例 - 從 S3 載入:
假設您有一個檔案 custom_callbacks.py,儲存在您的 S3 bucket litellm-proxy 中,內容如下:
# custom_callbacks.py (stored in S3)
from litellm.integrations.custom_logger import CustomLogger
import litellm

class MyCustomHandler(CustomLogger):
    async def async_log_success_event(self, kwargs, response_obj, start_time, end_time):
        print(f"Custom UI SSO callback executed!")
        # Your custom logic here

    async def async_log_failure_event(self, kwargs, response_obj, start_time, end_time):
        print(f"Custom UI SSO failure callback!")
        # Your failure handling logic

# Instance that will be loaded by LiteLLM
custom_handler = MyCustomHandler()
設定:
model_list:
  - model_name: gpt-3.5-turbo
    litellm_params:
      model: gpt-3.5-turbo

litellm_settings:
  callbacks: ["s3://litellm-proxy/custom_callbacks.custom_handler"]
範例 - 從 GCS 載入:
model_list:
  - model_name: gpt-3.5-turbo
    litellm_params:
      model: gpt-3.5-turbo

litellm_settings:
  callbacks: ["gcs://my-gcs-bucket/custom_callbacks.custom_handler"]
運作方式:
- LiteLLM 偵測 S3/GCS URL 前綴
- 將 Python 檔下載到暫存位置
- 載入模組並擷取指定的實例
- 清理暫存檔案
- 使用該回呼實例進行記錄
這種做法可讓您:
- 在多個 proxy 實例之間集中管理回呼檔案
- 在不同環境之間共用回呼
- 在雲端儲存空間中為回呼檔案進行版本控制
步驟 2c - 在 Helm/Kubernetes 中掛載自訂 Callback(替代方式)
在使用 Helm 或 Kubernetes 部署時,您可以使用 subPath,將自訂回呼 Python 檔與您的 config.yaml 一起掛載,以避免覆蓋 config 目錄。
問題:
將 volume 掛載到某個目錄(例如 /app/)通常會隱藏該目錄中所有既有檔案,包括您的 config.yaml。
解決方案:
在您的 volumeMounts 中使用 subPath,即可掛載個別檔案,而不會覆蓋整個目錄。
範例 - Helm values.yaml:
# values.yaml
volumes:
  - name: callback-files
    configMap:
      name: litellm-callback-files

volumeMounts:
  - name: callback-files
    mountPath: /app/custom_callbacks.py  # Mount to specific FILE path
    subPath: custom_callbacks.py         # Required to avoid overwriting directory
使用您的回呼檔建立 ConfigMap:
apiVersion: v1
kind: ConfigMap
metadata:
  name: litellm-callback-files
data:
  custom_callbacks.py: |
    from litellm.integrations.custom_logger import CustomLogger

    class MyCustomHandler(CustomLogger):
        async def async_log_success_event(self, kwargs, response_obj, start_time, end_time):
            print(f"Success! Model: {kwargs.get('model')}")

    proxy_handler_instance = MyCustomHandler()
在您的 config.yaml 中參照:
litellm_settings:
  callbacks: custom_callbacks.proxy_handler_instance
運作方式:
subPath參數會告訴 Kubernetes 只掛載特定檔案- 這會將
custom_callbacks.py放到/app/,並與您既有的config.yaml一起存放 - LiteLLM 會自動在與 config 相同的目錄中尋找回呼檔案
- 不會覆蓋或隱藏任何檔案
注意: 您可以透過新增更多 volumeMounts 項目來掛載多個回呼檔案,每個項目都各自帶有自己的 subPath。
步驟 3 - 啟動 proxy + 測試請求
litellm --config proxy_config.yaml
curl --location 'http://0.0.0.0:4000/chat/completions' \
    --header 'Authorization: Bearer sk-1234' \
    --data ' {
    "model": "gpt-3.5-turbo",
    "messages": [
        {
        "role": "user",
        "content": "good morning good sir"
        }
    ],
    "user": "ishaan-app",
    "temperature": 0.2
    }'
proxy 上產生的記錄
On Success
    Model: gpt-3.5-turbo,
    Messages: [{'role': 'user', 'content': 'good morning good sir'}],
    User: ishaan-app,
    Usage: {'completion_tokens': 10, 'prompt_tokens': 11, 'total_tokens': 21},
    Cost: 3.65e-05,
    Response: {'id': 'chatcmpl-8S8avKJ1aVBg941y5xzGMSKrYCMvN', 'choices': [{'finish_reason': 'stop', 'index': 0, 'message': {'content': 'Good morning! How can I assist you today?', 'role': 'assistant'}}], 'created': 1701716913, 'model': 'gpt-3.5-turbo-0613', 'object': 'chat.completion', 'system_fingerprint': None, 'usage': {'completion_tokens': 10, 'prompt_tokens': 11, 'total_tokens': 21}}
    Proxy Metadata: {'user_api_key': None, 'headers': Headers({'host': '0.0.0.0:4000', 'user-agent': 'curl/7.88.1', 'accept': '*/*', 'authorization': 'Bearer sk-1234', 'content-length': '199', 'content-type': 'application/x-www-form-urlencoded'}), 'model_group': 'gpt-3.5-turbo', 'deployment': 'gpt-3.5-turbo-ModelID-gpt-3.5-turbo'}
記錄 Proxy 請求物件、標頭、URL
以下說明如何存取每個請求送往 proxy 的 url、headers、request body
class MyCustomHandler(CustomLogger):
    async def async_log_success_event(self, kwargs, response_obj, start_time, end_time):
        print(f"On Async Success!")

        litellm_params = kwargs.get("litellm_params", None)
        proxy_server_request = litellm_params.get("proxy_server_request")
        print(proxy_server_request)
預期輸出
{
  "url": "http://testserver/chat/completions",
  "method": "POST",
  "headers": {
    "host": "testserver",
    "accept": "*/*",
    "accept-encoding": "gzip, deflate",
    "connection": "keep-alive",
    "user-agent": "testclient",
    "authorization": "Bearer None",
    "content-length": "105",
    "content-type": "application/json"
  },
  "body": {
    "model": "Azure OpenAI GPT-4 Canada",
    "messages": [
      {
        "role": "user",
        "content": "hi"
      }
    ],
    "max_tokens": 10
  }
}
記錄在 config.yaml 中設定的 model_info
以下說明如何記錄設定在您的 proxy config.yaml 中的 model_info。關於在 config.yaml 上設定 model_info 的資訊
class MyCustomHandler(CustomLogger):
    async def async_log_success_event(self, kwargs, response_obj, start_time, end_time):
        print(f"On Async Success!")

        litellm_params = kwargs.get("litellm_params", None)
        model_info = litellm_params.get("model_info")
        print(model_info)
預期輸出
{'mode': 'embedding', 'input_cost_per_token': 0.002}
記錄來自 proxy 的回應
/chat/completions 與 /embeddings 回應皆可作為 response_obj 取得
注意:對於 /chat/completions,stream=True 與 non stream 回應皆可作為 response_obj 取得
class MyCustomHandler(CustomLogger):
    async def async_log_success_event(self, kwargs, response_obj, start_time, end_time):
        print(f"On Async Success!")
        print(response_obj)
預期輸出 /chat/completion [適用於 stream 與 non-stream 回應]
ModelResponse(
    id='chatcmpl-8Tfu8GoMElwOZuj2JlHBhNHG01PPo',
    choices=[
        Choices(
            finish_reason='stop',
            index=0,
            message=Message(
                content='As an AI language model, I do not have a physical body and therefore do not possess any degree or educational qualifications. My knowledge and abilities come from the programming and algorithms that have been developed by my creators.',
                role='assistant'
            )
        )
    ],
    created=1702083284,
    model='chatgpt-v-2',
    object='chat.completion',
    system_fingerprint=None,
    usage=Usage(
        completion_tokens=42,
        prompt_tokens=5,
        total_tokens=47
    )
)
預期輸出 /embeddings
{
    'model': 'ada',
    'data': [
        {
            'embedding': [
                -0.035126980394124985, -0.020624293014407158, -0.015343423001468182,
                -0.03980357199907303, -0.02750781551003456, 0.02111034281551838,
                -0.022069307044148445, -0.019442008808255196, -0.00955679826438427,
                -0.013143060728907585, 0.029583381488919258, -0.004725852981209755,
                -0.015198921784758568, -0.014069183729588985, 0.00897879246622324,
                0.01521205808967352,
                # ... (truncated for brevity)
            ]
        }
    ]
}
自訂 Callback API [Async]
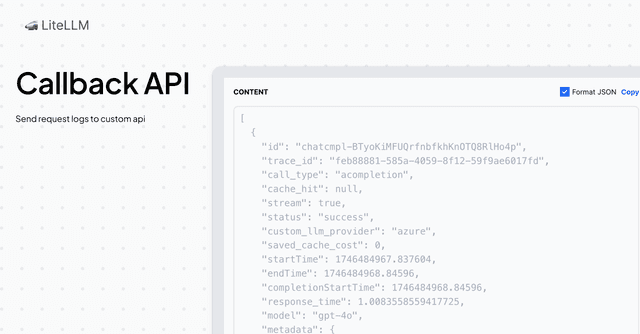
將 LiteLLM 記錄傳送至自訂 API 端點
這是僅限 Enterprise 的功能 在此開始使用 Enterprise
| 屬性 | 詳細資訊 |
|---|---|
| 說明 | 將 LLM 輸入/輸出記錄到自訂 API 端點 |
| Logged Payload | List[StandardLoggingPayload] LiteLLM 會將一份 StandardLoggingPayload 物件 清單記錄到您的端點 |
如果您有以下需求,請使用此功能:
- 想使用以非 Python 程式語言撰寫的自訂回呼
- 希望回呼在不同的微服務上執行
使用方式
- 在 litellm config.yaml 上設定
success_callback: ["generic_api"]
model_list:
  - model_name: openai/gpt-4o
    litellm_params:
      model: openai/gpt-4o
      api_key: os.environ/OPENAI_API_KEY

litellm_settings:
  success_callback: ["generic_api"]
- 為自訂 API 端點設定環境變數
| 環境變數 | 詳細說明 | 必填 |
|---|---|---|
GENERIC_LOGGER_ENDPOINT | 我們應將 callback 記錄傳送到的端點 + 路由 | 是 |
GENERIC_LOGGER_HEADERS | 選填:設定要傳送至自訂 API 端點的標頭 | 否,這是選填 |
GENERIC_LOGGER_ENDPOINT="https://webhook-test.com/30343bc33591bc5e6dc44217ceae3e0a"


# Optional: Set headers to be sent to the custom API endpoint
GENERIC_LOGGER_HEADERS="Authorization=Bearer <your-api-key>"
# if multiple headers, separate by commas
GENERIC_LOGGER_HEADERS="Authorization=Bearer <your-api-key>,X-Custom-Header=custom-header-value"
- 啟動 proxy
litellm --config /path/to/config.yaml
- 發送測試請求
curl -i --location 'http://0.0.0.0:4000/chat/completions' \
    --header 'Content-Type: application/json' \
    --header 'Authorization: Bearer sk-1234' \
    --data '{
    "model": "openai/gpt-4o",
    "messages": [
        {
        "role": "user",
        "content": "what llm are you"
        }
    ]
}'
Langsmith
- 在 litellm config.yaml 上設定
success_callback: ["langsmith"]
如果您使用自訂的 LangSmith 執行個體,可以設定
LANGSMITH_BASE_URL 環境變數以指向您的執行個體。
litellm_settings:
  success_callback: ["langsmith"]

environment_variables:
  LANGSMITH_API_KEY: "lsv2_pt_xxxxxxxx"
  LANGSMITH_PROJECT: "litellm-proxy"

  LANGSMITH_BASE_URL: "https://api.smith.langchain.com" # (Optional - only needed if you have a custom Langsmith instance)
- 啟動 Proxy
litellm --config /path/to/config.yaml
- 測試!
curl --location 'http://0.0.0.0:4000/chat/completions' \
--header 'Content-Type: application/json' \
--data ' {
      "model": "fake-openai-endpoint",
      "messages": [
        {
          "role": "user",
          "content": "Hello, Claude gm!"
        }
      ],
    }
'
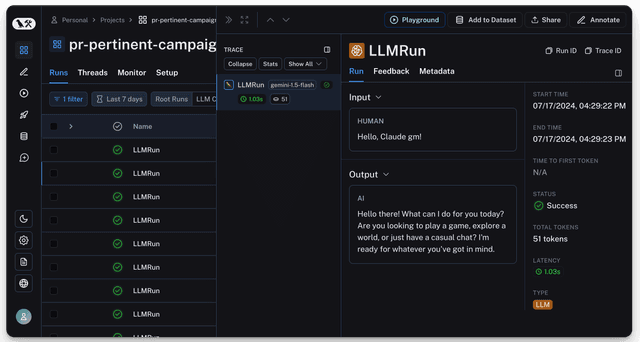
預期會在 Langfuse 上看到您的記錄
Arize AI
- 在 litellm config.yaml 上設定
success_callback: ["arize"]
model_list:
  - model_name: gpt-4
    litellm_params:
      model: openai/fake
      api_key: fake-key
      api_base: https://exampleopenaiendpoint-production.up.railway.app/

litellm_settings:
  callbacks: ["arize"]

environment_variables:
    ARIZE_SPACE_KEY: "d0*****"
    ARIZE_API_KEY: "141a****"
    ARIZE_ENDPOINT: "https://otlp.arize.com/v1" # OPTIONAL - your custom arize GRPC api endpoint
    ARIZE_HTTP_ENDPOINT: "https://otlp.arize.com/v1" # OPTIONAL - your custom arize HTTP api endpoint. Set either this or ARIZE_ENDPOINT
- 啟動 Proxy
litellm --config /path/to/config.yaml
- 測試!
curl --location 'http://0.0.0.0:4000/chat/completions' \
--header 'Content-Type: application/json' \
--data ' {
      "model": "fake-openai-endpoint",
      "messages": [
        {
          "role": "user",
          "content": "Hello, Claude gm!"
        }
      ],
    }
'
預期會在 Langfuse 上看到您的記錄
Langtrace
- 在 litellm config.yaml 上設定
success_callback: ["langtrace"]
model_list:
  - model_name: gpt-4
    litellm_params:
      model: openai/fake
      api_key: fake-key
      api_base: https://exampleopenaiendpoint-production.up.railway.app/

litellm_settings:
  callbacks: ["langtrace"]

environment_variables:
    LANGTRACE_API_KEY: "141a****"
- 啟動 Proxy
litellm --config /path/to/config.yaml
- 測試!
curl --location 'http://0.0.0.0:4000/chat/completions' \
--header 'Content-Type: application/json' \
--data ' {
      "model": "fake-openai-endpoint",
      "messages": [
        {
          "role": "user",
          "content": "Hello, Claude gm!"
        }
      ],
    }
'
Galileo
[BETA]
使用 www.rungalileo.io 記錄 LLM I/O
Beta 整合
必要環境變數
Galileo Cloud (app.galileo.ai):
export GALILEO_API_KEY=""
export GALILEO_PROJECT_ID=""
export GALILEO_LOG_STREAM_ID=""  # optional
export GALILEO_BASE_URL="https://api.galileo.ai"  # optional, defaults when GALILEO_API_KEY is set
Enterprise / self-hosted Observe:
export GALILEO_BASE_URL=""  # Replace 'console' with 'api' in your console URL (e.g. https://api.galileo.myenterprise.com)
export GALILEO_PROJECT_ID=""
export GALILEO_USERNAME=""
export GALILEO_PASSWORD=""
快速入門
- 新增至 Config.yaml
model_list:
- litellm_params:
    api_base: https://exampleopenaiendpoint-production.up.railway.app/
    api_key: my-fake-key
    model: openai/my-fake-model
  model_name: fake-openai-endpoint

environment_variables:
  GALILEO_API_KEY: "os.environ/GALILEO_API_KEY"
  GALILEO_PROJECT_ID: "your-project-id"
  GALILEO_LOG_STREAM_ID: "your-log-stream-id"  # optional

litellm_settings:
  success_callback: ["galileo"] # 👈 KEY CHANGE
- 啟動 Proxy
litellm --config /path/to/config.yaml
- 測試!
curl --location 'http://0.0.0.0:4000/chat/completions' \
--header 'Content-Type: application/json' \
--data ' {
      "model": "fake-openai-endpoint",
      "messages": [
        {
          "role": "user",
          "content": "what llm are you"
        }
      ],
    }
'
🎉 就這樣 - 預期會在您的 Galileo 儀表板上看到您的記錄
OpenMeter
使用 OpenMeter 根據客戶的 LLM API 用量向其計費
必要環境變數
# from https://openmeter.cloud
export OPENMETER_API_ENDPOINT="" # defaults to https://openmeter.cloud
export OPENMETER_API_KEY=""
快速入門
- 新增至 Config.yaml
model_list:
- litellm_params:
    api_base: https://openai-function-calling-workers.tasslexyz.workers.dev/
    api_key: my-fake-key
    model: openai/my-fake-model
  model_name: fake-openai-endpoint

litellm_settings:
  success_callback: ["openmeter"] # 👈 KEY CHANGE
- 啟動 Proxy
litellm --config /path/to/config.yaml
- 測試!
curl --location 'http://0.0.0.0:4000/chat/completions' \
--header 'Content-Type: application/json' \
--data ' {
      "model": "fake-openai-endpoint",
      "messages": [
        {
          "role": "user",
          "content": "what llm are you"
        }
      ],
    }
'
DynamoDB
我們將使用 --config 來設定
litellm.success_callback = ["dynamodb"]litellm.dynamodb_table_name = "your-table-name"
這會將所有成功的 LLM 呼叫記錄到 DynamoDB
步驟 1 在 .env 中設定 AWS 憑證
AWS_ACCESS_KEY_ID = ""
AWS_SECRET_ACCESS_KEY = ""
AWS_REGION_NAME = ""
步驟 2:建立 config.yaml 檔案並設定 litellm_settings:success_callback
model_list:
 - model_name: gpt-3.5-turbo
    litellm_params:
      model: gpt-3.5-turbo
litellm_settings:
  success_callback: ["dynamodb"]
  dynamodb_table_name: your-table-name
步驟 3:啟動 proxy,發送測試請求
啟動 proxy
litellm --config config.yaml --debug
測試請求
curl --location 'http://0.0.0.0:4000/chat/completions' \
    --header 'Content-Type: application/json' \
    --data ' {
    "model": "Azure OpenAI GPT-4 East",
    "messages": [
        {
        "role": "user",
        "content": "what llm are you"
        }
    ]
    }'
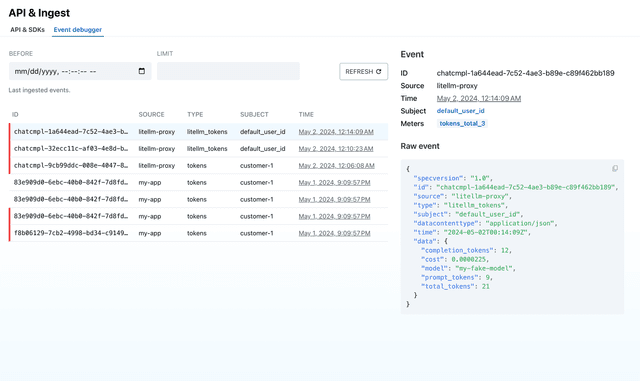
您的記錄應可在 DynamoDB 上取得
記錄到 DynamoDB 的 /chat/completions 資料
{
  "id": {
    "S": "chatcmpl-8W15J4480a3fAQ1yQaMgtsKJAicen"
  },
  "call_type": {
    "S": "acompletion"
  },
  "endTime": {
    "S": "2023-12-15 17:25:58.424118"
  },
  "messages": {
    "S": "[{'role': 'user', 'content': 'This is a test'}]"
  },
  "metadata": {
    "S": "{}"
  },
  "model": {
    "S": "gpt-3.5-turbo"
  },
  "modelParameters": {
    "S": "{'temperature': 0.7, 'max_tokens': 100, 'user': 'ishaan-2'}"
  },
  "response": {
    "S": "ModelResponse(id='chatcmpl-8W15J4480a3fAQ1yQaMgtsKJAicen', choices=[Choices(finish_reason='stop', index=0, message=Message(content='Great! What can I assist you with?', role='assistant'))], created=1702641357, model='gpt-3.5-turbo-0613', object='chat.completion', system_fingerprint=None, usage=Usage(completion_tokens=9, prompt_tokens=11, total_tokens=20))"
  },
  "startTime": {
    "S": "2023-12-15 17:25:56.047035"
  },
  "usage": {
    "S": "Usage(completion_tokens=9, prompt_tokens=11, total_tokens=20)"
  },
  "user": {
    "S": "ishaan-2"
  }
}
記錄到 DynamoDB 的 /embeddings 資料
{
  "id": {
    "S": "4dec8d4d-4817-472d-9fc6-c7a6153eb2ca"
  },
  "call_type": {
    "S": "aembedding"
  },
  "endTime": {
    "S": "2023-12-15 17:25:59.890261"
  },
  "messages": {
    "S": "['hi']"
  },
  "metadata": {
    "S": "{}"
  },
  "model": {
    "S": "text-embedding-ada-002"
  },
  "modelParameters": {
    "S": "{'user': 'ishaan-2'}"
  },
  "response": {
    "S": "EmbeddingResponse(model='text-embedding-ada-002-v2', data=[{'embedding': [-0.03503197431564331, -0.020601635798811913, -0.015375726856291294,
  }
}
Sentry
如果 API 請求失敗(llm/database),您可以將它們記錄到 Sentry:
步驟 1 安裝 Sentry
uv add --upgrade sentry-sdk
步驟 2:儲存您的 Sentry_DSN,並新增 litellm_settings:failure_callback
export SENTRY_DSN="your-sentry-dsn"
# Optional: Configure Sentry sampling rates
export SENTRY_API_SAMPLE_RATE="1.0"  # Controls what percentage of errors are sent (default: 1.0 = 100%)
export SENTRY_API_TRACE_RATE="1.0"   # Controls what percentage of transactions are sampled for performance monitoring (default: 1.0 = 100%)
export SENTRY_ENVIRONMENT="development" # Controls the Sentry Environment (default: production)
model_list:
 - model_name: gpt-3.5-turbo
    litellm_params:
      model: gpt-3.5-turbo
litellm_settings:
  # other settings
  failure_callback: ["sentry"]
general_settings:
  database_url: "my-bad-url" # set a fake url to trigger a sentry exception
步驟 3:啟動 proxy,發出測試請求
啟動 proxy
litellm --config config.yaml --debug
測試請求
litellm --test
Athina
Athina 可讓您記錄 LLM 輸入/輸出,以進行監控、分析與可觀測性。
我們將使用 --config 來設定 litellm.success_callback = ["athina"];這會將所有成功的 LLM 請求記錄到 athina
步驟 1 設定 Athina API 金鑰
ATHINA_API_KEY = "your-athina-api-key"
步驟 2:建立 config.yaml 檔案,並設定 litellm_settings:success_callback
model_list:
  - model_name: gpt-3.5-turbo
    litellm_params:
      model: gpt-3.5-turbo
litellm_settings:
  success_callback: ["athina"]
步驟 3:啟動 proxy,發出測試請求
啟動 proxy
litellm --config config.yaml --debug
測試請求
curl --location 'http://0.0.0.0:4000/chat/completions' \
    --header 'Content-Type: application/json' \
    --data ' {
    "model": "gpt-3.5-turbo",
    "messages": [
        {
        "role": "user",
        "content": "which llm are you"
        }
    ]
    }'