建立直通端點
將請求從您的 LiteLLM proxy 路由到任何外部 API。非常適合自訂模型、圖像生成 API,或任何您想透過 LiteLLM 代理的服務。
主要優點:
- 上線 Bria API 和 Mistral OCR 等第三方端點
- 設定每次請求的自訂定價
- Proxy 管理員無需提供開發者對上游 LLM 提供者(如 Bria、Mistral OCR 等)的 API 金鑰
- 維持集中式驗證、支出追蹤、預算控管
使用 UI 快速開始(建議)
建立直通端點最簡單的方式是透過 LiteLLM UI。在此範例中,我們將上線 Bria API 並設定每次請求的成本。
步驟 1:建立路由對應
若要建立直通端點:
- 前往 LiteLLM Proxy UI
- 前往
Models + Endpoints分頁 - 點擊
Pass Through Endpoints - 點擊「Add Pass Through Endpoint」
- 輸入以下詳細資訊:
必要欄位:
Path Prefix:用戶端在呼叫 LiteLLM Proxy 時使用的路由(例如:/bria、/mistral-ocr)Target URL:請求將被轉送至的 URL
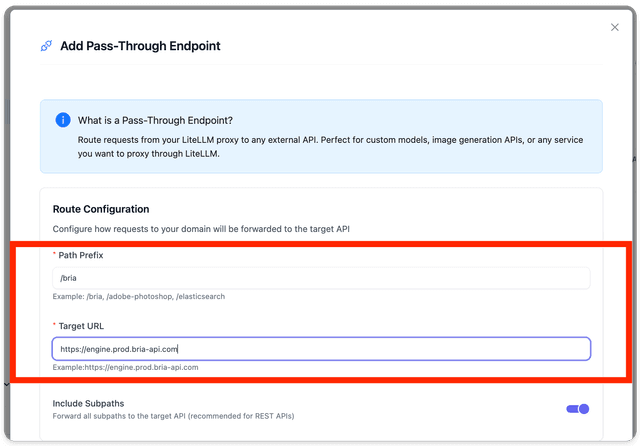
路由對應範例:
上述設定會建立以下路由對應:
| LiteLLM Proxy 路由 | 目標 URL |
|---|---|
/bria | https://engine.prod.bria-api.com |
/bria/v1/text-to-image/base/model | https://engine.prod.bria-api.com/v1/text-to-image/base/model |
/bria/v1/enhance_image | https://engine.prod.bria-api.com/v1/enhance_image |
/bria/<any-sub-path> | https://engine.prod.bria-api.com/<any-sub-path> |
所有路由都會以您的 LiteLLM proxy 基礎 URL 作為前綴:https://<litellm-proxy-base-url>
步驟 2:設定標頭與定價
設定所需的驗證與定價:
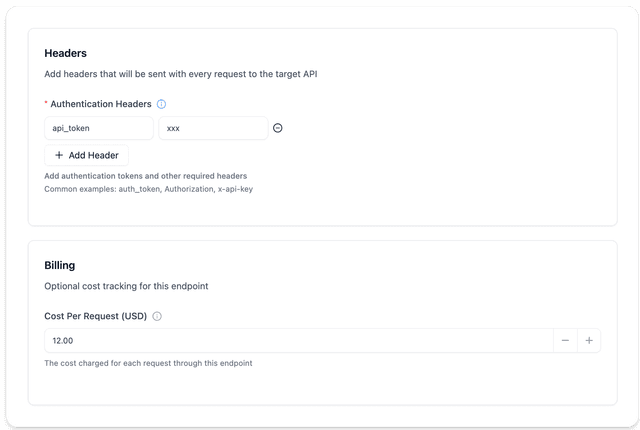
驗證設定:
- Bria API 需要
api_token標頭 - 輸入您的 Bria API 金鑰作為
api_token標頭的值
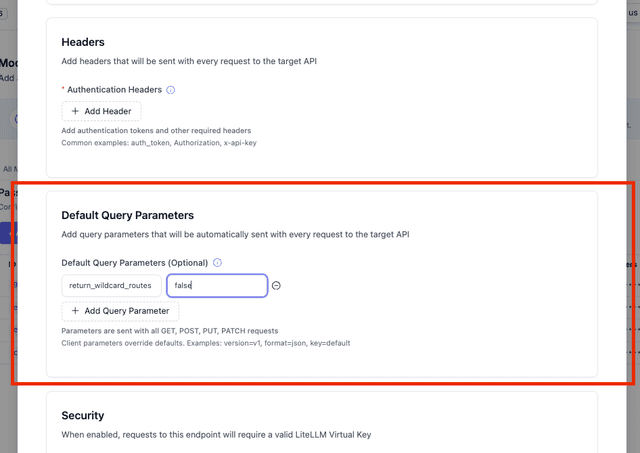
預設查詢參數(選用):
- 新增將隨每個請求自動送出的查詢參數
- 非常適合 API 版本控管、格式規格或預設設定
- 用戶端可透過提供自己的值來覆寫這些參數
- 範例:
version=v1、format=json、timeout=30
定價設定:
- 設定每次請求的成本(例如:此範例中為 $12.00)
- 這可為您的使用者啟用成本追蹤與計費
步驟 3:儲存您的端點
完成設定後:
- 檢視您的設定
- 點擊「Add Pass Through Endpoint」
- 您的端點將被建立並立即可用
步驟 4:測試您的端點
透過您的 LiteLLM Proxy 對 Bria API 發送測試請求,以驗證您的設定:
curl -i -X POST \
  'http://localhost:4000/bria/v1/text-to-image/base/2.3' \
  -H 'Content-Type: application/json' \
  -H 'Authorization: Bearer <your-litellm-api-key>' \
  -d '{
    "prompt": "a book",
    "num_results": 2,
    "sync": true
  }'
預期回應: 如果一切都設定正確,您應該會收到來自 Bria API 的回應,其中包含生成的圖像資料。
Config.yaml 設定
您也可以使用 config.yaml 檔案建立直通端點。以下說明如何新增一個將請求轉送至 Cohere API 的 /v1/rerank 路由:
設定範例
general_settings:
  master_key: sk-1234
  pass_through_endpoints:
    - path: "/v1/rerank"                                  # Route on LiteLLM Proxy
      target: "https://api.cohere.com/v1/rerank"          # Target endpoint
      headers:                                            # Headers to forward
        Authorization: "bearer os.environ/COHERE_API_KEY"
        content-type: application/json
        accept: application/json
      forward_headers: true                               # Forward all incoming headers
      default_query_params:                               # Optional: Default query parameters
        version: "v1"                                     # Always send version=v1
        format: "json"                                    # Default format (can be overridden)
啟動與測試
-
啟動 proxy:
litellm --config config.yaml --detailed_debug -
發送測試請求:
curl --request POST \
  --url http://localhost:4000/v1/rerank \
  --header 'accept: application/json' \
  --header 'content-type: application/json' \
  --data '{
    "model": "rerank-english-v3.0",
    "query": "What is the capital of the United States?",
    "top_n": 3,
    "documents": ["Carson City is the capital city of the American state of Nevada."]
  }'
預期回應
{
  "id": "37103a5b-8cfb-48d3-87c7-da288bedd429",
  "results": [
    {
      "index": 2,
      "relevance_score": 0.999071
    }
  ],
  "meta": {
    "api_version": {"version": "1"},
    "billed_units": {"search_units": 1}
  }
}
設定參考
完整規格
general_settings:
  pass_through_request_timeout: 600   # Optional: upstream timeout (seconds) for all pass-through routes. Default: 600
  pass_through_endpoints:
    - path: string                    # Route on LiteLLM Proxy Server
      target: string                  # Target URL for forwarding
      auth: boolean                   # Enable LiteLLM authentication (Enterprise)
      forward_headers: boolean        # Forward all incoming headers
      include_subpath: boolean        # If true, forwards requests to sub-paths (default: false)
      timeout: float                  # Optional: per-endpoint upstream timeout (seconds). Overrides pass_through_request_timeout
      methods: list[string]           # Optional: HTTP methods (e.g., ["GET", "POST"]). If not specified, all methods are supported.
      default_query_params:           # Optional: Default query parameters sent with every request
        <param-name>: string          # Key-value pairs (e.g., version: "v1", format: "json")
      headers:                        # Custom headers to add
        Authorization: string         # Auth header for target API
        content-type: string         # Request content type
        accept: string               # Expected response format
        LANGFUSE_PUBLIC_KEY: string  # For Langfuse endpoints
        LANGFUSE_SECRET_KEY: string  # For Langfuse endpoints
        <custom-header>: string      # Any custom header
請求逾時
直通路由預設的上游逾時為 600 秒。設定 general_settings.pass_through_request_timeout 可作為全域覆寫,或在自訂端點上設定 timeout(以每個端點為準)。適用於自訂直通端點與原生提供者 passthrough 路由(例如 Bedrock /converse)。
標頭選項
- Authorization:目標 API 的驗證
- content-type:請求主體格式規格
- accept:預期的回應格式
- LANGFUSE_PUBLIC_KEY/SECRET_KEY:用於 Langfuse 整合
- 自訂標頭:任何額外的鍵值配對
預設查詢參數
- 參數優先順序:用戶端參數 > URL 參數 > 預設參數
- 使用情境:API 版本控管、驗證權杖、格式控制、功能旗標
- 覆寫能力:用戶端可覆寫任何預設參數
- 範例:
version: "v1"、format: "json"、timeout: "30"
子路徑路由
預設情況下,直通端點只會比對指定的完全相同路徑。若要將請求轉送至子路徑,請設定 include_subpath: true:
general_settings:
  pass_through_endpoints:
    - path: "/custom-api"                    # Any path prefix you choose
      target: "https://api.example.com"
      include_subpath: true  # Forward /custom-api/*, not just /custom-api
| 設定 | 行為 |
|---|---|
include_subpath: false(預設) | 只會轉送 /custom-api |
include_subpath: true | /custom-api、/custom-api/v1/chat、/custom-api/anything 都會被轉送 |
預設查詢參數
直通端點支援預設查詢參數,這些參數會自動新增到每個請求中。這對 API 版本控管、格式規格、驗證權杖或任何預設設定都很有用。
運作方式
參數優先順序(由高到低):
- 用戶端提供的參數(在請求 URL 中)
- URL 參數(來自目標 URL)
- 預設參數(來自設定)
設定範例
general_settings:
  pass_through_endpoints:
    - path: "/api/v1"
      target: "https://external-api.com/service?timeout=60"  # URL has timeout=60
      default_query_params:
        version: "v1"          # Always add version=v1
        format: "json"         # Default format=json (can be overridden)
        auth_level: "basic"    # Always add auth_level=basic
請求範例
用戶端請求: GET /api/v1/users
實際後端呼叫: https://external-api.com/service?version=v1&format=json&auth_level=basic&timeout=60
用戶端請求: GET /api/v1/users?format=xml&custom=value
實際後端呼叫: https://external-api.com/service?version=v1&auth_level=basic&timeout=60&format=xml&custom=value
- 用戶端
format=xml會覆寫預設的format=json - 預設的
version=v1與auth_level=basic會被保留 - URL
timeout=60會被保留 - 用戶端
custom=value會被新增
使用情境
- API 版本控管:一律傳送
version=v2以維持相容性 - 驗證:新增如
api_key=default_key的驗證權杖 - 格式控制:預設為
format=json,但允許用戶端覆寫 - 速率限制:將
rate_limit=standard設為預設 - 功能旗標:預設啟用
experimental=false
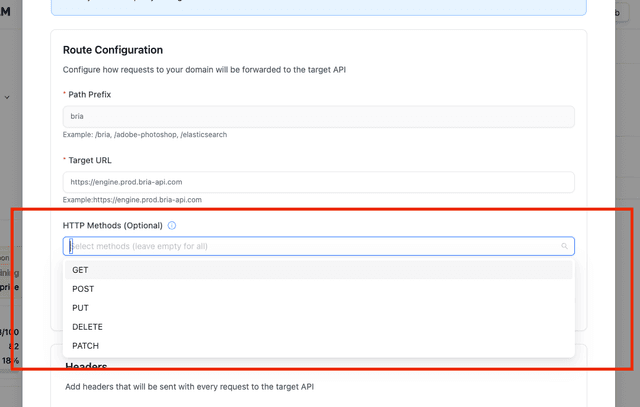
您可以使用不同的 HTTP 方法,為相同路徑設定不同的目標 URL。當不同的後端處理不同操作時,這很有用:
general_settings:
  pass_through_endpoints:
    # GET requests to /azure/kb go to read API
    - path: "/azure/kb"
      target: "https://read-api.example.com/knowledge-base"
      methods: ["GET"]
      headers:
        Authorization: "bearer os.environ/READ_API_KEY"

    # POST requests to /azure/kb go to write API
    - path: "/azure/kb"
      target: "https://write-api.example.com/knowledge-base"
      methods: ["POST"]
      headers:
        Authorization: "bearer os.environ/WRITE_API_KEY"

    # PUT requests to /azure/kb go to update API
    - path: "/azure/kb"
      target: "https://update-api.example.com/knowledge-base"
      methods: ["PUT"]
      headers:
        Authorization: "bearer os.environ/UPDATE_API_KEY"
重點:
- 如果未指定
methods,該端點支援所有 HTTP 方法(GET、POST、PUT、DELETE、PATCH) - 只要方法不同,多個端點可以共用相同路徑
- 您可以為單一端點指定多個方法:
methods: ["GET", "POST"] - 這讓您可以依據操作類型路由到不同的後端
進階:自訂 Adapter
對於複雜整合(例如 Anthropic/Bedrock 用戶端),您可以建立自訂 adapter,在不同的 API schema 之間進行轉換。
1. 建立 Adapter
from litellm import adapter_completion
from litellm.integrations.custom_logger import CustomLogger
from litellm.types.llms.anthropic import AnthropicMessagesRequest, AnthropicResponse

class AnthropicAdapter(CustomLogger):
    def translate_completion_input_params(self, kwargs):
        """Translate Anthropic format to OpenAI format"""
        request_body = AnthropicMessagesRequest(**kwargs)
        return litellm.AnthropicConfig().translate_anthropic_to_openai(
            anthropic_message_request=request_body
        )

    def translate_completion_output_params(self, response):
        """Translate OpenAI response back to Anthropic format"""
        return litellm.AnthropicConfig().translate_openai_response_to_anthropic(
            response=response
        )

anthropic_adapter = AnthropicAdapter()
2. 設定端點
model_list:
  - model_name: my-claude-endpoint
    litellm_params:
      model: gpt-3.5-turbo
      api_key: os.environ/OPENAI_API_KEY

general_settings:
  master_key: sk-1234
  pass_through_endpoints:
    - path: "/v1/messages"
      target: custom_callbacks.anthropic_adapter
      headers:
        litellm_user_api_key: "x-api-key"
3. 測試自訂端點
curl --location 'http://0.0.0.0:4000/v1/messages' \
  -H 'x-api-key: sk-1234' \
  -H 'anthropic-version: 2023-06-01' \
  -H 'content-type: application/json' \
  -d '{
    "model": "my-claude-endpoint",
    "max_tokens": 1024,
    "messages": [{"role": "user", "content": "Hello, world"}]
  }'
教學 - 將 Azure OpenAI Assistants API 加入為直通端點
在這部影片中,我們將把 Azure OpenAI Assistants API 加入為 LiteLLM Proxy 的直通端點。
疑難排解
常見問題
驗證錯誤:
- 確認 API 金鑰已正確設定在標頭中
- 確認目標 API 接受所提供的驗證方法
路由問題:
- 確認路徑前綴與您的請求 URL 相符
- 確認可存取目標 URL
- 檢查設定中是否有尾端斜線
回應錯誤:
- 使用
--detailed_debug啟用詳細除錯 - 檢查 LiteLLM proxy 記錄中的錯誤詳細資訊
- 確認目標 API 預期的請求格式
允許 Team JWT 使用 pass-through 路由
如果您使用 pass-through provider 路由(例如 /anthropic/*),並希望您的 JWT team token 可存取這些路由,請將 mapped_pass_through_routes 加入 team_allowed_routes 中的 litellm_jwtauth,或明確新增相關路由。
範例(proxy_server_config.yaml):
general_settings:
  enable_jwt_auth: True
  litellm_jwtauth:
    team_ids_jwt_field: "team_ids"
    team_allowed_routes: ["openai_routes","info_routes","mapped_pass_through_routes"]
取得協助
我們的電子郵件 ✉️ ishaan@berri.ai / krrish@berri.ai