虛擬金鑰
透過閘道的虛擬金鑰追蹤支出並控制模型存取
設定
需求:
- 需要一個 postgres 資料庫(例如 Supabase、Neon 等)
- 在您的 env 中設定
DATABASE_URL=postgresql://<user>:<password>@<host>:<port>/<dbname> - 設定一個
master key,這是您的 Proxy 管理員金鑰 - 您可以用它來建立其他金鑰(🚨 必須以sk-開頭)。- ** 在 config.yaml 中設定**:將您的 master key 設在
general_settings:master_key,如下方範例 - ** 設定環境變數**:設定
LITELLM_MASTER_KEY
- ** 在 config.yaml 中設定**:將您的 master key 設在
(proxy Dockerfile 會檢查是否已設定 DATABASE_URL,然後初始化 DB 連線)
export DATABASE_URL=postgresql://<user>:<password>@<host>:<port>/<dbname>
接著,您可以透過呼叫 /key/generate 端點來產生金鑰。
快速入門 - 產生金鑰
步驟 1:儲存 postgres db url
model_list:
  - model_name: gpt-4
    litellm_params:
        model: ollama/llama2
  - model_name: gpt-3.5-turbo
    litellm_params:
        model: ollama/llama2

general_settings:
  master_key: sk-1234
  database_url: "postgresql://<user>:<password>@<host>:<port>/<dbname>" # 👈 KEY CHANGE
步驟 2:啟動 litellm
litellm --config /path/to/config.yaml
步驟 3:產生金鑰
curl 'http://0.0.0.0:4000/key/generate' \
--header 'Authorization: Bearer <your-master-key>' \
--header 'Content-Type: application/json' \
--data-raw '{"models": ["gpt-3.5-turbo", "gpt-4"], "metadata": {"user": "ishaan@berri.ai"}}'
消費追蹤
取得支出依據:
- 金鑰 - 透過
/key/infoSwagger - 使用者 - 透過
/user/infoSwagger - 團隊 - 透過
/team/infoSwagger - ⏳ 最終使用者 - 透過
/end_user/info- 在此 issue 留言以進行最終使用者成本追蹤
它是如何計算的?
每個模型的成本儲存在這裡,並由 completion_cost 函式計算。
它是如何追蹤的?
支出會針對 "LiteLLM_VerificationTokenTable" 中的金鑰自動追蹤。如果金鑰附帶 'user_id' 或 'team_id',則該使用者的支出會記錄在 "LiteLLM_UserTable" 中,而團隊的支出會記錄在 "LiteLLM_TeamTable" 中。
- 金鑰支出
- 使用者支出
- 團隊支出
您可以使用 /key/info 端點取得某個金鑰的支出。
curl 'http://0.0.0.0:4000/key/info?key=<user-key>' \
     -X GET \
     -H 'Authorization: Bearer <your-master-key>'
當使用 litellm 的 completion_cost() 函式對 /completions、/chat/completions、/embeddings 發出請求時,這會自動更新(以 USD 計)。 查看程式碼。
範例回應
{
    "key": "sk-tXL0wt5-lOOVK9sfY2UacA",
    "info": {
        "token": "sk-tXL0wt5-lOOVK9sfY2UacA",
        "spend": 0.0001065, # 👈 SPEND
        "expires": "2023-11-24T23:19:11.131000Z",
        "models": [
            "gpt-3.5-turbo",
            "gpt-4",
            "claude-2"
        ],
        "aliases": {
            "mistral-7b": "gpt-3.5-turbo"
        },
        "config": {}
    }
}
1. 建立使用者
curl --location 'http://localhost:4000/user/new' \
--header 'Authorization: Bearer <your-master-key>' \
--header 'Content-Type: application/json' \
--data-raw '{user_email: "krrish@berri.ai"}'
預期回應
{
    ...
    "expires": "2023-12-22T09:53:13.861000Z",
    "user_id": "my-unique-id", # 👈 unique id
    "max_budget": 0.0
}
2. 為該使用者建立金鑰
curl 'http://0.0.0.0:4000/key/generate' \
--header 'Authorization: Bearer <your-master-key>' \
--header 'Content-Type: application/json' \
--data-raw '{"models": ["gpt-3.5-turbo", "gpt-4"], "user_id": "my-unique-id"}'
回傳一組金鑰 - sk-...。
3. 查看使用者的支出
curl 'http://0.0.0.0:4000/user/info?user_id=my-unique-id' \
     -X GET \
     -H 'Authorization: Bearer <your-master-key>'
預期回應
{
  ...
  "spend": 0 # 👈 SPEND
}
如果您希望金鑰可由多人擁有,請使用團隊(例如用於正式環境應用程式)。
1. 建立團隊
curl --location 'http://localhost:4000/team/new' \
--header 'Authorization: Bearer <your-master-key>' \
--header 'Content-Type: application/json' \
--data-raw '{"team_alias": "my-awesome-team"}'
預期回應
{
    ...
    "expires": "2023-12-22T09:53:13.861000Z",
    "team_id": "my-unique-id", # 👈 unique id
    "max_budget": 0.0
}
2. 為該團隊建立金鑰
curl 'http://0.0.0.0:4000/key/generate' \
--header 'Authorization: Bearer <your-master-key>' \
--header 'Content-Type: application/json' \
--data-raw '{"models": ["gpt-3.5-turbo", "gpt-4"], "team_id": "my-unique-id"}'
回傳一組金鑰 - sk-...。
3. 查看團隊的支出
curl 'http://0.0.0.0:4000/team/info?team_id=my-unique-id' \
     -X GET \
     -H 'Authorization: Bearer <your-master-key>'
預期回應
{
  ...
  "spend": 0 # 👈 SPEND
}
模型別名
如果預期使用者會使用指定模型(即 gpt3-5),而您想要:
- 嘗試將請求升級(即 GPT4)
- 或將其降級(即 Mistral)
您可以這樣做:
步驟 1:在 config.yaml 中建立模型群組(儲存模型名稱、API 金鑰等)
model_list:
  - model_name: my-free-tier
    litellm_params:
        model: huggingface/HuggingFaceH4/zephyr-7b-beta
        api_base: http://0.0.0.0:8001
  - model_name: my-free-tier
    litellm_params:
        model: huggingface/HuggingFaceH4/zephyr-7b-beta
        api_base: http://0.0.0.0:8002
  - model_name: my-free-tier
    litellm_params:
        model: huggingface/HuggingFaceH4/zephyr-7b-beta
        api_base: http://0.0.0.0:8003
  - model_name: my-paid-tier
    litellm_params:
        model: gpt-4
        api_key: my-api-key
步驟 2:產生金鑰
curl -X POST "https://0.0.0.0:4000/key/generate" \
-H "Authorization: Bearer <your-master-key>" \
-H "Content-Type: application/json" \
-d '{
	"models": ["my-free-tier"],
	"aliases": {"gpt-3.5-turbo": "my-free-tier"}, # 👈 KEY CHANGE
	"duration": "30min"
}'
- 如何升級 / 降級請求? 變更別名對應
步驟 3:測試金鑰
curl -X POST "https://0.0.0.0:4000/key/generate" \
-H "Authorization: Bearer <user-key>" \
-H "Content-Type: application/json" \
-d '{
    "model": "gpt-3.5-turbo",
    "messages": [
        {
            "role": "user",
            "content": "this is a test request, write a short poem"
        }
    ]
}'
進階
在自訂標頭中傳遞 LiteLLM 金鑰
使用這個可讓 LiteLLM proxy 改為在自訂標頭中尋找虛擬金鑰,而不是預設的 "Authorization" 標頭
步驟 1 在 litellm config.yaml 上定義 litellm_key_header_name 名稱
model_list:
  - model_name: fake-openai-endpoint
    litellm_params:
      model: openai/fake
      api_key: fake-key
      api_base: https://exampleopenaiendpoint-production.up.railway.app/

general_settings:
  master_key: sk-1234
  litellm_key_header_name: "X-Litellm-Key" # 👈 Key Change
步驟 2 測試它
在此請求中,litellm 會使用 X-Litellm-Key 標頭中的虛擬金鑰
- curl
- OpenAI Python SDK
curl http://localhost:4000/v1/chat/completions \
  -H "Content-Type: application/json" \
  -H "X-Litellm-Key: Bearer sk-1234" \
  -H "Authorization: Bearer bad-key" \
  -d '{
    "model": "fake-openai-endpoint",
    "messages": [
      {"role": "user", "content": "Hello, Claude gm!"}
    ]
  }'
預期回應
預期會從 litellm proxy 收到成功回應,因為在 X-Litellm-Key 中傳入的金鑰是有效的
{"id":"chatcmpl-f9b2b79a7c30477ab93cd0e717d1773e","choices":[{"finish_reason":"stop","index":0,"message":{"content":"\n\nHello there, how may I assist you today?","role":"assistant","tool_calls":null,"function_call":null}}],"created":1677652288,"model":"gpt-3.5-turbo-0125","object":"chat.completion","system_fingerprint":"fp_44709d6fcb","usage":{"completion_tokens":12,"prompt_tokens":9,"total_tokens":21}
client = openai.OpenAI(
    api_key="not-used",
    base_url="https://api-gateway-url.com/llmservc/api/litellmp",
    default_headers={
        "Authorization": f"Bearer {API_GATEWAY_TOKEN}", # (optional) For your API Gateway
        "X-Litellm-Key": f"Bearer sk-1234"              # For LiteLLM Proxy
    }
)
啟用/停用虛擬金鑰
停用金鑰
curl -L -X POST 'http://0.0.0.0:4000/key/block' \
-H 'Authorization: Bearer LITELLM_MASTER_KEY' \
-H 'Content-Type: application/json' \
-d '{"key": "KEY-TO-BLOCK"}'
預期回應:
{
  ...
  "blocked": true
}
啟用金鑰
curl -L -X POST 'http://0.0.0.0:4000/key/unblock' \
-H 'Authorization: Bearer LITELLM_MASTER_KEY' \
-H 'Content-Type: application/json' \
-d '{"key": "KEY-TO-UNBLOCK"}'
{
  ...
  "blocked": false
}
自訂 /key/generate
如果您需要在產生 Proxy API 金鑰之前加入自訂邏輯(範例:驗證 team_id)
1. 編寫自訂 custom_generate_key_fn
custom_generate_key_fn 函式的輸入是一個單一參數:data (型別:GenerateKeyRequest)
您的 custom_generate_key_fn 輸出應為具有以下結構的字典
{
    "decision": False,
    "message": "This violates LiteLLM Proxy Rules. No team id provided.",
}
-
decision(型別:bool):布林值,表示是否允許產生金鑰(True)或不允許(False)。
-
message(型別:str,選填):選用訊息,提供關於該決策的額外資訊。當 decision 為 False 時會包含此欄位。
async def custom_generate_key_fn(data: GenerateKeyRequest)-> dict:
        """
        Asynchronous function for generating a key based on the input data.

        Args:
            data (GenerateKeyRequest): The input data for key generation.

        Returns:
            dict: A dictionary containing the decision and an optional message.
            {
                "decision": False,
                "message": "This violates LiteLLM Proxy Rules. No team id provided.",
            }
        """

        # decide if a key should be generated or not
        print("using custom auth function!")
        data_json = data.json()  # type: ignore

        # Unpacking variables
        team_id = data_json.get("team_id")
        duration = data_json.get("duration")
        models = data_json.get("models")
        aliases = data_json.get("aliases")
        config = data_json.get("config")
        spend = data_json.get("spend")
        user_id = data_json.get("user_id")
        max_parallel_requests = data_json.get("max_parallel_requests")
        metadata = data_json.get("metadata")
        tpm_limit = data_json.get("tpm_limit")
        rpm_limit = data_json.get("rpm_limit")

        if team_id is not None and team_id == "litellm-core-infra@gmail.com":
            # only team_id="litellm-core-infra@gmail.com" can make keys
            return {
                "decision": True,
            }
        else:
            print("Failed custom auth")
            return {
                "decision": False,
                "message": "This violates LiteLLM Proxy Rules. No team id provided.",
            }
2. 傳遞檔案路徑(相對於 config.yaml)
將 config.yaml 的檔案路徑傳入
例如,如果它們都在同一個目錄中 - ./config.yaml 和 ./custom_auth.py,會是這樣:
model_list:
  - model_name: "openai-model"
    litellm_params:
      model: "gpt-3.5-turbo"

litellm_settings:
  drop_params: True
  set_verbose: True

general_settings:
  custom_key_generate: custom_auth.custom_generate_key_fn
/key/generate 參數上限
如果您需要為每個 key 設定 max_budget、budget_duration 或任何 key/generate 參數的預設上限,請使用這個。
設定 litellm_settings:upperbound_key_generate_params:
litellm_settings:
  upperbound_key_generate_params:
    max_budget: 100 # Optional[float], optional): upperbound of $100, for all /key/generate requests
    budget_duration: "10d" # Optional[str], optional): upperbound of 10 days for budget_duration values
    duration: "30d" # Optional[str], optional): upperbound of 30 days for all /key/generate requests
    max_parallel_requests: 1000 # (Optional[int], optional): Max number of requests that can be made in parallel. Defaults to None.
    tpm_limit: 1000 #(Optional[int], optional): Tpm limit. Defaults to None.
    rpm_limit: 1000 #(Optional[int], optional): Rpm limit. Defaults to None.
** 預期行為 **
- 送出一個帶有
/key/generate的max_budget=200請求 - 由於 100 是上限,key 會以
max_budget=100建立
/key/generate 預設參數
如果您需要控制每個 key 的預設 max_budget 或任何 key/generate 參數,請使用這個。
當 /key/generate 請求未指定 max_budget 時,將會使用 default_key_generate_params 中指定的 max_budget
設定 litellm_settings:default_key_generate_params:
litellm_settings:
  default_key_generate_params:
    max_budget: 1.5000
    models: ["azure-gpt-3.5"]
    duration:     # blank means `null`
    metadata: {"setting":"default"}
    team_id: "core-infra"
✨ 金鑰輪替
可選擇在更新其參數的同時,輪替現有的 API 金鑰。
curl 'http://localhost:4000/key/sk-1234/regenerate' \
  -X POST \
  -H 'Authorization: Bearer sk-1234' \
  -H 'Content-Type: application/json' \
  -d '{
    "max_budget": 100,
    "metadata": {
      "team": "core-infra"
    },
    "models": [
      "gpt-4",
      "gpt-3.5-turbo"
    ],
    "grace_period": "48h"
  }'
寬限期(可選):設定 grace_period(例如 "24h"、"2d"、"1w"),以在過渡期間讓舊金鑰保持有效。舊金鑰與新金鑰在寬限期結束前都能使用,可在不中斷正式環境的情況下順利切換。省略或留空 = 立即撤銷。也可透過 LITELLM_KEY_ROTATION_GRACE_PERIOD 環境變數設定,用於排程輪替。
閱讀更多
排程金鑰輪替
LiteLLM 可以依據您定義的時間間隔自動輪替 virtual keys。
必要條件
- 需要資料庫連線 - 金鑰輪替需要連線中的資料庫來追蹤輪替排程
- 啟用輪替工作程序 - 設定環境變數
LITELLM_KEY_ROTATION_ENABLED=true - 設定檢查間隔 - 可選擇設定
LITELLM_KEY_ROTATION_CHECK_INTERVAL_SECONDS(預設:86400 秒 / 24 小時)
運作方式
- 建立 virtual key 時,設定
auto_rotate: true和rotation_interval(持續時間字串) - LiteLLM 會將下一次輪替時間計算為
now + rotation_interval,並儲存在資料庫中 - 背景工作會定期檢查已超過輪替時間的 keys
- 當 key 到達輪替時機時,LiteLLM 會自動重新產生它,並使舊的 key 字串失效
- 會重新計算新的輪替時間,並持續此循環
建立具有自動輪替的金鑰
API
curl 'http://0.0.0.0:4000/key/generate' \
  -H 'Authorization: Bearer <your-master-key>' \
  -H 'Content-Type: application/json' \
  -d '{
        "models": ["gpt-4o"],
        "auto_rotate": true,
        "rotation_interval": "30d"
      }'
LiteLLM UI
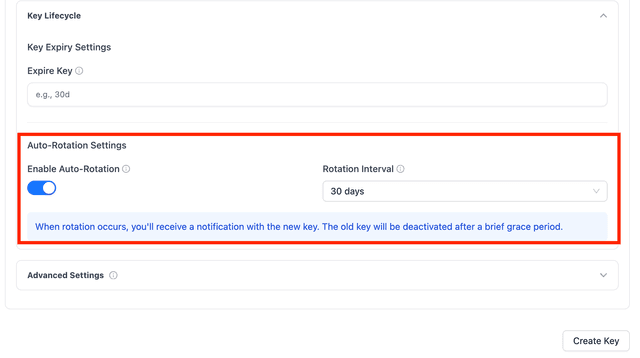
在 LiteLLM UI 上,前往 Keys 頁面並點選 Generate Key > Key Lifecycle > Enable Auto Rotation
有效的 rotation_interval 格式:
"30s"- 30 秒"30m"- 30 分鐘"30h"- 30 小時"30d"- 30 天"90d"- 90 天
更新既有金鑰以啟用輪替
API
curl 'http://0.0.0.0:4000/key/update' \
  -H 'Authorization: Bearer <your-master-key>' \
  -H 'Content-Type: application/json' \
  -d '{
        "key": "sk-existing-key",
        "auto_rotate": true,
        "rotation_interval": "90d"
      }'
LiteLLM UI
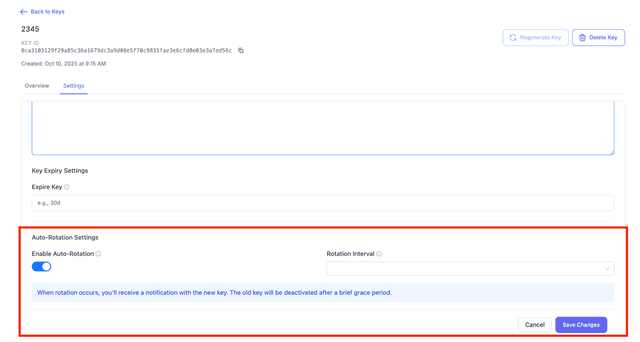
在 LiteLLM UI 上,前往 Keys 頁面。選取您要更新的金鑰,然後點選 Edit Settings > Auto-Rotation Settings
環境變數
在啟動 proxy 時設定這些環境變數:
| 變數 | 說明 | 預設值 |
|---|---|---|
LITELLM_KEY_ROTATION_ENABLED | 啟用 rotation worker | false |
LITELLM_KEY_ROTATION_CHECK_INTERVAL_SECONDS | 掃描要輪替的金鑰的頻率(以秒為單位) | 86400(24 小時) |
LITELLM_KEY_ROTATION_GRACE_PERIOD | 輪替後保留舊金鑰有效的持續時間(例如 24h、2d) | ""(立即撤銷) |
範例:
export LITELLM_KEY_ROTATION_ENABLED=true
export LITELLM_KEY_ROTATION_CHECK_INTERVAL_SECONDS=3600  # Check every hour
export LITELLM_KEY_ROTATION_GRACE_PERIOD=48h  # Keep old key valid for 48h during cutover

litellm --config config.yaml
暫時增加預算
使用 /key/update 端點來增加既有金鑰的預算。
curl -L -X POST 'http://localhost:4000/key/update' \
-H 'Authorization: Bearer sk-1234' \
-H 'Content-Type: application/json' \
-d '{"key": "sk-b3Z3Lqdb_detHXSUp4ol4Q", "temp_budget_increase": 100, "temp_budget_expiry": "10d"}'
限制金鑰產生
用來控制誰可以產生金鑰。當讓其他人在 UI 上建立金鑰時很有用。
litellm_settings:
  key_generation_settings:
    team_key_generation:
      allowed_team_member_roles: ["admin"]
      required_params: ["tags"] # require team admins to set tags for cost-tracking when generating a team key
    personal_key_generation: # maps to 'Default Team' on UI
      allowed_user_roles: ["proxy_admin"]
規格
key_generation_settings: Optional[StandardKeyGenerationConfig] = None
類型
class StandardKeyGenerationConfig(TypedDict, total=False):
    team_key_generation: TeamUIKeyGenerationConfig
    personal_key_generation: PersonalUIKeyGenerationConfig

class TeamUIKeyGenerationConfig(TypedDict):
    allowed_team_member_roles: List[str] # either 'user' or 'admin'
    required_params: List[str] # require params on `/key/generate` to be set if a team key (team_id in request) is being generated


class PersonalUIKeyGenerationConfig(TypedDict):
    allowed_user_roles: List[LitellmUserRoles]
    required_params: List[str] # require params on `/key/generate` to be set if a personal key (no team_id in request) is being generated


class LitellmUserRoles(str, enum.Enum):
    """
    Admin Roles:
    PROXY_ADMIN: admin over the platform
    PROXY_ADMIN_VIEW_ONLY: can login, view all own keys, view all spend
    ORG_ADMIN: admin over a specific organization, can create teams, users only within their organization

    Internal User Roles:
    INTERNAL_USER: can login, view/create/delete their own keys, view their spend
    INTERNAL_USER_VIEW_ONLY: can login, view their own keys, view their own spend


    Team Roles:
    TEAM: used for JWT auth


    Customer Roles:
    CUSTOMER: External users -> these are customers

    """

    # Admin Roles
    PROXY_ADMIN = "proxy_admin"
    PROXY_ADMIN_VIEW_ONLY = "proxy_admin_viewer"

    # Organization admins
    ORG_ADMIN = "org_admin"

    # Internal User Roles
    INTERNAL_USER = "internal_user"
    INTERNAL_USER_VIEW_ONLY = "internal_user_viewer"

    # Team Roles
    TEAM = "team"

    # Customer Roles - External users of proxy
    CUSTOMER = "customer"
後續步驟 - 設定每個虛擬金鑰的預算、速率限制
請依照這份文件,使用 LiteLLM 為虛擬金鑰設定預算、每個虛擬金鑰的速率限制器