Getting Started Tutorial
End-to-End tutorial for LiteLLM Proxy to:
- Add an Azure OpenAI model
- Make a successful /chat/completion call
- Generate a virtual key
- Set RPM limit on virtual key
Quick Install (Recommended for local / beginners)
New to LiteLLM? This is the easiest way to get started locally. One command installs LiteLLM and walks you through setup interactively — no config files to write by hand.
1. Install
curl -fsSL https://raw.githubusercontent.com/BerriAI/litellm/main/scripts/install.sh | sh
This detects your OS, installs litellm[proxy], and drops you straight into the setup wizard.
2. Follow the wizard
$ litellm --setup

  Welcome to LiteLLM

  Choose your LLM providers
  ○ 1. OpenAI        GPT-4o, GPT-4o-mini, o1
  ○ 2. Anthropic     Claude Opus, Sonnet, Haiku
  ○ 3. Azure OpenAI  GPT-4o via Azure
  ○ 4. Google Gemini Gemini 2.0 Flash, 1.5 Pro
  ○ 5. AWS Bedrock   Claude, Llama via AWS
  ○ 6. Ollama        Local models

  ❯ Provider(s): 1,2

  ❯ OpenAI API key: sk-...
  ❯ Anthropic API key: sk-ant-...

  ❯ Port [4000]:
  ❯ Master key [auto-generate]:

  ✔ Config saved → ./litellm_config.yaml

  ❯ Start the proxy now? (Y/n):
The wizard walks you through:
- Pick your LLM providers (OpenAI, Anthropic, Azure, Bedrock, Gemini, Ollama)
- Enter API keys for each provider
- Set a port and master key (or accept the defaults)
- Config is saved to
./litellm_config.yamland the proxy starts immediately
3. Make a call
Your proxy is running on http://0.0.0.0:4000. Test it:
curl -X POST 'http://0.0.0.0:4000/chat/completions' \
-H 'Content-Type: application/json' \
-H 'Authorization: Bearer <your-master-key>' \
-d '{
    "model": "gpt-4o",
    "messages": [{"role": "user", "content": "Hello!"}]
}'
You can skip the curl install and run litellm --setup directly after uv tool install 'litellm[proxy]'.
Pre-Requisites
Choose your install method. Docker Compose users complete their full setup inside the tab and are done. Docker and LiteLLM CLI users continue with the steps below the tabs.
- Docker
- LiteLLM CLI
- Docker Compose (Proxy + DB)
docker pull docker.litellm.ai/berriai/litellm:latest
$ uv tool install 'litellm[proxy]'
LiteLLM 1.84.0 and newer require Python 3.10 or higher (requires-python >=3.10). uv tool install and the install.sh script above handle this for you by provisioning a compatible Python automatically. A bare pip install 'litellm[proxy]' does not; on Python 3.9 pip silently resolves down to the last release that still allowed 3.9, which is 1.83.9, with no error. If you pinned to an old version unexpectedly, check python --version and upgrade to 3.10+ (or use uv), then reinstall
Docker Compose bundles LiteLLM with a Postgres database. Follow the steps below — the proxy will be fully running by the end.
Step 1 — Pull the LiteLLM database image
LiteLLM provides a dedicated litellm-database image for proxy deployments that connect to Postgres.
docker pull ghcr.io/berriai/litellm-database:latest
See all available tags on the GitHub Container Registry.
Step 2 — Set up a database
Complete all three config files before running docker compose up. The proxy server will not start correctly if any of these are missing.
2.1 — Get docker-compose.yml and create .env
# Get the docker compose file
curl -O https://raw.githubusercontent.com/BerriAI/litellm/main/docker-compose.yml

# Add the master key - you can change this after setup
echo 'LITELLM_MASTER_KEY="sk-1234"' > .env

# Add the litellm salt key — cannot be changed after adding a model
# Used to encrypt/decrypt your LLM API key credentials
# Generate a strong random value: https://1password.com/password-generator/
echo 'LITELLM_SALT_KEY="sk-1234"' >> .env

# Add your model credentials
echo 'AZURE_API_BASE="https://openai-***********/"' >> .env
echo 'AZURE_API_KEY="your-azure-api-key"' >> .env
2.2 — Create config.yaml
The default docker-compose.yml starts a Postgres container at db:5432. Your config.yaml must include database_url pointing to it:
model_list:
  - model_name: gpt-4o
    litellm_params:
      model: azure/my_azure_deployment
      api_base: os.environ/AZURE_API_BASE
      api_key: os.environ/AZURE_API_KEY
      api_version: "2025-01-01-preview"

general_settings:
  master_key: sk-1234 # 🔑 your proxy admin key (must start with sk-)
  database_url: "postgresql://llmproxy:dbpassword9090@db:5432/litellm"
2.3 — Create prometheus.yml
This file must exist as a file before docker compose up. If it is missing, Docker auto-creates it as an empty directory and the Prometheus container fails to start.
global:
  scrape_interval: 15s
  evaluation_interval: 15s

scrape_configs:
  - job_name: "litellm"
    static_configs:
      - targets: ["litellm:4000"]
Also verify that the config.yaml volume mount and --config flag are not commented out in docker-compose.yml:
services:
  litellm:
    volumes:
      - ./config.yaml:/app/config.yaml # ✅ must be uncommented
    command:
      - "--config=/app/config.yaml" # ✅ must be uncommented
All three files (.env, config.yaml, prometheus.yml) must be present before running docker compose up. See Troubleshooting if you run into issues.
Step 3 — Start the proxy server and test it
After config.yaml, prometheus.yml, and .env are complete, start the proxy:
docker compose up
Once running, test it with a curl request:
curl -X POST 'http://0.0.0.0:4000/chat/completions' \
  -H 'Content-Type: application/json' \
  -H 'Authorization: Bearer sk-1234' \
  -d '{
    "model": "gpt-4o",
    "messages": [{"role": "user", "content": "Hello!"}]
  }'
Expected response:
{
  "id": "chatcmpl-abcd",
  "created": 1773817678,
  "model": "gpt-4o",
  "object": "chat.completion",
  "system_fingerprint": "fp_6b1ef07cda",
  "choices": [
    {
      "finish_reason": "stop",
      "index": 0,
      "message": {
        "content": "Hello! How can I assist you today?",
        "role": "assistant",
        "annotations": []
      }
    }
  ],
  "usage": {
    "completion_tokens": 9,
    "prompt_tokens": 9,
    "total_tokens": 18,
    "completion_tokens_details": {
      "accepted_prediction_tokens": 0,
      "audio_tokens": 0,
      "reasoning_tokens": 0,
      "rejected_prediction_tokens": 0
    },
    "prompt_tokens_details": {
      "audio_tokens": 0,
      "cached_tokens": 0
    }
  },
  "service_tier": "default"
}
Optional — Navigate to the LiteLLM UI and generate a virtual key
Open http://localhost:4000/ui in your browser and log in with your master key (sk-1234).
Navigate to Virtual Keys and click + Create New Key:
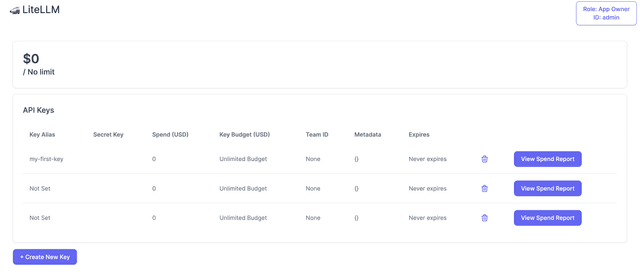
Virtual keys let you track spend, set rate limits, and control model access per user or team.
Your setup is complete — the steps below are for Docker and LiteLLM CLI users only.
Step 1 — Add a model
Control LiteLLM Proxy with a config.yaml file. Create one with your Azure model:
model_list:
  - model_name: gpt-4o
    litellm_params:
      model: azure/my_azure_deployment
      api_base: os.environ/AZURE_API_BASE
      api_key: "os.environ/AZURE_API_KEY"
      api_version: "2025-01-01-preview" # [OPTIONAL] litellm uses the latest azure api_version by default
Model List Specification
You can read more about how model resolution works in the Model Configuration section.
model_name(str) - This field should contain the name of the model as received.litellm_params(dict) See All LiteLLM Paramsmodel(str) - Specifies the model name to be sent tolitellm.acompletion/litellm.aembedding, etc. This is the identifier used by LiteLLM to route to the correct model + provider logic on the backend.api_key(str) - The API key required for authentication. It can be retrieved from an environment variable usingos.environ/.api_base(str) - The API base for your azure deployment.api_version(str) - The API Version to use when calling Azure's OpenAI API. Get the latest Inference API version here.
Useful Links
- All Supported LLM API Providers (OpenAI/Bedrock/Vertex/etc.)
- Full Config.Yaml Spec
- Pass provider-specific params
2. Make a successful /chat/completion call
LiteLLM Proxy is 100% OpenAI-compatible. Test your azure model via the /chat/completions route.
2.1 Start Proxy
Save your config.yaml from step 1. as litellm_config.yaml.
- Docker
- LiteLLM CLI
docker run \
    -v $(pwd)/litellm_config.yaml:/app/config.yaml \
    -e AZURE_API_KEY=d6*********** \
    -e AZURE_API_BASE=https://openai-***********/ \
    -p 4000:4000 \
    docker.litellm.ai/berriai/litellm:latest \
    --config /app/config.yaml --detailed_debug

# RUNNING on http://0.0.0.0:4000
$ litellm --config /app/config.yaml --detailed_debug
Confirm your config was loaded correctly — you should see this in the logs:
Loaded config YAML (api_key and environment_variables are not shown):
{
  "model_list": [
    {
      "model_name": ...
2.2 Make Call
LiteLLM Proxy is 100% OpenAI-compatible. Test your model via /chat/completions:
curl -X POST 'http://0.0.0.0:4000/chat/completions' \
-H 'Content-Type: application/json' \
-H 'Authorization: Bearer sk-1234' \
-d '{
    "model": "gpt-4o",
    "messages": [
      {
        "role": "system",
        "content": "You are an LLM named gpt-4o"
      },
      {
        "role": "user",
        "content": "what is your name?"
      }
    ]
}'
Expected Response
{
  "id": "chatcmpl-BcO8tRQmQV6Dfw6onqMufxPkLLkA8",
  "created": 1748488967,
  "model": "gpt-4o-2024-11-20",
  "object": "chat.completion",
  "system_fingerprint": "fp_ee1d74bde0",
  "choices": [
    {
      "finish_reason": "stop",
      "index": 0,
      "message": {
        "content": "My name is **gpt-4o**! How can I assist you today?",
        "role": "assistant",
        "tool_calls": null,
        "function_call": null,
        "annotations": []
      }
    }
  ],
  "usage": {
    "completion_tokens": 19,
    "prompt_tokens": 28,
    "total_tokens": 47,
    "completion_tokens_details": {
      "accepted_prediction_tokens": 0,
      "audio_tokens": 0,
      "reasoning_tokens": 0,
      "rejected_prediction_tokens": 0
    },
    "prompt_tokens_details": {
      "audio_tokens": 0,
      "cached_tokens": 0
    }
  },
  "service_tier": null,
  "prompt_filter_results": [
    {
      "prompt_index": 0,
      "content_filter_results": {
        "hate": {
          "filtered": false,
          "severity": "safe"
        },
        "self_harm": {
          "filtered": false,
          "severity": "safe"
        },
        "sexual": {
          "filtered": false,
          "severity": "safe"
        },
        "violence": {
          "filtered": false,
          "severity": "safe"
        }
      }
    }
  ]
}
Useful Links
- All Supported LLM API Providers (OpenAI/Bedrock/Vertex/etc.)
- Call LiteLLM Proxy via OpenAI SDK, Langchain, etc.
- All API Endpoints Swagger
- Other/Non-Chat Completion Endpoints
- Pass-through for VertexAI, Bedrock, etc.
Optional: Generate a virtual key
Track spend and control model access via virtual keys for the proxy.
Prerequisite — Set up a database
Your Postgres container is already running — skip ahead to Create Key w/ RPM Limit below.
Docker / LiteLLM CLI users — you need a Postgres database (e.g. Supabase, Neon, or self-hosted). Add general_settings to your config.yaml:
model_list:
  - model_name: gpt-4o
    litellm_params:
      model: azure/my_azure_deployment
      api_base: os.environ/AZURE_API_BASE
      api_key: "os.environ/AZURE_API_KEY"
      api_version: "2025-01-01-preview" # [OPTIONAL] litellm uses the latest azure api_version by default

general_settings:
  master_key: sk-1234
  database_url: "postgresql://<user>:<password>@<host>:<port>/<dbname>" # 👈 KEY CHANGE
Save config.yaml as litellm_config.yaml before continuing.
You must finish this setup before starting the proxy server.
What is general_settings?
These are settings for the LiteLLM Proxy Server.
See All General Settings here.
-
master_key(str)- Description:
- Set a
master key, this is your Proxy Admin key - you can use this to create other keys (🚨 must start withsk-).
- Set a
- Usage:
- Set on config.yaml set your master key under
general_settings:master_key, example -master_key: sk-1234 - Set env variable set
LITELLM_MASTER_KEY
- Set on config.yaml set your master key under
- Description:
-
database_url(str)- Description:
- Set a
database_url, this is the connection to your Postgres DB, which is used by litellm for generating keys, users, teams.
- Set a
- Usage:
- Set on config.yaml set your
database_urlundergeneral_settings:database_url, example -database_url: "postgresql://..." - Set
DATABASE_URL=postgresql://<user>:<password>@<host>:<port>/<dbname>in your env
- Set on config.yaml set your
- Description:
Start Proxy
docker run \
    -v $(pwd)/litellm_config.yaml:/app/config.yaml \
    -e AZURE_API_KEY=d6*********** \
    -e AZURE_API_BASE=https://openai-***********/ \
    -p 4000:4000 \
    ghcr.io/berriai/litellm-database:latest \
    --config /app/config.yaml --detailed_debug
Create Key w/ RPM Limit
Create a key with rpm_limit: 1. This will only allow 1 request per minute for calls to proxy with this key.
curl -L -X POST 'http://0.0.0.0:4000/key/generate' \
-H 'Authorization: Bearer sk-1234' \
-H 'Content-Type: application/json' \
-d '{
    "rpm_limit": 1
}'
Expected Response
{
    "key": "sk-12..."
}
Test it!
Use the virtual key you just created.
1st call - Expect to work!
curl -X POST 'http://0.0.0.0:4000/chat/completions' \
-H 'Content-Type: application/json' \
-H 'Authorization: Bearer sk-12...' \
-d '{
    "model": "gpt-4o",
    "messages": [
      {
        "role": "system",
        "content": "You are a helpful math tutor. Guide the user through the solution step by step."
      },
      {
        "role": "user",
        "content": "how can I solve 8x + 7 = -23"
      }
    ]
}'
Expected Response
{
    "id": "chatcmpl-2076f062-3095-4052-a520-7c321c115c68",
    "choices": [
        ...
}
2nd call - Expect to fail!
Why did this call fail?
We set the virtual key's requests per minute (RPM) limit to 1. This has now been crossed.
curl -X POST 'http://0.0.0.0:4000/chat/completions' \
-H 'Content-Type: application/json' \
-H 'Authorization: Bearer sk-12...' \
-d '{
    "model": "gpt-4o",
    "messages": [
      {
        "role": "system",
        "content": "You are a helpful math tutor. Guide the user through the solution step by step."
      },
      {
        "role": "user",
        "content": "how can I solve 8x + 7 = -23"
      }
    ]
}'
Expected Response
{
  "error": {
    "message": "LiteLLM Rate Limit Handler for rate limit type = key. Crossed TPM / RPM / Max Parallel Request Limit. current rpm: 1, rpm limit: 1, current tpm: 348, tpm limit: 9223372036854775807, current max_parallel_requests: 0, max_parallel_requests: 9223372036854775807",
    "type": "None",
    "param": "None",
    "code": "429"
  }
}
Useful Links
- Creating Virtual Keys
- Key Management API Endpoints Swagger
- Set Budgets / Rate Limits per key/user/teams
- Dynamic TPM/RPM Limits for keys
Key Concepts
This section explains key concepts on LiteLLM AI Gateway.
Understanding Model Configuration
For this config.yaml example:
model_list:
  - model_name: gpt-4o
    litellm_params:
      model: azure/my_azure_deployment
      api_base: os.environ/AZURE_API_BASE
      api_key: "os.environ/AZURE_API_KEY"
      api_version: "2025-01-01-preview" # [OPTIONAL] litellm uses the latest azure api_version by default
How Model Resolution Works:
Client Request                LiteLLM Proxy                 Provider API
──────────────              ────────────────              ─────────────

POST /chat/completions
{                           1. Looks up model_name
  "model": "gpt-4o" ──────────▶ in config.yaml
  ...
}                           2. Finds matching entry:
                               model_name: gpt-4o

                            3. Extracts litellm_params:
                               model: azure/my_azure_deployment
                               api_base: https://...
                               api_key: sk-...

                            4. Routes to provider ──▶ Azure OpenAI API
                                                      POST /deployments/my_azure_deployment/...
Breaking Down the model Parameter under litellm_params:
model_list:
  - model_name: gpt-4o                       # What the client calls
    litellm_params:
      model: azure/my_azure_deployment       # <provider>/<model-name>
             ─────  ───────────────────
               │           │
               │           └─────▶ Model name sent to the provider API
               │
               └─────────────────▶ Provider that LiteLLM routes to
Visual Breakdown:
model: azure/my_azure_deployment
       └─┬─┘ └─────────┬─────────┘
         │             │
         │             └────▶ The actual model identifier that gets sent to Azure
         │                   (e.g., your deployment name, or the model name)
         │
         └──────────────────▶ Tells LiteLLM which provider to use
                             (azure, openai, anthropic, bedrock, etc.)
Key Concepts:
-
model_name: The alias your client uses to call the model. This is what you send in your API requests (e.g.,gpt-4o). -
model(in litellm_params): Format is<provider>/<model-identifier>- Provider (before
/): Routes to the correct LLM provider (e.g.,azure,openai,anthropic,bedrock) - Model identifier (after
/): The actual model/deployment name sent to that provider's API
- Provider (before
Advanced Configuration Examples:
For custom OpenAI-compatible endpoints (e.g., vLLM, Ollama, custom deployments):
model_list:
  - model_name: my-custom-model
    litellm_params:
      model: openai/nvidia/llama-3.2-nv-embedqa-1b-v2
      api_base: http://my-service.svc.cluster.local:8000/v1
      api_key: "sk-1234"
Breaking down complex model paths:
model: openai/nvidia/llama-3.2-nv-embedqa-1b-v2
       └─┬──┘ └────────────┬────────────────┘
         │                 │
         │                 └────▶ Full model string sent to the provider API
         │                       (in this case: "nvidia/llama-3.2-nv-embedqa-1b-v2")
         │
         └──────────────────────▶ Provider (openai = OpenAI-compatible API)
The key point: Everything after the first / is passed as-is to the provider's API.
Common Patterns:
model_list:
  # Azure deployment
  - model_name: gpt-4
    litellm_params:
      model: azure/gpt-4-deployment
      api_base: https://my-azure.openai.azure.com

  # OpenAI
  - model_name: gpt-4
    litellm_params:
      model: openai/gpt-4
      api_key: os.environ/OPENAI_API_KEY

  # Custom OpenAI-compatible endpoint
  - model_name: my-llama-model
    litellm_params:
      model: openai/meta/llama-3-8b
      api_base: http://my-vllm-server:8000/v1
      api_key: "optional-key"

  # Bedrock
  - model_name: claude-3
    litellm_params:
      model: bedrock/anthropic.claude-3-sonnet-20240229-v1:0
      aws_region_name: us-east-1
Troubleshooting
prometheus.yml mount error — "not a directory"
If you see:
Error: cannot create subdirectories in ".../prometheus.yml": not a directory
Docker created prometheus.yml as an empty directory instead of a file. This happens when the file is missing at docker compose up time.
Fix it:
Then create the file (see Step 2.3 — Create prometheus.yml) and run docker compose up again.
rm -rf prometheus.yml
Then create the file (see Step 2.4) and run docker compose up again.
Non-root docker image?
If you need to run the docker image as a non-root user, use this.
SSL Verification Issue / Connection Error.
If you see
ssl.SSLCertVerificationError: [SSL: CERTIFICATE_VERIFY_FAILED] certificate verify failed: self-signed certificate in certificate chain (_ssl.c:1006)
OR
Connection Error.
You can disable ssl verification with:
model_list:
  - model_name: gpt-4o
    litellm_params:
      model: azure/my_azure_deployment
      api_base: os.environ/AZURE_API_BASE
      api_key: "os.environ/AZURE_API_KEY"
      api_version: "2025-01-01-preview"

litellm_settings:
    ssl_verify: false # 👈 KEY CHANGE
(DB) All connection attempts failed
If you see:
httpx.ConnectError: All connection attempts failed

ERROR:    Application startup failed. Exiting.
3:21:43 - LiteLLM Proxy:ERROR: utils.py:2207 - Error getting LiteLLM_SpendLogs row count: All connection attempts failed
This might be a DB permission issue.
- Validate db user permission issue
Try creating a new database.
STATEMENT: CREATE DATABASE "litellm"
If you get:
ERROR: permission denied to create
This indicates you have a permission issue.
- Grant permissions to your DB user
It should look something like this:
psql -U postgres
CREATE DATABASE litellm;
On CloudSQL, this is:
GRANT ALL PRIVILEGES ON DATABASE litellm TO your_username;
What is litellm_settings?
LiteLLM Proxy uses the LiteLLM Python SDK for handling LLM API calls.
litellm_settings are module-level params for the LiteLLM Python SDK (equivalent to doing litellm.<some_param> on the SDK). You can see all params here
Support & Talk with founders
-
Our emails ✉️ ishaan@berri.ai / krrish@berri.ai

